Persistent Storage in Core
Regular Storage, Shared Storage, Offline Storage... everything you need to know (with examples!)
Welcome to this tutorial on Core’s persistent storage system!
In this tutorial, you will learn:
- How to enable persistent storage in your games
- What is persistent storage
- What are the three types of persistent storage
- Example cases of use of persistent storage
- Tips and best practices
Let’s begin!
Summary:
- The basics of persistent storage
- Regular Storage
- Shared Storage
- Offline Storage
- To go further, best practices
- Useful resources
The basics of persistent storage
What is persistent storage?
Persistent storage allows you to keep players' data on Core servers through an API.
Let’s say you have a game in which the player earns XP when completing a level. You would not want this XP to reset to 0 every time the player reconnects to the game, right? Then, you must use persistent storage to store the data related to the player XP amount, and fetch this data when the player reconnects.
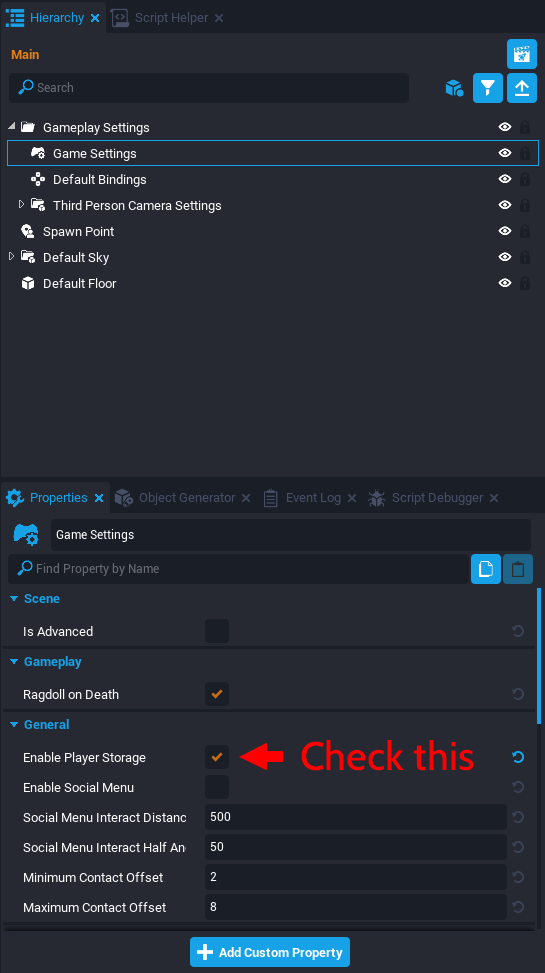
By default, a new project in Core will not use the Storage API. To use it, you must place a Game Settings object in your game and check the Enable Player Storage property on it.
What are the different types of persistent storage, and what is their use?
An important fact to keep in mind is that three different types of persistent storage exist on Core, with different uses. Do not worry though, they are very easy to understand!
-
Regular Storage is the “main” kind of storage. It is the one you will use the most, as it refers to the API system to store and retrieve the players data in a game.
-
Shared Storage allows you to share players data between your created games. For example, you could track a player progression through different games you made, and show it to them in a UI.
-
Offline Storage allows you to access data for a player that is not currently connected to the game, which is not possible through regular storage.
This tutorial will cover these three types of storage and provide example use cases.
Throughout this tutorial, we will create from scratch a storage system to store players XP info. We will see how to share it across games and how to access this data for offline players.
The projects used for the tutorial were published under the name “Storage System Tutorial” and “Shared Storage Tutorial”. You can find them in Core by browsing to the Community Projects tab in the Create section. They include all the scripts and assets shown in this tutorial.
Regular Storage
Start an empty new project.
For this tutorial, we will create collectible gems that will give XP to the player who collects them.
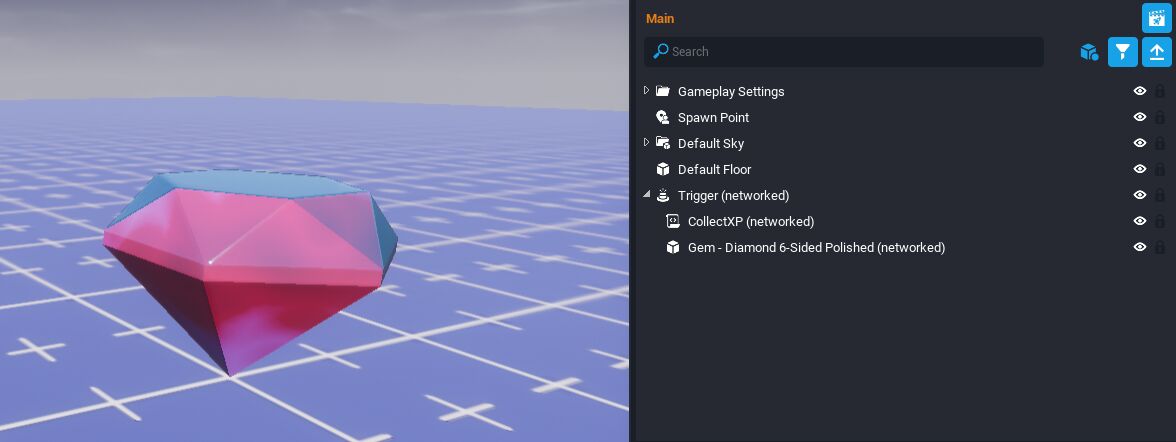
- Add a Trigger to the hierarchy, and enable the networking on it (right-click > Enable networking)
- Create a new script called “CollectXP” and make it a child of the trigger.
- Finally, add a 3D model of a gem (“Gem - Diamond 6-Sided Polished” will do it) as a child of the trigger. Set its Game Collision property to “Force Off”. Feel free to customize it!
“Magic Glass” material was applied to the gem model.
Open the script named CollectXP and paste this code into it:
local trigger = script.parent

-- function called when the player enters the trigger (= walks on the gem)
function OnBeginOverlap(whichTrigger, other)
	if other:IsA("Player") then
		other:AddResource("XP", 5) -- add XP to the player
        print("XP amount: "..other:GetResource("XP")) -- print player XP new amount to the console
        trigger:Destroy() -- remove the gem from the world
	end
end

trigger.beginOverlapEvent:Connect(OnBeginOverlap)
The purpose of this tutorial is not to learn how to use triggers and the players resource property. Thus, this code will not be explained in detail. See the Trigger API reference for more information.
Copy the trigger and paste it several times in the Game Hierarchy. Move them across the game world to make different gems the player will be able to collect.

Press the “Play” button to start the game preview. As you collect the gems, you can see in the Event Log window your character XP amount increases.
Stop the preview and press the “Play” button to start it again. When you collect the gems, you can see in the Event Log window the previous XP amount was not conserved and reset to 0.
Let’s fix this problem by using the Core Storage system.
Let’s save the player XP!
REMINDER: By default, a new project in Core will not use the Storage API. To use it, you must place a Game Settings object in your game and check the Enable Player Storage property on it.
Before asking ourselves how we can save players data, let’s figure out when we should do it.
A simple way would be to save the data each time it changes. In this case, it would mean saving data each time the player collects a gem. However, it may not be the most efficient way to do it: saving the player data implies a network cost, so we have to be thoughtful to make this cost as low as possible.
The best solution, in our case, would probably be to save the player data when they leave the game.
But if I save the data only when the player leaves the game session, I will not be able to access updated data during their session!
Yes, you will. This is why we use the player resource property to store the amount of XP. This way, it can easily be retrieved and used by other gameplay systems. This amount will be saved when the player disconnects, and when they reconnect it will be retrieved and set as the player “XP” resource amount.
- Create a new script, named “StorageManager”, and drag it to the Hierarchy.
- Open the script and paste this code into it:
function OnPlayerLeft(player)
    local data = Storage.GetPlayerData(player) -- fetch the player current data
	local XPamount = player:GetResource("XP") -- fetch player amount of XP (in their resources). 0 is default

    data["XP"] = XPamount                      -- we set the data value for the key "XP" with the new value
    Storage.SetPlayerData(player, data)         -- last step, we save this on the server!
end

Game.playerLeftEvent:Connect(OnPlayerLeft) -- calls the function "OnPlayerLeft" when a player disconnects from the server.
Let’s take a look at this code and explain it.
First, we listen to an event fired every time a player disconnects from the game: playerLeftEvent. When this event is fired, it calls our function “OnPlayerLeft”. This function takes care of saving the player XP amount.
The player data is stored as a table. A table is composed of a key associated with a value. In our case, the key is a string (XP) and the value is an integer.
To make sure the data is saved, we have to:
- Fetch the already existing player data, by using Storage.GetPlayerData(player). As said above, this returns a table: it may already contains multiple keys, depending on what data has already been stored.
- Update the data value for the corresponding key, here, XP.
- Update the player data, by using Storage.SetPlayerData(player, data). We need to push the whole data table, this is why the first step is really important!
Now that the player XP amount is saved, let’s see how to access it.
Get the player XP and level
In the previous step, we saved the player amount of XP in the game persistent storage. However, when the player reconnects, they will not have their XP back: we still have to code this. Let’s see how to access the saved data and how to use it.
Still in StorageManager.lua, add this piece of code:
function OnPlayerJoined(player)
    local data = Storage.GetPlayerData(player) -- fetch the player saved data
    local XPamount = data["XP"] or 0            -- get the value for the key "XP". If it does not exist (= the player joins the game for the first time), it defaults to 0

    player:SetResource("XP", XPamount)          -- set the player XP resource to this amount
end

Game.playerJoinedEvent:Connect(OnPlayerJoined) -- calls the function "OnPlayerJoined" when a player joins the game.
Let’s take a look at what this code does.
First, we listen to an event fired every time a player joins the game: playerJoinedEvent. When this event is fired, it calls our function “OnPlayerJoined”. This function takes care of collecting the player’s saved data, fetching his amount of XP, and store this amount as a resource named "XP".
Easy, right? Start the game preview, and collect some gems. Stop the game preview and start it again: when you collect gems, you will see in the Event Log that the count does not start from 0 anymore, but from the previous stored value!
Now, you know how to use regular storage in Core. A last useful information: in this tutorial, we stored a number (Integer), but there are far more types of variable you can store:
- boolean
- Int32
- Float
- string
- Color
- Rotator
- Vector2
- Vector3
- Vector4
- Player
- table
Be careful, storage has size limits!
Core storage allows a maximum of 32Kb (32768 bytes) of encoded data to be stored. How much does it represent? A letter (“A”, “B”, “C”...) can be stored in 1 byte. So this represents quite a lot! (this entire tutorial could fit in there!) If saved data exceeds this limit, then it is not guaranteed to be stored. This could cause loss of stored data. If the limit is exceeded, a warning will be displayed in the Event Log during preview mode. Good to know!
Pro-tip: use Storage.SizeOfData(table data) to know exactly the size of the data table you are trying to store. If you are near the limit, consider compressing data techniques (see further).
Shared Storage
As told above, Shared Storage allows you to use player data across different games you own. In this tutorial, we will try to access previously saved XP data in another Core project.
This tutorial will cover how to share data between two Core projects, but note that this system is also useful for games with Scenes. It allows games to share data between their Scenes.
The first step is to create a Shared Storage Key!
Shared Storage Key
REMINDER: By default, a new project in Core will not use the Storage API. To use it, you must place a Game Settings object in your game and check the Enable Player Storage property on it.
In the same project as before, follow those steps:
- Move your cursor to the top bar menu: Window > Shared Storage
- Click “Create New Shared Key”
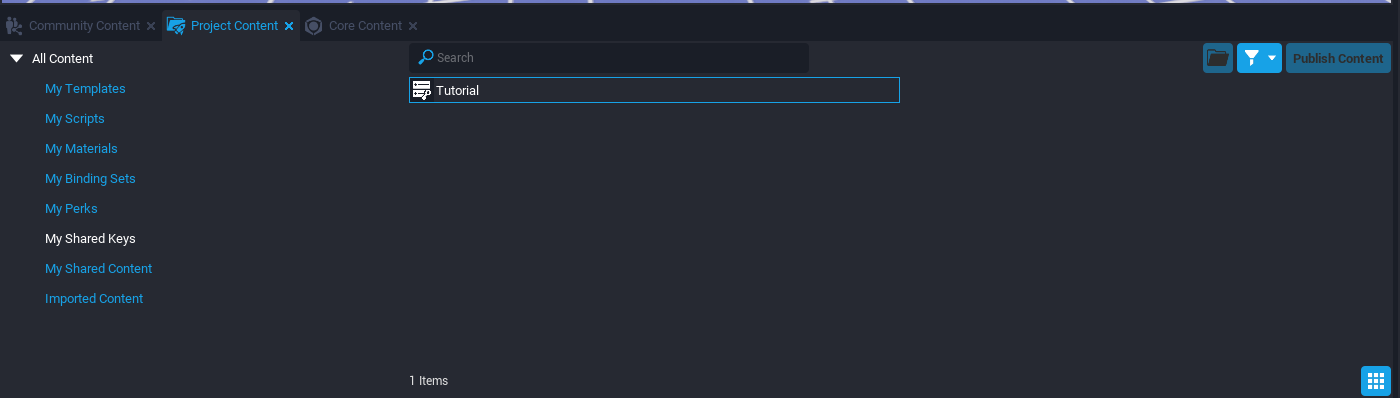
- Choose a name and press “Create”
The Key appears in the Project Content tab.
This new Shared Storage is empty by default: if we want to access our player XP amount from another game, we have to store it in the Shared Storage first.
To do so, open StorageManager.lua and add this to the “OnPlayerLeft” function:
local sharedData = Storage.GetSharedPlayerData(sharedStorageKey, player)    -- fetch player data stored in Shared Storage
sharedData["XP"] = XPamount                                                  -- we set the data value for the key "XP" with the new value
Storage.SetSharedPlayerData(sharedStorageKey, player, sharedData)                  -- last step, we save this on the server!
If you followed this tutorial section on Regular Storage, you should be familiar with what this code does. Note that Shared Storage uses specific functions (GetSharedPlayerData and SetSharedPlayerData).
You can see in the code above a variable named sharedStorageKey. Indeed, we have to reference the Key we created earlier. To do so, in the game hierarchy, click on the StorageManager script. Drag the Key onto the properties part of the script.
Do not forget to add this to StorageManager.lua, to reference the Key in the code. Change "Tutorial" according to the name you gave to the custom property.
local sharedStorageKey = script:GetCustomProperty("Tutorial")
Now, exit the project and create a new one.
- Remember, first step is to enable Player Storage in the Game Settings!
- Then, in the top bar menu, click Window > Shared Storage.
- The Key we created earlier should show. Enable it by clicking on the radio button at the left of the key name. The shared key is now showing in Project Content.
- Create a new script named “SharedData”.
Paste this code inside:
local sharedStorageKey = script:GetCustomProperty("Tutorial") -- NetReference for the Shared Storage Key

function OnPlayerJoined(player)
    local data = Storage.GetSharedPlayerData(sharedStorageKey, player) -- fetch the player saved data
    local XPamount = data["XP"] or 0            -- get the value for the key "XP". If it does not exist (= the player joins the game for the first time), it defaults to 0
    print(XPamount)
end

Game.playerJoinedEvent:Connect(OnPlayerJoined) -- calls the function "OnPlayerJoined" when a player joins the game.
Once again, drag the shared key from the Project Content window onto the custom properties section of the SharedData script.
Start preview mode, and look at the Event Log. The player XP amount is printed there. It works!
Offline Storage
Last type of storage we have to explore is offline storage. We can access data for a player who is not currently in the game. Note, however, that we can only access it, not edit this data.
REMINDER: By default, a new project in Core will not use the Storage API. To use it, you must place a Game Settings object in your game and check the Enable Player Storage property on it.
Additional leaderboard info
Let’s say your game contains a minigame that has a leaderboard associated with it. A leaderboard entry contains:
- The player ID
- The player name
- Their score
- Optionally, additional data that was submitted with the score
This is great, but what if we want to show other information on the player who submitted this score? We can use Offline Storage in this case.
First, we need to create a new Global Leaderboard we can use:
- In the top bar menu, go to Window > Global Leaderboards
- Click on “Create New Leaderboard”
- Choose a name and click on “Create” !
Now, create a new script named “OfflineStorage”, and drag the Global Leaderboard you just created to its custom properties.
Open OfflineStorage.lua and paste this code into it:
local tutorialLeaderboard = script:GetCustomProperty("Tutorial")
while not Leaderboards.HasLeaderboards() do -- wait for the leaderboards to load
Task.Wait()
end
-- Let's show the leaderboard entries!
local leaderboard = Leaderboards.GetLeaderboard(tutorialLeaderboard, LeaderboardType.GLOBAL) -- we load the leaderboard entries
for key, value in pairs(leaderboard) do
-- let's fetch the player XP amount
local data = Storage.GetOfflinePlayerData(value.id) -- note the function is GetOfflinePlayerData(). We retrieve the player data with their player ID
local XPamount = data["XP"] or 0 -- get the player
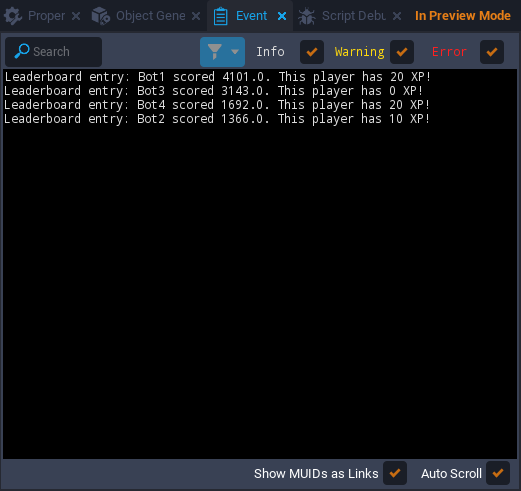
print("Leaderboard entry: "..value.name.." scored "..value.score..". This player has "..XPamount.." XP!")
end
-- for the use of this tutorial, we create an artificial leaderboard entry for each player joining the game
function OnPlayerJoined(player)
Leaderboards.SubmitPlayerScore(tutorialLeaderboard, player, math.random(0, 5000)) -- the score is random between 0 and 5000
end
Game.playerJoinedEvent:Connect(OnPlayerJoined) -- calls the function "OnPlayerJoined" when a player joins the game.
Once again, the purpose of the tutorial is not to explain deeper how Global Leaderboards work in Core. Feel free to look at the API Reference page if you are curious to learn more!
What does this code do?
First, it creates an artificial leaderboard entry for each player joining the game. This is obviously for the test purpose, in order to have entries to show. In your game, this step would be included inside your minigame, when the player hits a good score.
Then, the script prints in the Event Log window all the leaderboard entries.
To do so, it accesses the leaderboard entries with Leaderboards.GetLeaderboard(). This function returns a table that we iterate through with a for loop. The offline player data is accessed through their ID, with GetOfflinePlayerData() function.
Note that the function is specific to Offline Storage : GetOfflinePlayerData().
To test the code, start a multiplayer preview with up to 4 players. Collect gems with some of them so they have different XP amounts; then, close the preview and start it again (not necessarily in multiplayer, this time you can start a singleplayer preview). Check the Event Log to see what is printed there!
To access an offline player data, you have to know their ID. Currently, the only way to get an offline player ID is through the leaderboard system, making Offline Storage very specific to this use case.
To go further, best practices
Optimization
We learned above that Core storage has a limit of 32kb per user data. In this part of the tutorial, we will describe a very simple technique to reduce storage size.
Let’s say you want to create an RPG game. When a player joins the game for the first time, they’d have to create their character and choose characteristics such as the character race (e.g. elf, human, orc…). Of course, you will want to save these values so the player does not have to recreate their character everytime they reconnect to the game. You already know how to do this because you carefully read this tutorial, right? Here is a little tip to reduce the size of data stored:
Intuitively, you would want to store the player’s race as a String value associated to a “race” key, such as:
data["race"] = "human"
This works well but it can be optimized quite simply. Try using numbers instead of full strings!
data["race"] = 2
Since you are the creator of the game, you know what the possibilities are for the choice of a character race, so you can easily associate them to numbers, like this:
elf => 1

human => 2

orc => 3

… => n
This way, it is better to store races as numbers that will be interpreted by the server with no problem.
Globally, when working with strings, try to replace them with numbers to make your code more efficient and optimized.
Other techniques exist and can be combined to make your game storage data even lighter. They will not be described in this tutorial, but feel free to browse the Internet!
Useful resources
- Core API on Storage
- NicholasForeman “Simple Player Data” on Community Content
- Easier way to manage player storage. Check it out, it is really well documented and makes things quicker!
Thank you for reading this tutorial. I hope it was useful and taught you something. 
If you have any question or suggestion, feel free to reach me on Discord or add a post below.