Core Scenes - Everything you need to know
Welcome to this tutorial on Core Scenes!
In this tutorial, you will learn:
- What are scenes, the problems they solve and their benefits
- How to create, delete, publish and depublish scenes
- What is a Main Scene and how to set it
- How to transfer individual and group of players to different scenes
An editable Core project was published under the name “Core Scenes Tutorial”. You can find it in Core by browsing to the Community Projects tab in the Create section. It includes all the scripts and assets shown in this tutorial.
Let's begin!
Summary:
Introduction to Scenes
What are scenes?
A Core Game is composed of one or several scenes. Each scene has their own hierarchy of objects and maximum amount of players.
Scenes make it easier for creators to expand their game by creating different areas or maps, while keeping common assets or game logic.
There is always a Main scene that is the default scene where a player will land in when joining the game.
The maximum amount of scenes for a game is set to 64.
What is their use?
Scenes are a solution for designs that were not possible before. To understand how they can be used, let's list some pros and cons of this system.
Pros
Multiple terrains
A Terrain is a special type of CoreObject that lets you create a land the player can walk on and that you can entirely model.
However, Core limits the use of only one collidable terrain per scene. This means you can have multiple terrains in a scene but the player will only collide (= being able to walk on instead of going through) with one of them.
Before the introduction of the Scenes feature, this meant creators could only have one collidable terrain per game. However, with scenes, creators can now create multiple collidable terrains by putting each of them in a different scene. This allows more creativity and a diversity of landscapes in games.
Huge maps
Scenes allow creators to expand their games by making maps bigger.
If your goal is to create a huge world that can be explored, it is possible with Scenes. When you reach the maximum amount of objects you can put in a scene, simply create another one and link the two with a magical portal!
This way, you can easily create a huge map composed of different regions that are interconnected, such as in the game The Witcher 3, for example.
Ease of use for developers
Before the introduction of scenes, to expand their game, developers had to create multiple different games that they would set as "Child Games". This caused a need to duplicate every script and asset needed to be shared between those games, and make sure to update them in every child game whenever it changed.
It also meant creators had to use Shared Storage between their child games to keep cohesion in the player's experience.
Now, with Scenes, everything is simpler and can be accessed in only one project. Creator can also keep to Regular Storage to handle the player data in their game, instead of having to set up and use a Shared Storage Key.
To learn more about Storage, see Persistent Storage in Core.
Cons
Loading times
However, keep in mind that the Scenes system also has its weaknesses.
Main weakness is the loading time that occurs when the player is transferred to another scene. Since the player computer only loads one scene at a time, it must entirely load every scene the player is transferred to.
This can affect the player experience negatively if those loading times occur too often.
Now that we've seen what scenes can be used for, let's learn how to use them!
How to use scenes
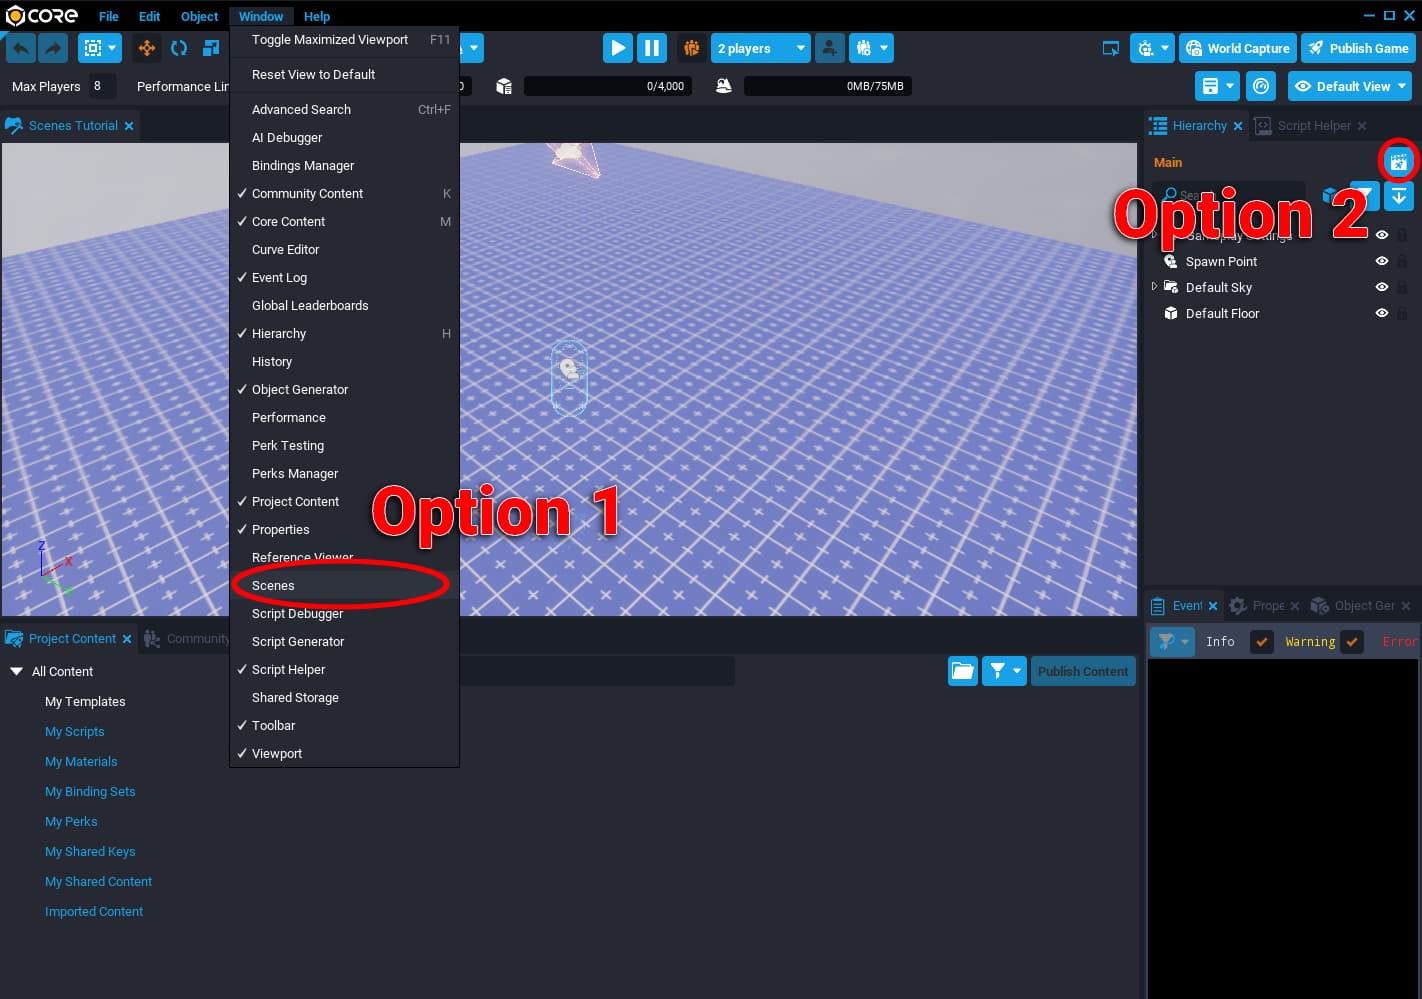
To work with scenes in the Core Editor, first step is to access the Scenes Panel. There are two ways to do it:
- Put your cursor over the Window tab in the top-bar menu and click on "Scenes"
- Click on the Scenes button in the Hierarchy panel of your project.
The panel will list all scenes currently existing in the project. For each scene, next to the checkbox, you can also see the maximum amount of players accepted.
From this panel, you will be able to create a new scene, delete an existing one, load a scene into the editor to edit it, and decide whether a scene should be published with your game or not.
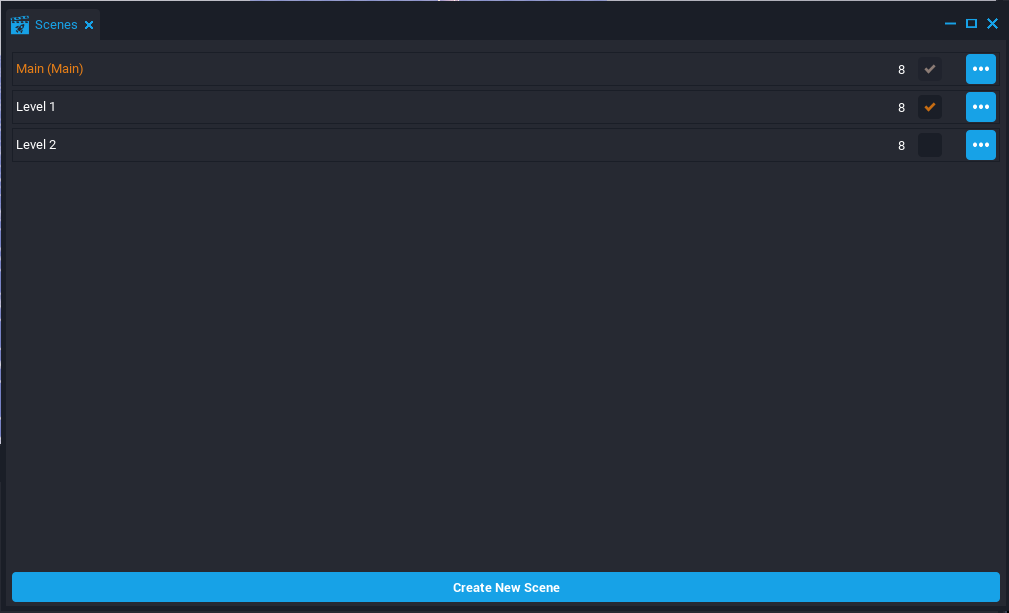
The orange color indicates that the scene is the one currently loaded into the editor.
Main Scene
The main scene is the scene that will be loaded by default when starting your game. It means the player joining your game will begin in this scene.
To change the game main scene, open the Options menu (by clicking on the three dots) and click on "Set as Main Scene", then hit OK.
Main Scene is indicated by the "(Main)" written after the name of the scene.
The main scene cannot be deleted or excluded from publish (see below). To do so, set another scene as main first.
Create a scene
To create a new scene, simply click on "Create New Scene" at the bottom of the Scenes panel. All you have to do is to choose a name for your scene and hit confirm!
After creating your scene, the Editor will ask you if you want to load the scene. If you want to directly work on the scene, choose "Load".
Delete a scene
Deleting a scene is also very simple. Open the options menu of the scene you'd like to delete by clicking on the three dots at the right of the scene name and click on "Delete Scene".
Keep in mind that you cannot delete a scene that is currently loaded into the editor. If you need to do so, load another scene first.
You cannot delete a Scene that is set as the main scene. Make sure to set another scene as main before trying to delete your scene.
Exclude and include scenes for/from publish
You can choose whether to publish or not a scene with your game.
To do so, either use the checkbox (if checked, the scene will be included in the release, else it will not) or in the options menu (opened by clicking on the three dots), choose "Include for publish" or "Exclude from publish".
A game must be published with at least one scene. Thus, you won't be able to exclude from publish a scene if it is the only one included.
Use case of this functionnality: a sample scene used to test features or mechanics in your game. You may want to have access to this test scene only in the editor, and not include it in the final release of your game.
Load a scene
If you want to work on a different scene, you have to load it into the editor.
There are two ways to do it:
- Click on the name of the scene and hit "Load".
- Open the options menu (by clicking on the three dots), and click on "Load Scene".
The scene will load in the editor. You are now able to add objects and scripts to it!
Note that the hierarchy panel changes according to the hierarchy of the scene you loaded.
Transferring players
Now that you have your scenes set up, you need to add a way for players to go between different scenes.
This is done through scripting.
At the time, transfer can't be done in preview/local mode so the only way to know if everything works well is to publish your game and test it yourself.
However, it is really easy to transfer players so this shouldn't really be a problem!
Two functions exist:
- TransferToScene(string sceneName, [table parameters]))
- Game.TransferPlayersToScene(string sceneName, Array players, [table parameters])
We will see below how these functions can be used.
Above functions are accessible only from a script executed by the server. It cannot be accessed from the client. To learn more about contexts, see Core Contexts - Everything you need to know.
Transferring one player (TransferToScene)
Use case: teleport a player to next level or area
To suit the needs of this tutorial, let's imagine you are working on a 3D-platform game with different levels. A good option would be to separate each level in different scenes. This way, you can easily use different terrains and assets to make each level unique, while keeping the same game logic.
Reminder: There is a loading time to consider when transferring a player to another scene. If loading times happen too frequently, the player experience might be affected!
You may want to have multiple levels on a same Scene or keep scenes for really huge levels to reduce amount of time the player needs to be transferred.
When the player comes to the end of the level, you want them to be teleported to the next level, meaning they need to be transferred to another scene. Let's make a little teleporter to do that!
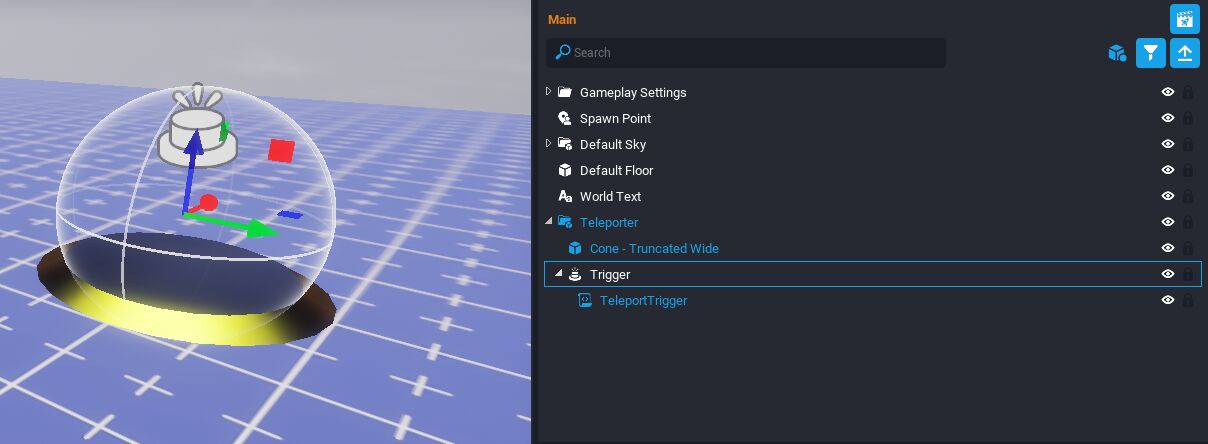
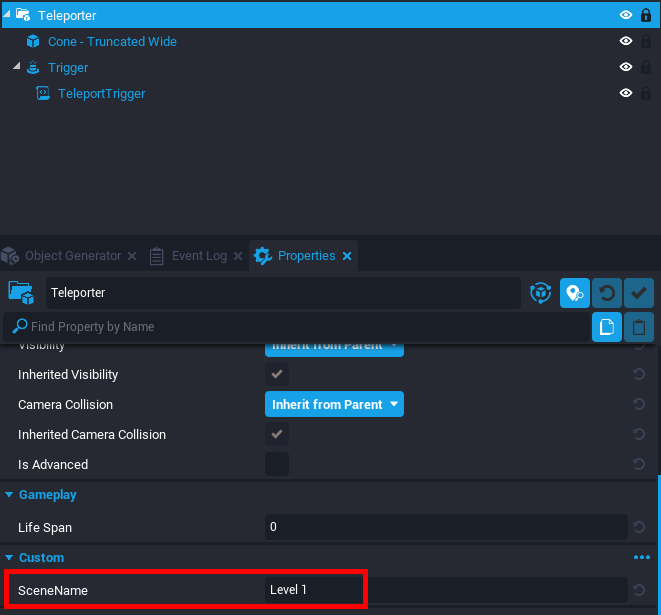
I created a group named "Teleporter" in which I put the 3D Model of a "Cone - Truncated Wide" with a scale of (2, 2, 0.2). Add a trigger and a script that is a child of this trigger.
An editable Core project was published under the name “Core Scenes Tutorial”. You can find it in Core by browsing to the Community Projects tab in the Create section. It includes all the scripts and assets shown in this tutorial, such as this teleporter.
Let's take a look at the TeleportTrigger.lua script:
local trigger = script.parent
local teleporter = trigger.parent

function OnBeginOverlap(whichTrigger, other)
	if other:IsA("Player") then
		other:TransferToScene(teleporter:GetCustomProperty("SceneName"))
	end
end

trigger.beginOverlapEvent:Connect(OnBeginOverlap)
Pretty simple, huh?
First, we reference the trigger, that is the parent of the script.
local trigger = script.parent
This way, we can add a listener to this trigger to know when something overlaps with it:
trigger.beginOverlapEvent:Connect(OnBeginOverlap)
When something overlaps with the trigger, the OnBeginOverlap function is called.
It checks if the "something" is a Player (to avoid trying to transfer a CoreObject, for example) and calls the TransferToScene function on them!
function OnBeginOverlap(whichTrigger, other)
	if other:IsA("Player") then
		other:TransferToScene(teleporter:GetCustomProperty("SceneName"))
	end
end
Now, what is the teleporter:GetCustomProperty("SceneName") part for?
According to the Core Documentation, the TransferToScene function needs an argument that is the name of the scene you want to transfer the player to.
In our case, we retrieve it from the teleporter custom property "SceneName" to easily be able to change it for each teleporter we put in the game.
If you don't need to change the scene you want to transfer the player to, you can just write the name of the scene directly into the code.
player:TransferToScene("Tutorial")
Finally, this function accepts an optional parameter: spawnKey (string). You can use this parameter to specify in what spawn the player should appear when transferred to the Scene. If not specified, the default spawn will be used. If an invalid key is provided, the player will spawn at the origin, (0, 0, 0).
player:TransferToScene("Tutorial", { spawnKey = "Part2" })
Transferring multiple players (Game.TransferPlayersToScene)
Use case: teleport everyone in a lobby to the arena
To transfer multiple players to another scene at the same time, simply use below function.
Game.TransferPlayersToScene(string sceneName, Array<Player> players, [table parameters])
- The first argument must be the name of the scene you want to transfer players to.
- The second argument is optional and is the list of players you want to transfer. (If not specified, then all players in the scene are going to be transfered. You can use this argument to filter players and let some of them stay in the scene).
- Finally, third argument accepts an optional parameter:
spawnKey (string). You can use this parameter to specify in what spawn the players should appear when transferred to the Scene. If not specified, the default spawn will be used. If an invalid key is provided, the players will spawn at the origin, (0, 0, 0).
Example code:
function OnTeamScoreChanged(team)
    local score = Game.GetTeamScore(team)

    if score >= 3 then
        print("Team " .. team .. " wins!")
        Game.EndRound()
        Game.TransferPlayersToScene("Lobby")
    end
end

Game.teamScoreChangedEvent:Connect(OnTeamScoreChanged)
Explanation:
Function OnTeamScoreChanged() is called whenever the teamScoreChangedEvent is fired. This happens when a team has its score updated.
Game.teamScoreChangedEvent:Connect(OnTeamScoreChanged)
If the new score of the team is equal or superior to 3, it prints in the console the winning team, ends the round, and transfer all players to the Lobby scene.
function OnTeamScoreChanged(team)
    local score = Game.GetTeamScore(team)

    if score >= 3 then
        print("Team " .. team .. " wins!")
        Game.EndRound()
        Game.TransferPlayersToScene("Lobby")
    end
end
Useful resources
- Core Documentation on Player: TransferToScene()
- Core Documentation on Game: TransferPlayersToScene()
Thank you for reading this tutorial. I hope it was useful and taught you something. 
If you have any question or suggestion, feel free to reach me on Discord or add a post below.