GUIDE TITLE: Tutorial "Key Binding Sets & Inputs"
ESTIMATED COMPLETION TIME: 20-30 Minutes recommended
CORE VERSION: 1.0.226
TRANSLITION:
This tutorial is made of the translation of Russian into English as well as correcting grammatical errors.
Used applications: DeepL, Grammarly
So if you find any errors write in a private message or here.
SUGGESTED PREREQUISITES:
- basic knowledge of Lua and Core Editor .
- Input - Core Documentation (coregames.com)
TUTORIAL SUMMARY:
Here you will learn the most important special behavior of bindings in-game creation and how to create different bindings.
EXPECT TO LEARN:
- Definition and explanation
- Creating a Binding Set
- Deleting a Binding Set
- Restoring a Binding Set
- Add Binding
- Delete Binding
- Edit Binding
- Binding behaviors
- Binding types
- Networked Bindings
OVERVIEW:
Binding Set - This is a convenient typing and controlled behavior of different keyboard and mouse clicks. Which allows creators to control it during the game I will start to tell you about it now.
BINDING NETWORK
If you want to tell the server when you activate an action for this you have to select the bindings and click it. The orange color means that it will activate as a network binding and the blue is by default only for the client.
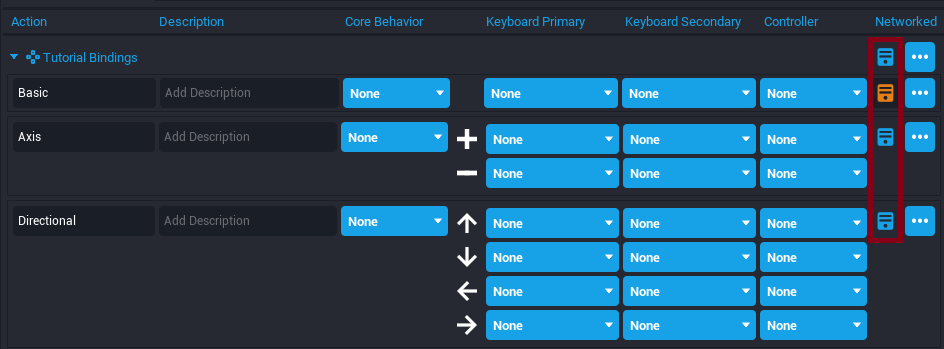
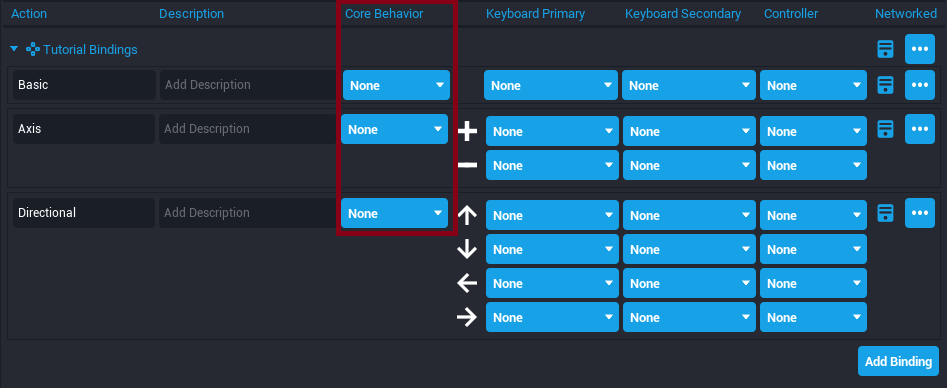
BINDING BEHAVIORS
Each behavior is available in 3 types of bindings. By default, they are set to "None" in each binding but you can activate it by selecting the desired behavior option.
- Jump
- Crouch
- Mount
- Interact
- CharacterPicker
- EmotePicker
- MountPicker
- SlotPicker
- Chat
- VehicleAccelerate
- VehicleReverse
- VehicleHandbrake
- VehicleExit
- PushToTalk
- MoveVertically
- Zoom
- VehicleTurn
- Move
- Look
BINDING TYPES
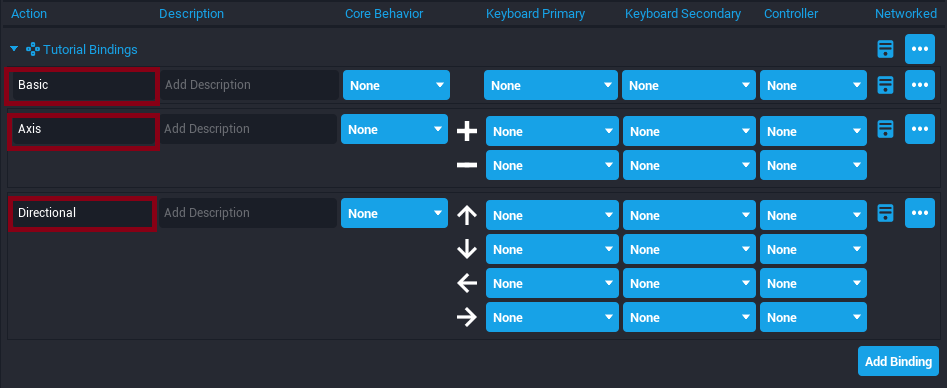
Basic Binding - This is the basic pressing and releasing of mouse and keyboards.
It has no +, - and arrow.
Axis Binding - This is the 2 way up and down position. (Useful for controlling camera range or scrolling the mouse wheel).
It has + and -.
Directional Binding - This is the 4 directions up, down, left, and right. (Used to control the > movement of a character or vehicle)
It has arrows from 4 directions

CREATE BINDING SET
-
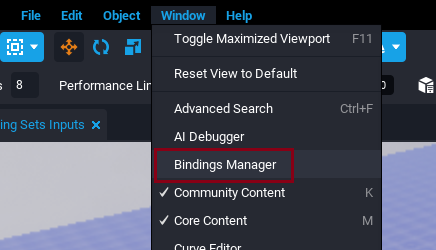
First you have to create the first set of bindings. To do this, go into your project and click on the title " Window -> Bindings Manager".
-
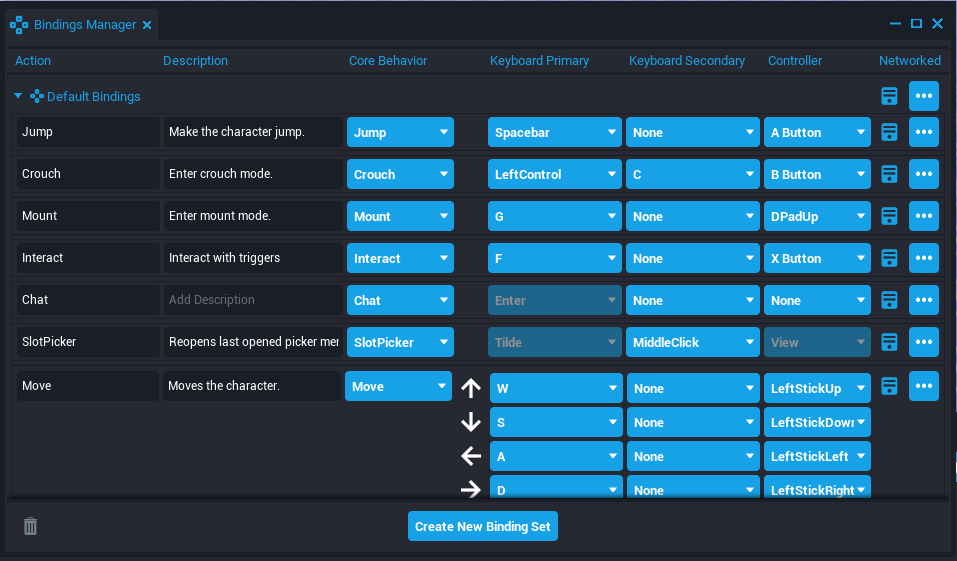
You will see a window "Bindings Manager" and there already has a set of "Default Bindings" you can delete or change.
-
In the open window at the bottom there is a button "Create New Binding Set" press it and enter the name of the set.
-
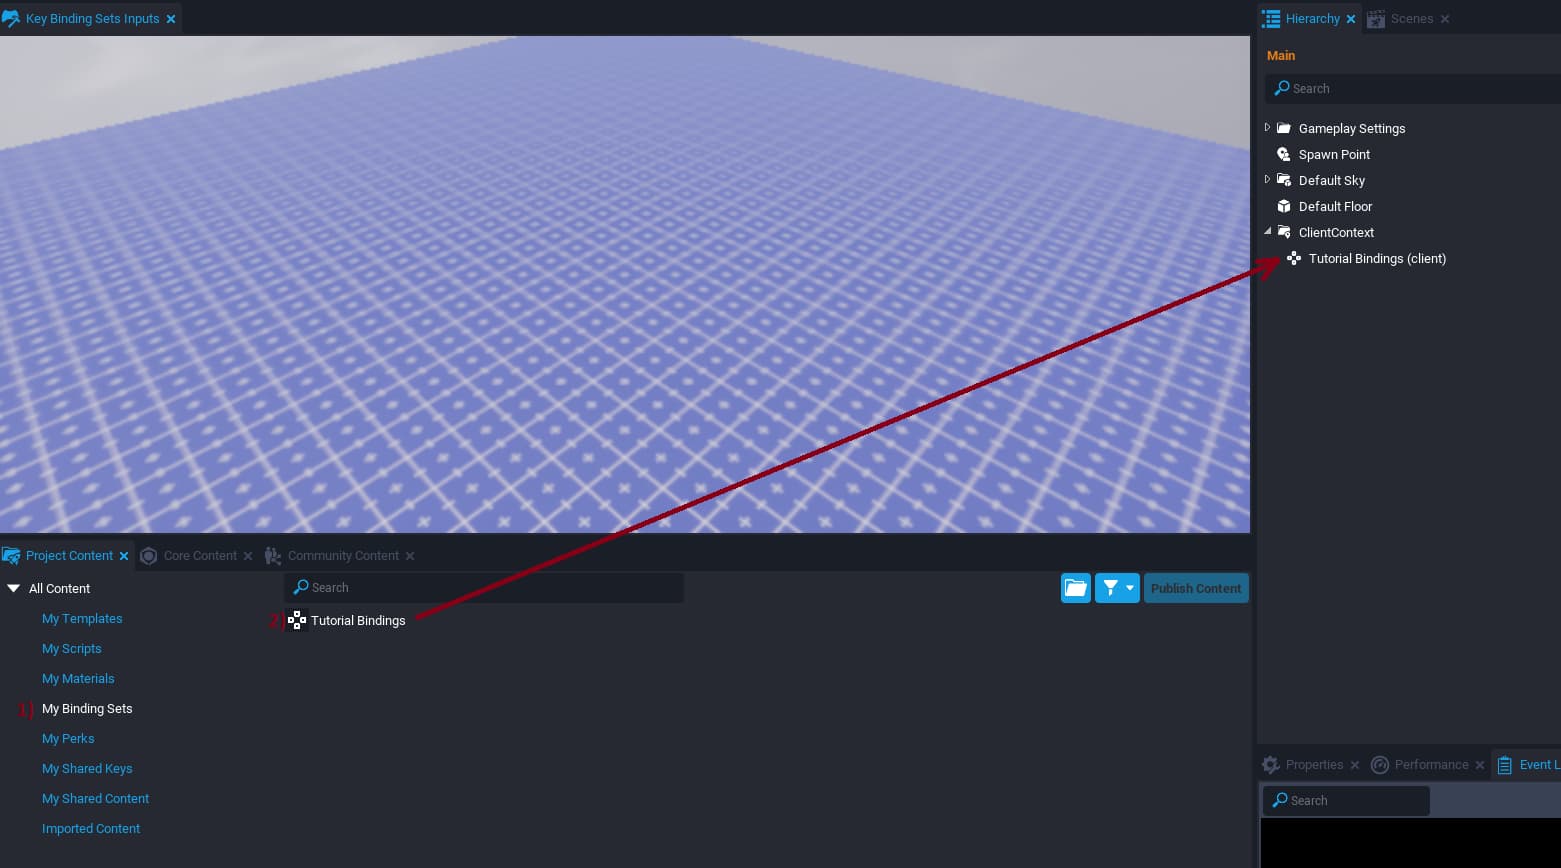
After successfully creating it still does not work in the game why? The thing is that it must be added to the hierarchy tree project to activate. You can move it to the client or the default. How did you transfer it to the project and it will work if you set up properly all the bindings at the time of creation, as well as specify the name of the action.
PS: I recommend the client folder so you can control its creation and removal while changing the interface.


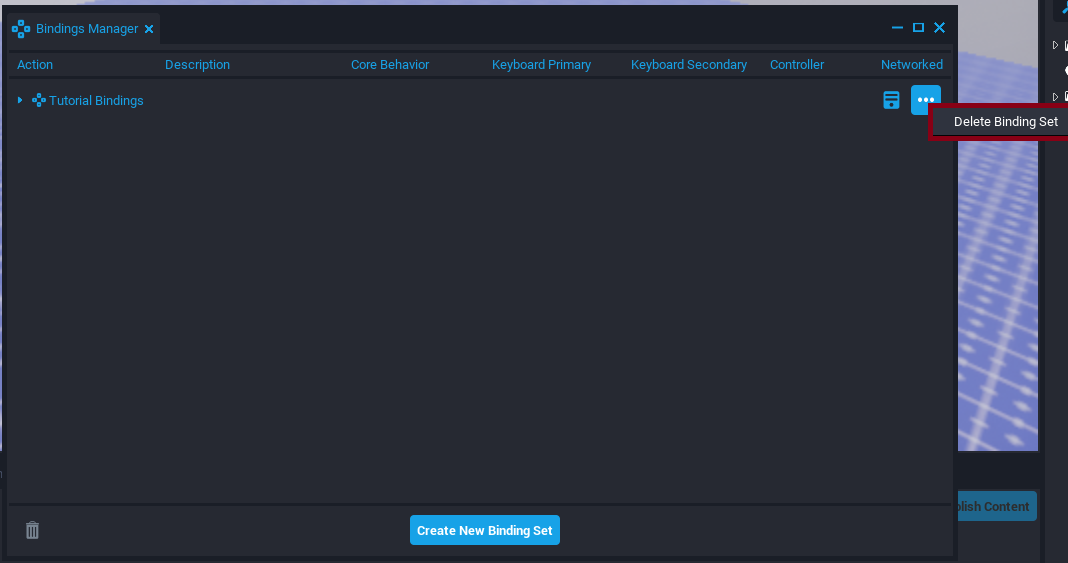
DELETE BINDING SET
-
To remove the bindings set, go to " Window -> Bindings Manager".
-
Select "Tutorial Bindings" with the triple dot button and the "Delete Bindigs Set" menu appears.
RESTORE BINDING SET
-
To restore a set of bindings, go to " Window -> Bindings Manager".
-
In the very corner to the left at the bottom, there is an image of a bucket it has 3 colors
- blue (There are deleted sets)
- gray (No deleted set).
- orange (And when you click the image becomes which means you are on the bindings kits restore page)
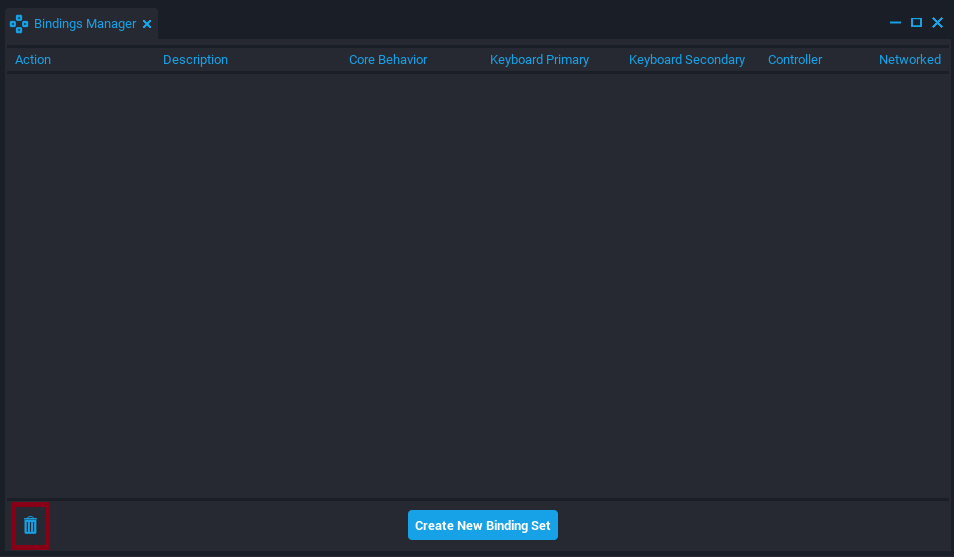
- Find the deleted "Tutorial Bindings" sets and click "Restore" and it will be restored.

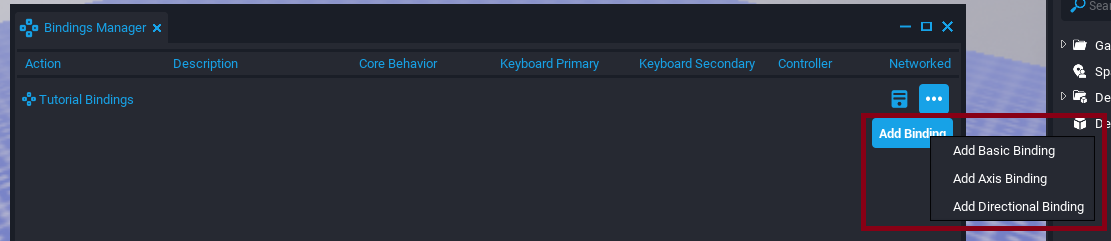
ADD BINDING
-
Open the "Window -> Bindings Manager" window.
-
Next to the triple dot there is a button "Add Binding" when clicked, a menu with 3 variations will appear: Add Basic Binding, Add Axis Binding, Add Directional Binding. (About this information can be found in TYPES OF BINDING)
-
Whichever variation you choose and successfully create and maintain the name of the action it will signal the API script.
-
Set which keys or mice will call this bind action.
-
Set the behavior of each bindings if you need it.

DELETE BINDING
-
Open the "Window -> Bindings Manager" window.
-
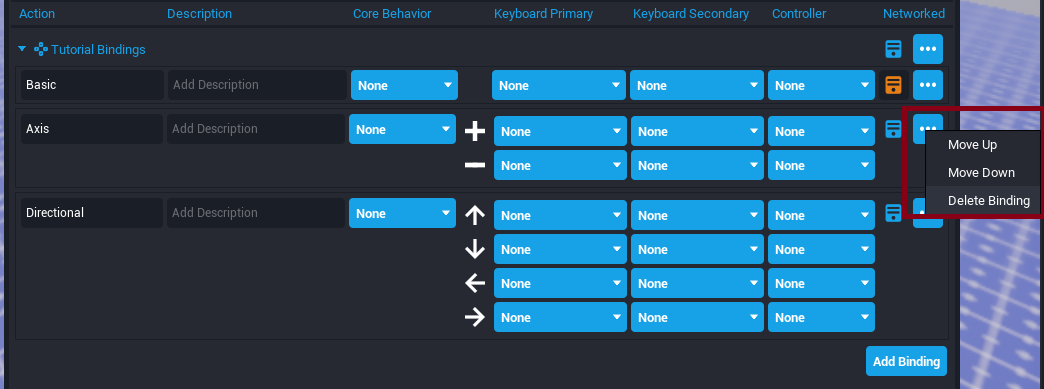
Select the "Tutorial Bindings" set and expand the list of action sets so that the arrow points down.
-
Select with the three dots as in the image, where the red frames are highlighted, and you will see the "Delete Binding" menu.
-
WARNING: You can't restore it after you delete it, so be careful who you delete the bindings.

EDIT BINGING
For each bind you can set a unique action name as well as a description to let the players know what the bind action does and customizable keyboard, mouse, and controller designator settings. And you can also move it up and down with three dots to tell the players where the bindings were removed.
- Move Up
- Move Down
Congratulations, you have mastered how to create, delete and edit bindings. As well as creating, deleting, and restoring a set of bindings.
SCRIPT
There are several examples of code implementation in the documentation