TITLE: Terrain 101 - All you need to know about terrains in Core.
ESTIMATED COMPLETION TIME: 20-30 Minutes recommended
CORE VERSION: 1.0.224-prod-s
TUTORIAL SUMMARY:
For this tutorial, we will be generating a terrain and use the tools at our disposal to dress it up and optimize it for gameplay.
EXPECT TO LEARN:
- How to generate a terrain
- How to generate foliage
- Setting up the mood
- Using custom materials
- How to make use of different tools for terrain manipulation
- Adding water to your terrain
- How to optimize your terrain
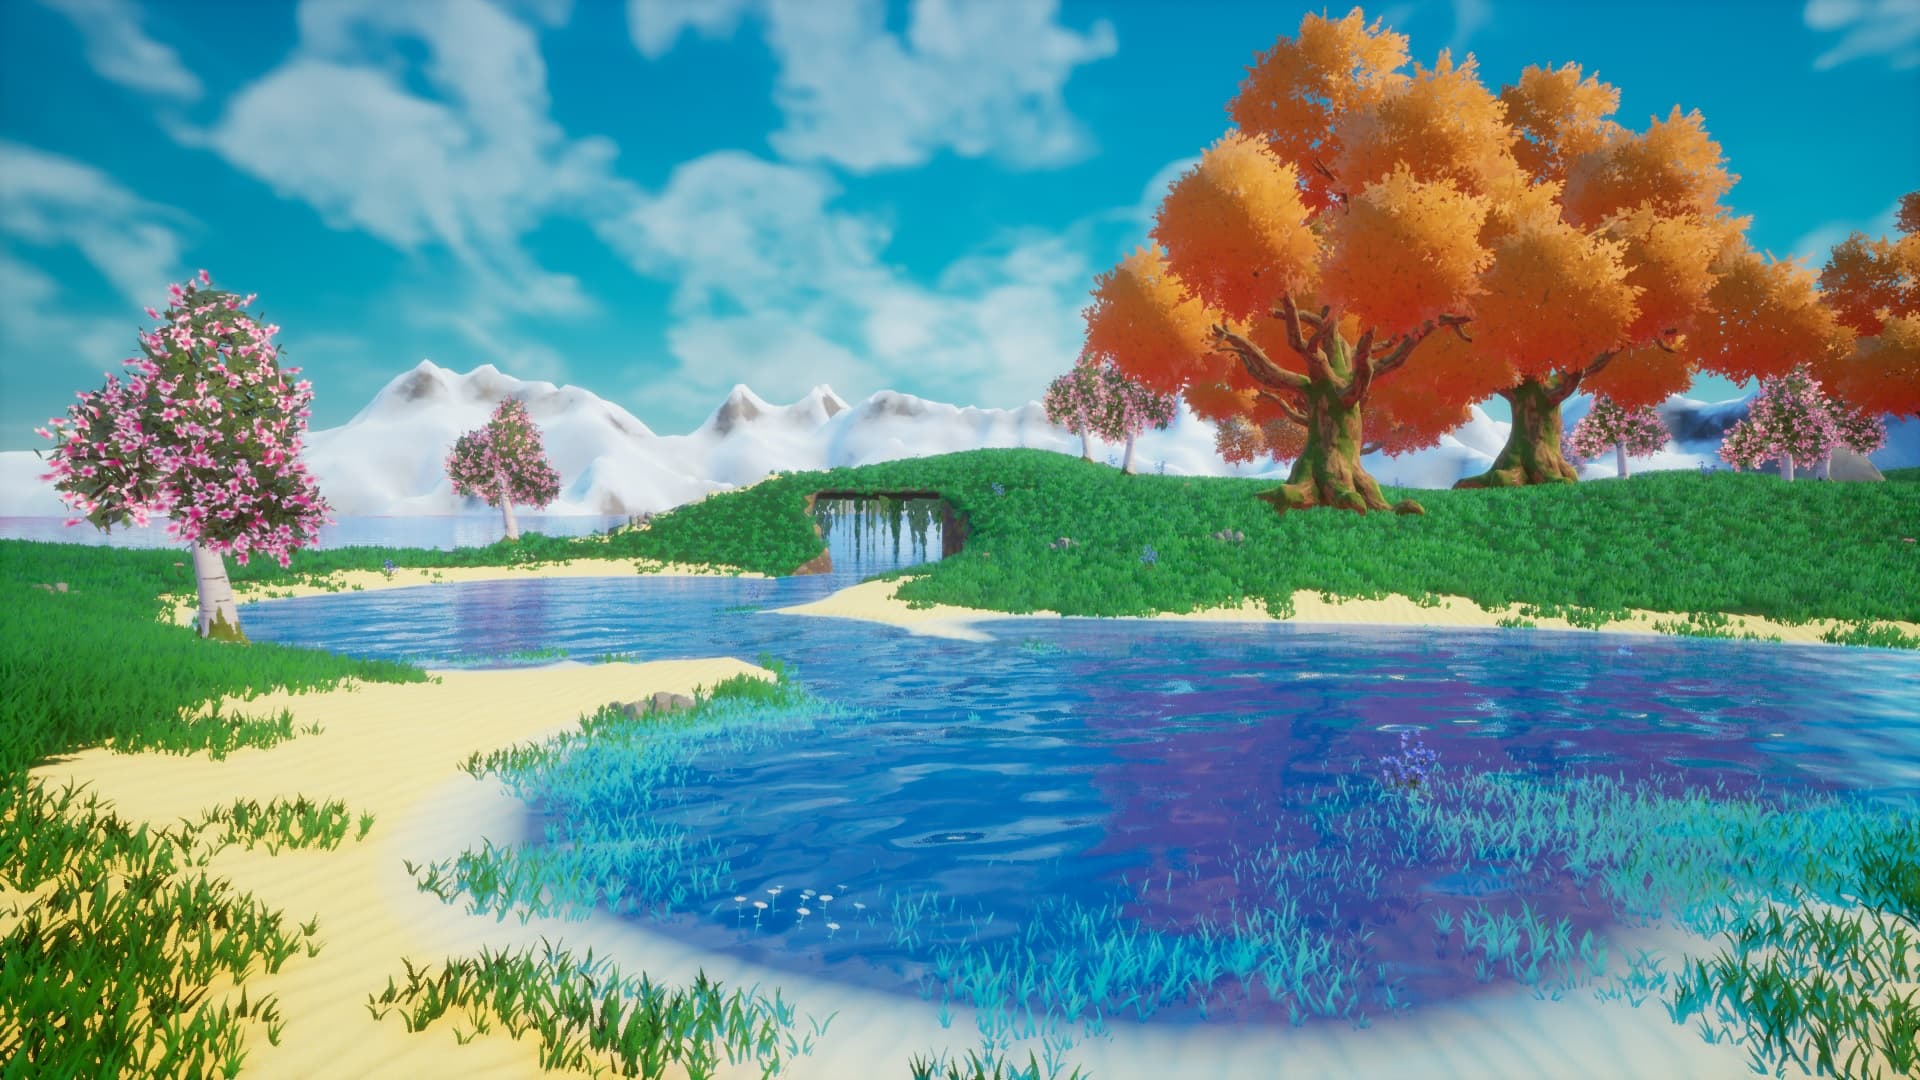
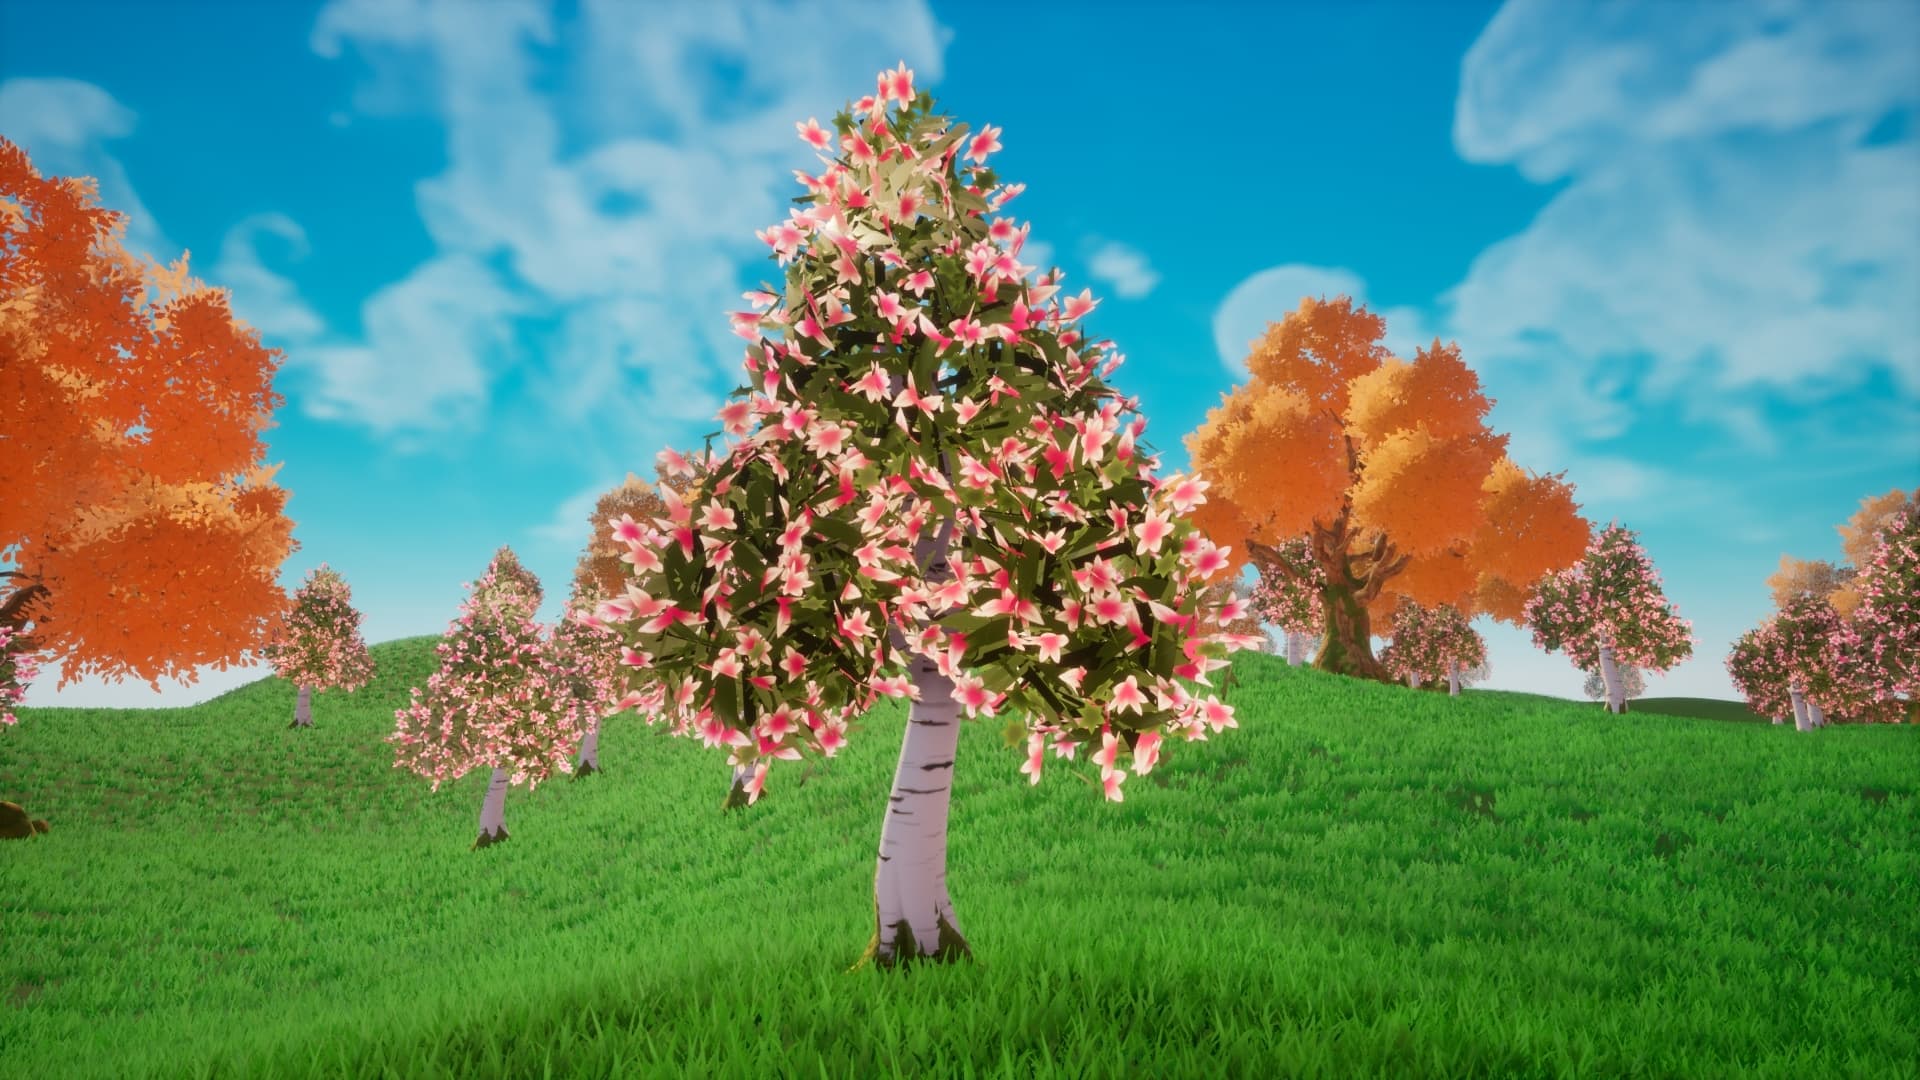
END PRODUCT VISUALS:
TUTORIAL:
Step 1:- Generating a new terrain
Click the icon on top left as shown in the picture below and click Generate New Terrain this will open up a new menu. For this tutorial, we will be using the Rolling Hills Preset.
Click on Terrain Size and select 256x256 from the drop down menu and set the Height to 20
Things to Consider
-
Voxel Size - You can further reduce or increase the size of your by decreasing or increasing the voxel size. Please note that lower voxel sizes will result in higher detail while high voxel size will result in lower detail.
-
Height - Because we used a lower terrain size of 256x256, we set the height to a lower value to offset that.
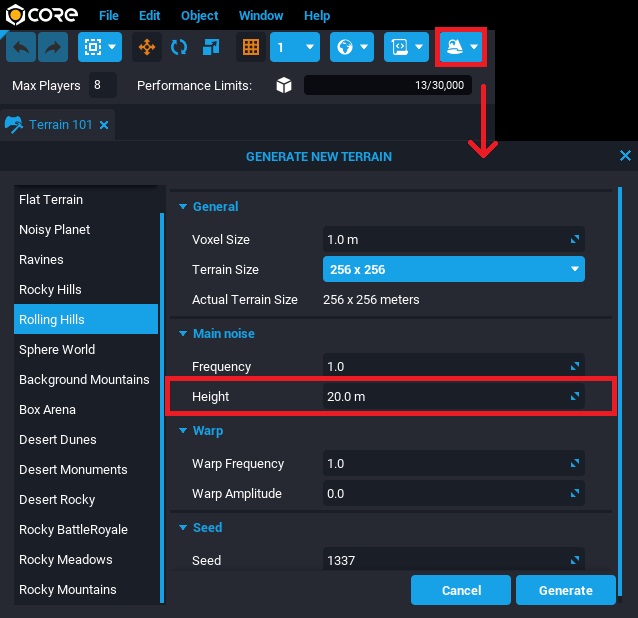
Click Generate to build your terrain.
Step 2:- Assigning Base Materials
Our newly loaded terrain will not have any material assigned to it by default, to load materials select your terrain from the hierarchy and click Create new terrain material as shown in the picture below.

This will open up the following screen.
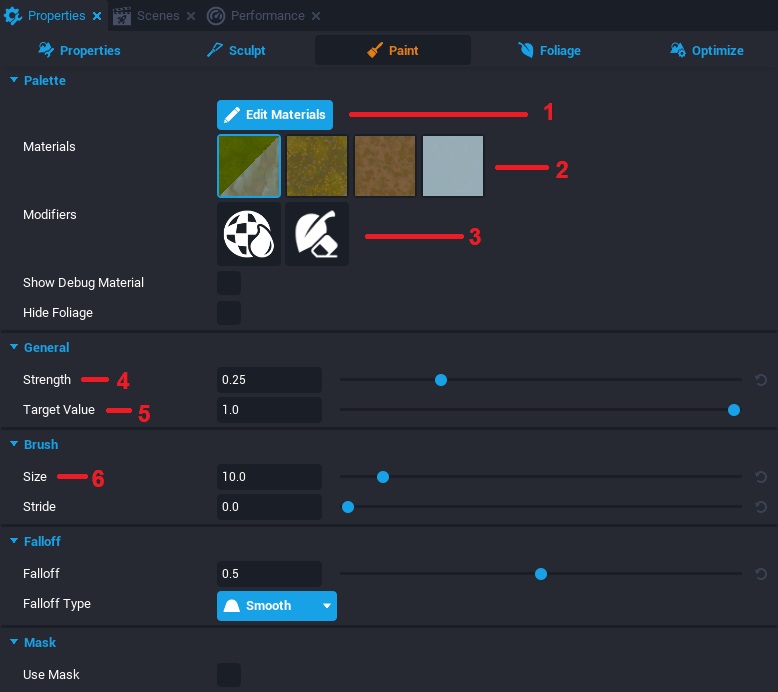
Properties
1 - Edit Materials:- This is where we can assign materials to our terrain as well set the scale of each material. We will come back to this in a bit.
2 - Materials:- By default, Core allows you to make use of up to a maximum of 4 materials, choose them wisely!
3 - Modifiers:- *The first modifier to the left is a Wetness modifier. This allows us to paint wetness over our terrain. For example making the sand on a beach appear wet near the water.
The second modifier on the left is used to erase foliage. With this selected, you can paint over any patch of grass or trees or any kind of generated foliage in order to erase it.
4 - Strength:- The amount of voxels to add or remove as you paint over the terrain. Lower values will result in light brush strokes while a value of 1 will result in 100% opacity.
5 - Target Value:- Higher values will result in more of the selected material being painted over the terrain while lower values will blend the existing material along with the selected material.
6 - Size:- Pretty much what it says it is. The size of the paint brush. Please note that sometimes if erasing foliage or painting a material over the terrain is not working as intended, it could mean that the size of your brush is too small.
Click on Edit Materials.
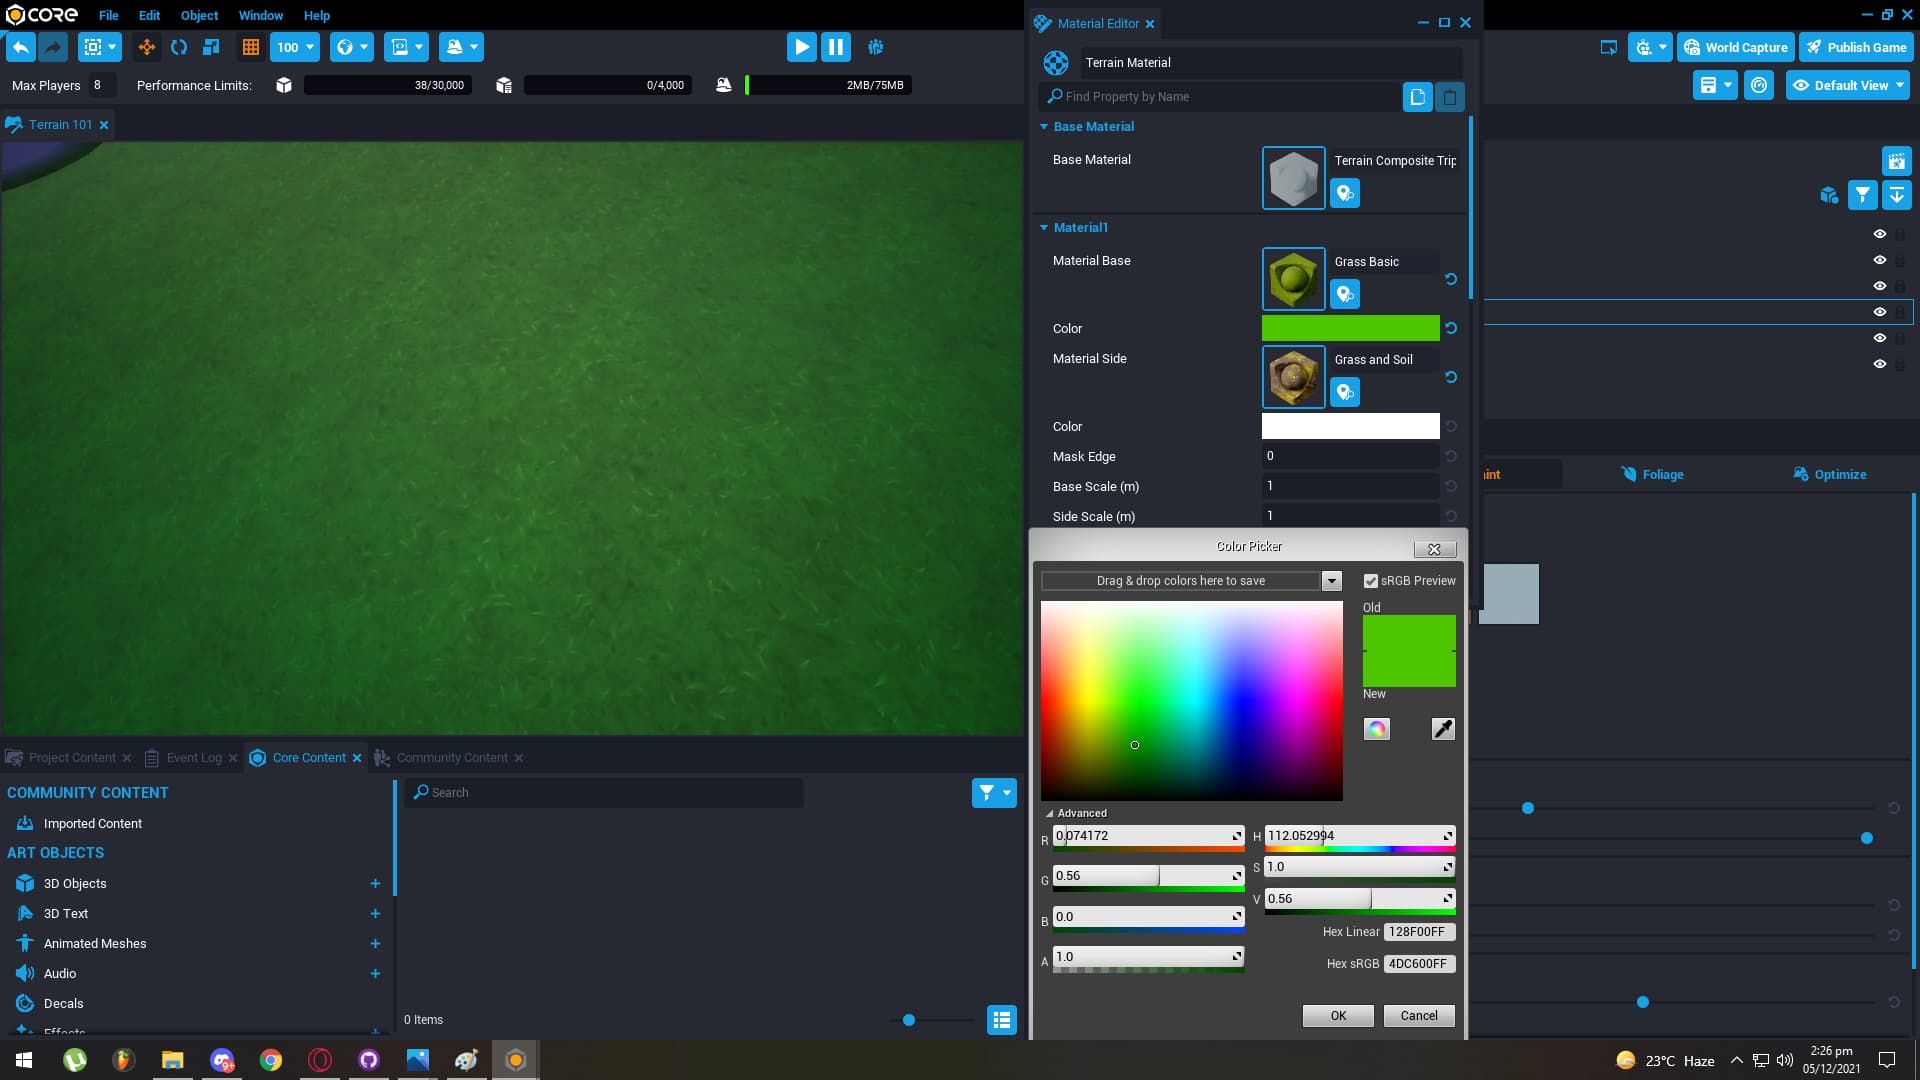
Double click the empty material icon and assign the materials as shown above. Set the color of your grass material or paste 4DC600FF in the Hex sRGB.
Next, assign the another material on the Material2 section of the Material editor as shown in the picture below.
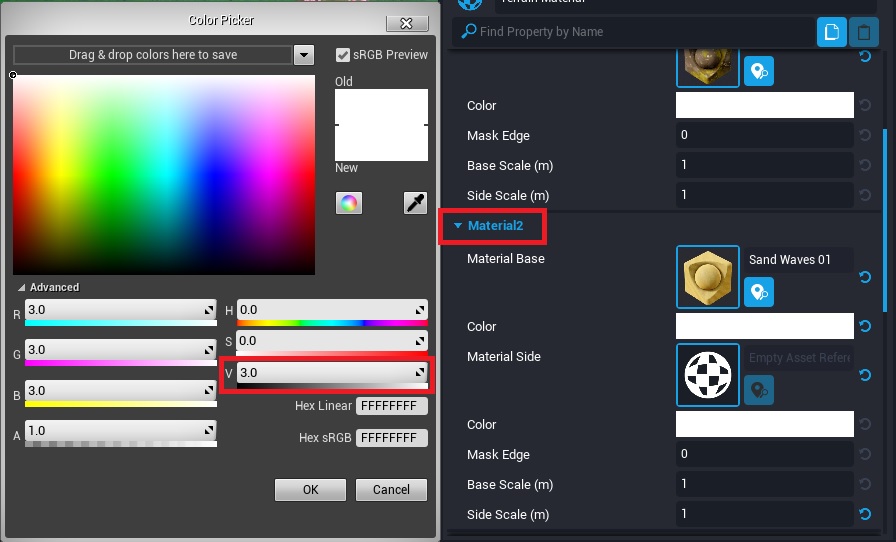
Note:- We drive the V value on the sand to 3 to give it that nice beach sand look.
With this, our needed materials for this tutorial are all set.
Step 3:- Generating Foliage & Custom Materials
Select the Foliage tab from the properties menu then click Add Foliage search and add Grass Short.
Set the properties on the grass as shown in the picture below.
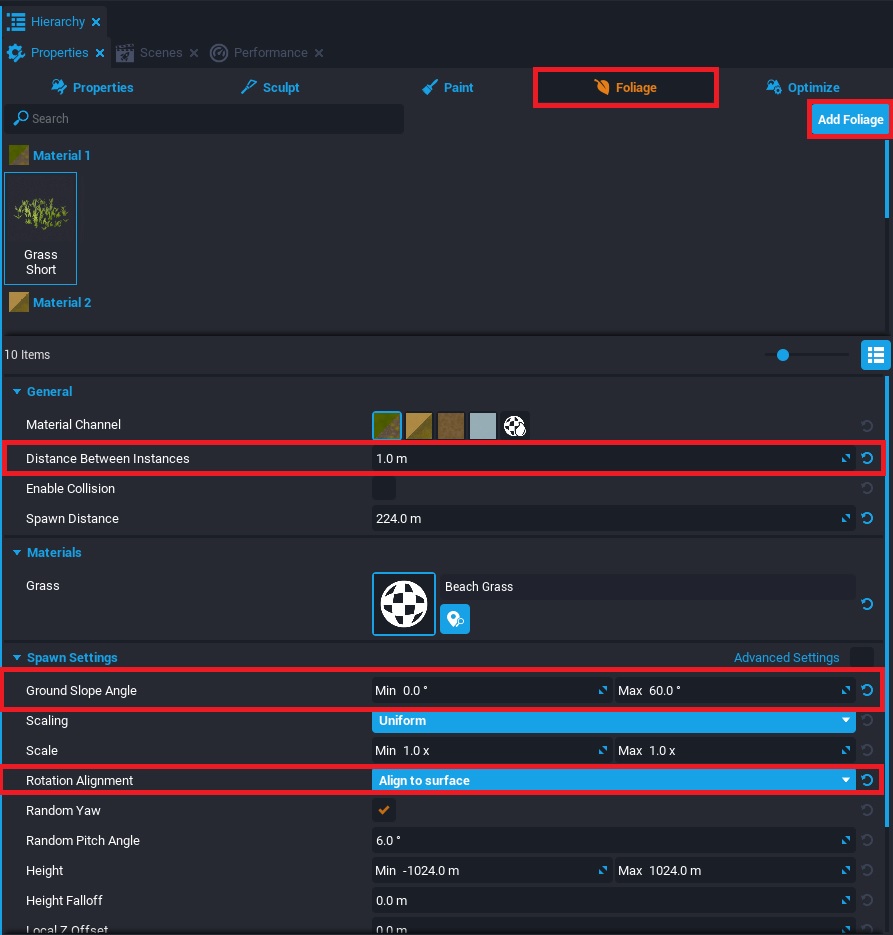
Distance Between Instances:- This controls how close together the selected foliage should spawn from each other. Please note that a lot of foliage with a low Distance Between Instances value can result in low framerates.
Ground Slope Angle:- We set the ground slope angle on the grass to range from minimum 0 up to a maximum of 60 degrees. This ensures that grass foliage does not spawn on angled cliffs where grass usually does not grow.
Rotation Alignment:- By default this property is set to Align to terrain up which places the foliage straight down on the terrain at a 90 degree angle, this is useful for trees but in the case of grass we select Align to surface which respects the curves on the terrain and places the foliage accordingly.
The picture below shows an example of using the properties mentioned above in order to create hanging Ivy foliage.

Now try adding in some trees using the add foliage button to fill the scene up. Remember to set the rotation alignment to Align to terrain up for the trees and set their distance between instances to a higher number.
The next step is to give our foliage some custom materials to make them fit better with our scene.
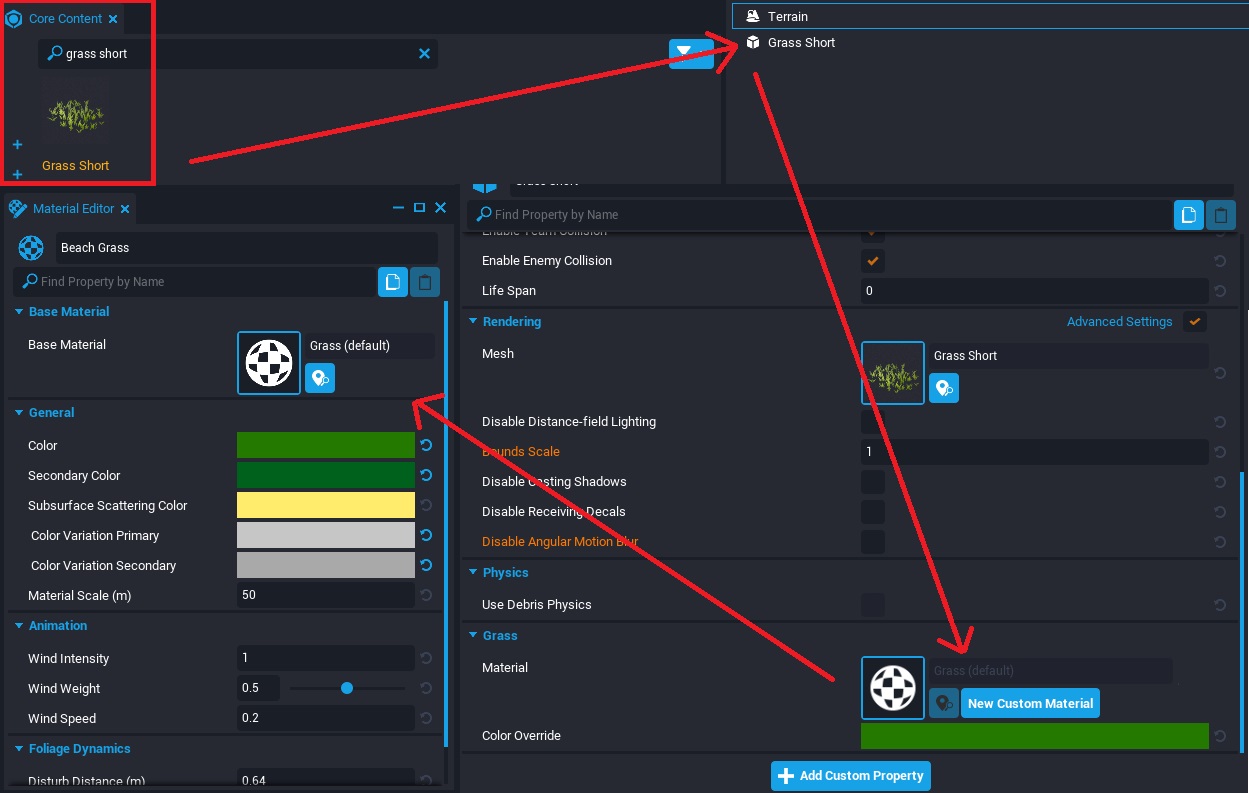
Important Note:- Any and every type of foliage that can be generated on terrain can be found under the Core Content tab as a separate object. We can search for that object from Core Content, drag it out into the hierarchy, scroll down under its properties and click New Custom Material This is extremely useful for two reasons. One, it allows us to modify a material to our liking and two, if you decide to make a change to the material later on, all objects using that custom material will change accordingly, this helps save a lot of time!
Give your custom grass material a name that you can easily remember and then lets assign it to our terrain grass before we make changes to the material itself. To do this, simply select your grass foliage and under its properties, double click the empty material grass slot and select your newly created custom grass material to apply over it.
We can now select our Grass Short object in the Hierarchy and instead of New Custom Material you will see a pencil icon instead. Click on it to start changing the colors and watch them reflect over the entire generated foliage grass!
Tune the colors to your liking and try following the same process to give color to your trees. It is worth mentioning that you can also steal a material from any Core Object meaning that if you took a flower object, clicked New Custom Material (give it a name for good practice) you could then apply that material to the leaves of a tree to turn it into a custom tree full of flowers as shown in the picture below!
Step 4:- Setting the Mood
So we have our terrain, we have some foliage with custom materials but the scene still looks dull. This is because our lighting does not match the scene we are trying to create and this might be a good time to address that.
For this tutorial, we are trying to create a bright, vibrant paradise like island so we delete the Default Sky from our hierarchy and instead search for Sky Whimsical Sunny Saturation and immediately notice a massive uplift to our overall look! Please note that fine tuning the lighting might be something you would want to do at a later stage but Core offers a variety of skyboxes as does the Community Content tab and there is no harm in testing out different skyboxes just to get the vibe going!
Step 5:- Water
Search and add a one sided plane (for this tutorial I used Plane 4m - One Sided ) into your hierarchy and scale it to 1024 on both, the X and the Y axis. Adjust the height according to your liking, at whichever height you want your water to be. Next, copy and paste the One Sided plane and then flip it over. Note:- you can only see One Sided planes from one angle.
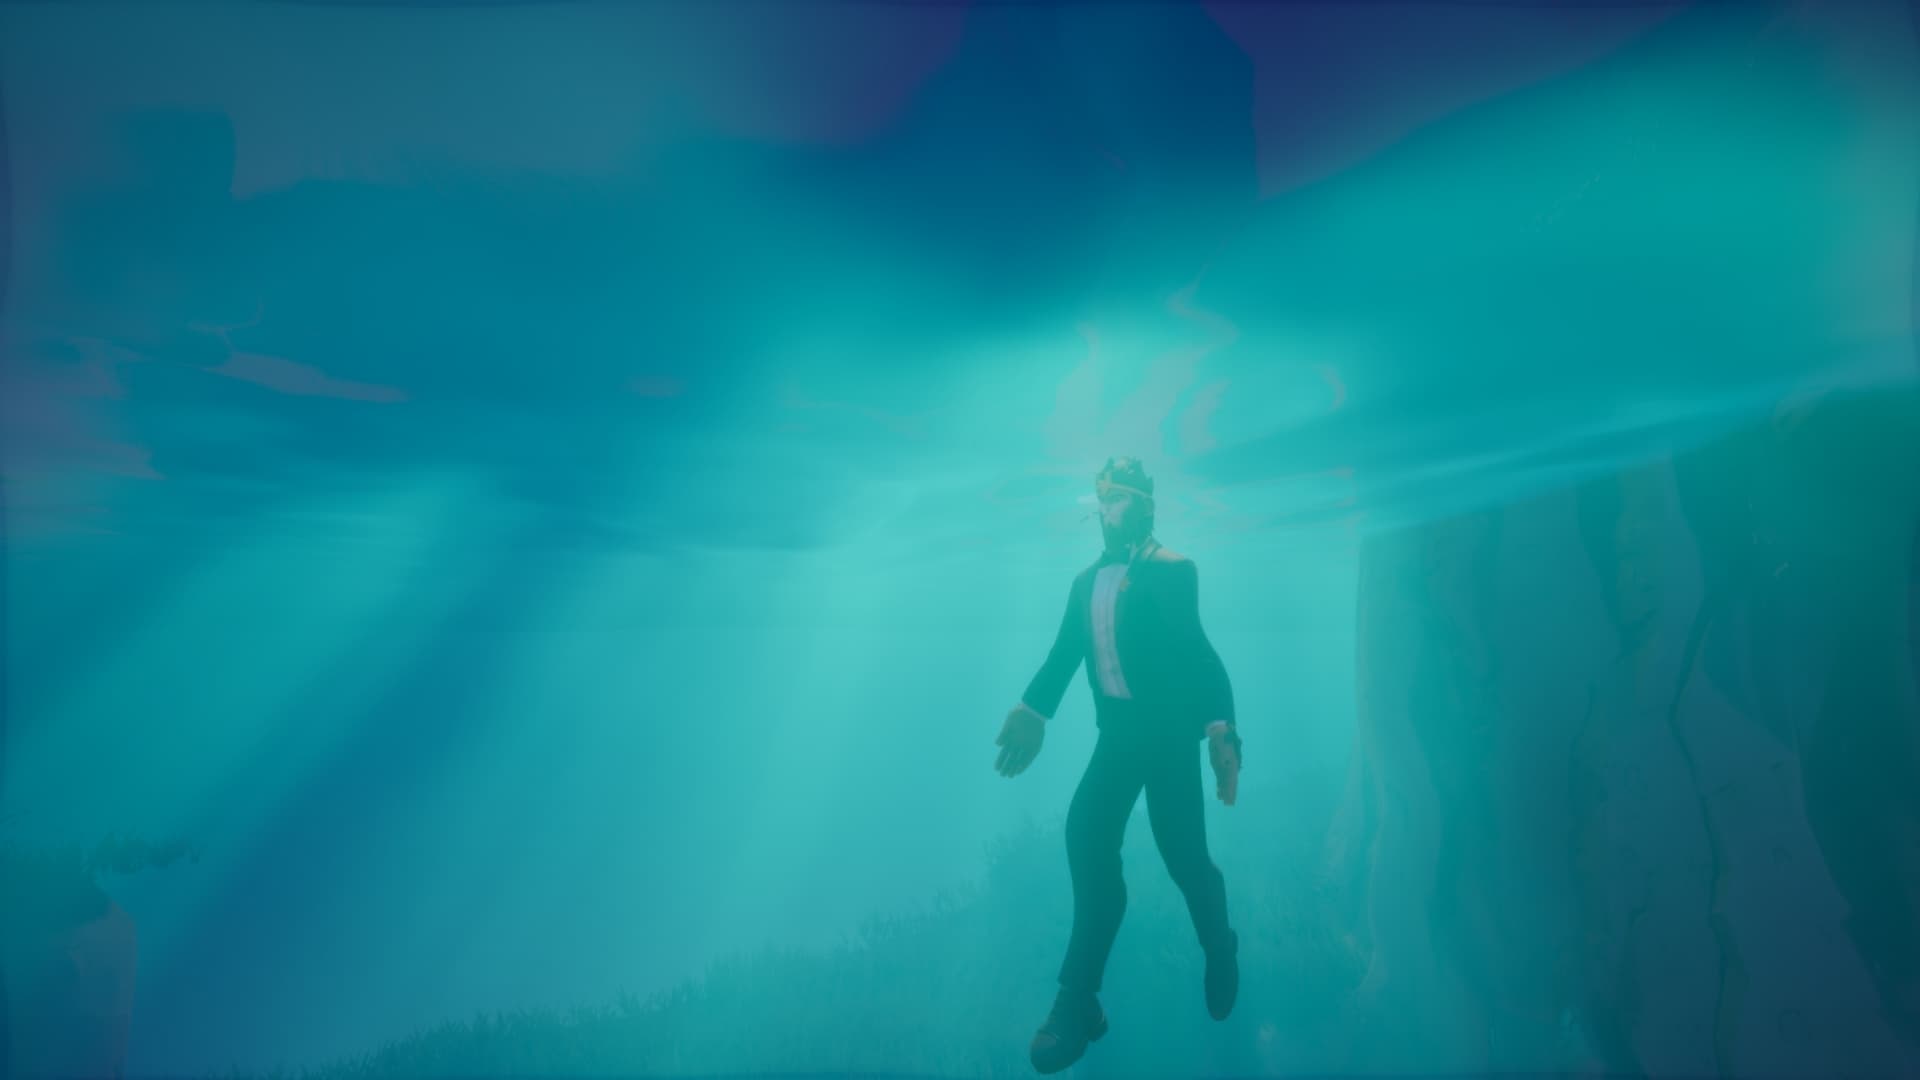
The reason we create a flipped plane for the water is because when the player enters the water and look up, they can see the surface of the water as shown below in the picture.
Make sure to turn Collision as well as Camera Collision OFF on both water planes so the player can actually jump into the water.
Next, assign a water material to your planes, for this tutorial I used Generic Water - No Distortion and as always, click New Custom Material to color it according to your liking.
The final step to make the player able to actually swim in the water is to search for Swimming Physics Volume drag it out into the hierarchy and make sure the volume box is as big as wherever you want the player to swim, adjust the Z position of the Swimming Physics Volume to have it at the same height as your water. *Please note that if you cannot see the volume box, pressing V will enable the widgets.
Step 6:- Sculpting
The sculpt section under the properties of the terrain allows you to carve out caves or form cliffs and mountains. They are self-explanatory but lets go over what they do briefly.
Surface:- The Surface tool allows us to pull or push the voxels on the terrain. If the default settings are too fast then try lowering down the strength to have more control over how fast and how much the terrain gets affected.
Shape:- The shape tool allows us to add in shapes from the Core Content Library to paint some interesting shapes on to our terrain.
Smooth:- Extremely useful tool to smooth out the terrain. This can help get rid of jagged edges and also make steep angles less steep if the players are to walk over it.
Trim:- Another useful tool to help get rid of jagged edges. Automatically aligns with the terrain.
Flatten:- Pushes the voxels down on the terrain, attempting to flatten it where possible.
Level:- Extremely useful tool to make steps, terraces and cliffs as well as caves!
IMPORTANT:-
The ALT key is basically your UNO reverse card. Holding it will do whatever you do on the terrain but in reverse.
While removing foliage with the foliage modifier selected did you remove a tree you really liked? Hold alt and paint over it with the modifier still selected and instead of erasing the foliage, it will add it back.
Did you add too much wetness over the beach and want to dry it up? Select the modifier, hold ALT and paint to remove wetness instead.
The ALT key also works while sculpting your terrain and while holding it, it will do the opposite of what the tool is supposed to do.
Something to consider
By default, the walkable floor angle of the player is set to 44 which can get annoying if you have a terrain that has a bit of a climb to it but the player is supposed to be able to get on top of. Simply search for your player settings object in the hierarchy Third Person Player Settings found under Third Person Camera Settings by default, scroll down to the walkable floor angle and set it to a higher number.
Step 7:- Paint
Select the second material slot under the Paint section of the terrain properties to now start painting our sand around the edges. Use the Strength and Target Value to blend the existing grass material nicely at the ends to make the transition from sand to grass seamless.
Step 8:- Background Mountains
Generate a new terrain but this time instead of Rolling Hills preset, we select Background Mountains
For this tutorial, I gave the background mountains the Terrain Snow material, choose a material and set the Z position of the background mountains according to your liking. *Please note that when adding a second terrain to your project, only the first "Primary" terrain will have collision.
Step 9:- Optimizations
There are a couple of things to consider when it comes to optimizing your terrain for gameplay. Lets go over them.
-
Terrain Geometry If your terrain has too many shapes to it in the form of high cliffs, tall mountains and deep tunnels, the game will need to calculate all those collisions. Making the terrain less complex will make your game more performant.
-
Foliage - (Distance Between Instances) As discussed earlier in Step 3 having too much foliage spawn in with low distance between each instance will significantly reduce load times and framerate, try to avoid this!
-
Cull Distance & Shadows - Cull distance will fade foliage at the set minimum distance and completely fade it out at the max distance. Consider setting the cull distance to lower values for foliage that doesn't need to be loaded and visible at all times for the player. Shadows can also lead to a heavy performance hit so ensure something that doesn't need to cast shadows isn't casting shadows by unchecking the checkbox.
Another option is to select the Optimize tab in the Terrain properties to Optimize or Simply Voxels on the terrain. Optimize is completely safe and does not affect terrain voxel quality whereas Simply Voxels might slightly reduce voxel quality if you have steep cliffs and caves.
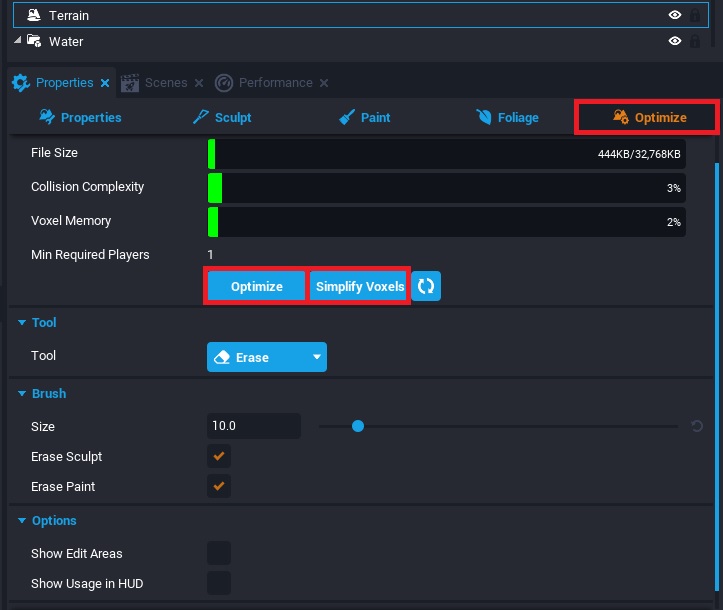
The optimize section also comes with Erase Sculpt and Erase Paint checkboxes. Select the one you need and paint over your terrain to set that area back to how it was when the terrain was first generated.
Step 10:- Have fun with it!
There are many tools at your disposal to make some amazing looking terrains on Core with many properties to experiment with and many sliders to slide. Don't be afraid to mess up, Core can practically Ctrl+Z seemingly endlessly. Many a times the best things you will make is by sliding a slider too much or by setting a number to a ridiculous value so go ahead and do just that.
Link to the final project
You can download the project from the Community Projects tab as shown in the image below.