GUIDE TITLE: How to install and play Core on GNU/Linux (Debian)
ESTIMATED COMPLETION TIME: 4 Hours recommended
CORE VERSION: Current version at the date 5/sept/2022
SUGGESTED PREREQUISITES: Basic understanding of Linux OS
TUTORIAL SUMMARY:
This tutorial will teach the readers how to setup any Debian based Linux distribution to be capable of running Core.
Allowing the GNU/Linux users to create & play Core games.
EXPECT TO LEARN:
- How to install Wine (the right way)
- How to install and setup Bottles ( Bottles | Flathub )
END PRODUCT VISUALS
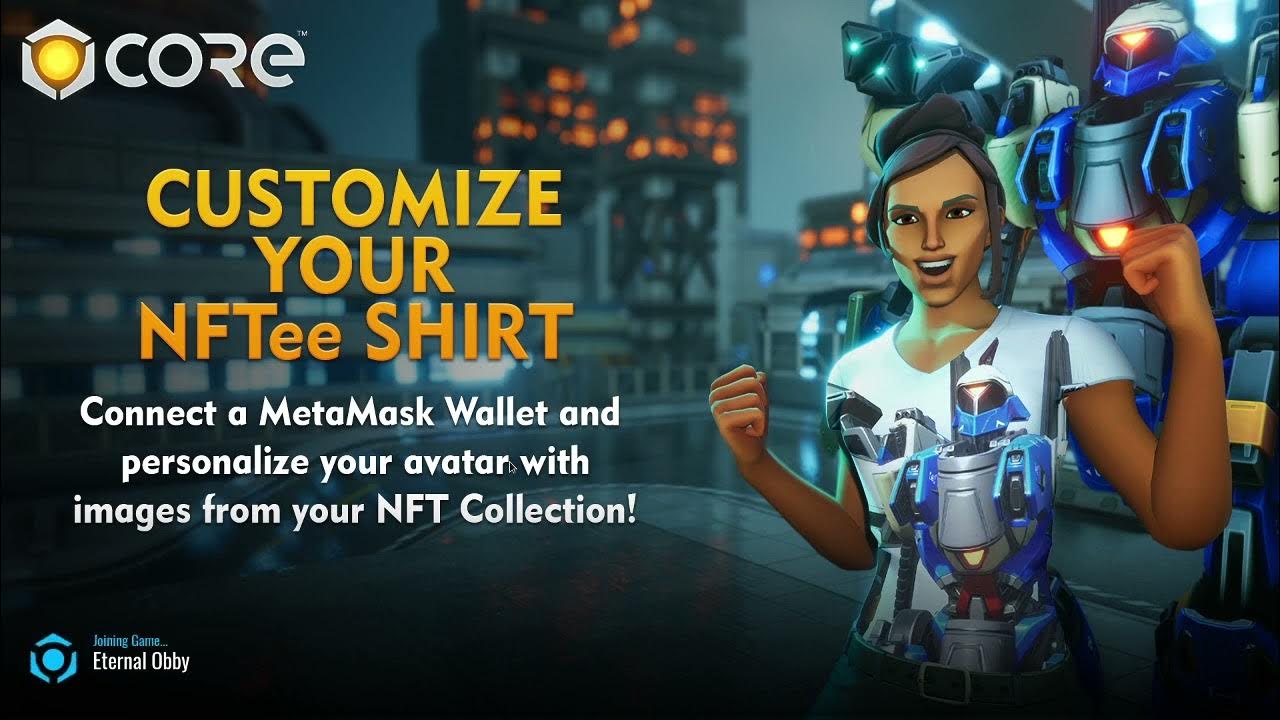
Gameplay session on Debian.
TUTORIAL:
1: Setup Debian to use and install WINE as this 1 page tutorial describes
https://wiki.winehq.org/Debian
(Note: follow each step of the page)
2: Install Bottles
For Debian users simply add the install flatpak and add the flathub repository.
apt update or sudo apt update
apt install gnome-software-plugin-flatpak
flatpak remote-add --if-not-exists flathub https://dl.flathub.org/repo/flathub.flatpakrepo
Note: above commands were extracted from: Debian Flathub Setup | Flathub
3: Install your GPU Drivers (NVIDIA or AMD)
Note: nowadays the drivers shipped with every Debian based distribution are more than enough to play any game.
4: Install Epic Games Launcher using Bottles & after that Install Core.
And that's it! Basically all you had to do to be able to play Core on GNU/Linux are those 5 steps.
IMPORTANT. if you don't need DETAILED information about how to do each of the 5 points mentioned simply stop reading. Do what is mentioned above and you will be fine. Otherwise... Welcome to the Tutorial!
Prologue
Every PC is completely different, playing on Linux has always been difficult no matter what, because each setup will behave different. This means that its highly probable that the configuration I've done might actually not work for you, specially if you are a NVIDIA user, because I have tested and run my games using a Radeon RX 570. But I'm not saying this to discourage anyone! by the contrary. NVIDIA provides OUTSTANDING DRIVERS (already shipped on any Debian based distribution) and I'm pretty confident this exact setup could work as well for NVIDIA users.
Why Linux? Because Linux is better. (specially if you are a developer, you will be amazed by the unimaginable amount of features the OS has)
And finally I want to make this detailed section of the tutorial straight to the point / important information. And that is precisely the main reason why I'm not going to explain step 1 (because it is perfectly explained on the URL provided)
3: GPU DRIVER (NVIDIA - AMD)
What is that?
A driver... is the software/program that tells your GPU (video card) what to do and how to do it.
Without the driver your GPU will not work as intended.
(I believe anyone nowadays knows what a driver is, just had to explain it the simplest way possible if there is someone with 0 knowledge reading this)
3.1 Do nothing - I mean it.
Debian 12 released recently and every single Debian based distribution comes with outstanding pre-installed graphics drivers. And yes, for both GPU families (AMD & NVIDIA)
However if you really want to install a downloaded driver from Official Drivers | NVIDIA Click on the 3.2 Section and read it.
For AMD Users like myself don't do it, is not necessary at all but just in case, here is the URL to download the amdgpu-installer script from AMD https://www.amd.com/en/support/linux-drivers
Once again: Don't download and install the drivers manually is not necessary since any Debian based distribution comes with outstanding pre-installed drivers which are usually the latest available for the GPUs. (Yes you can even run DOOM ETERNAL with those drivers)
3.2 Downloading the private Driver from the GPU Provider Nvidia or AMD (Deprecated section)
Simple guide to use the Terminal / Shell / Command Line
cd ---> Change directory (to move between the files of the system, opening folders or going back)
ls ---> List (to display the files on the current folder)
./NameOfTheFIle ---> will execute the fileNote: for more detailed information on how to move on the terminal google for some basic linux tutorials covering this topic.
A lot of them exist.
Manual Installation
To download the driver for the GPU you own. Enter to the GPU Vendor web page either on AMD Radeon web page or NVIDIA web page.
This might look like a simple step right? like hey... that is easy... I just download it and install it and TADAA right?
well... I was thinking the same thing, before actually uninstalling and reinstalling the driver more than 10 times.
So read carefully my WARNING: Make sure, make 100% sure that you are installing the RIGHT driver for your GPU + that you uninstall the "Native drivers" that Debian comes with before actually installing the downloaded driver.There are plenty of tutorials out there explaining how to completely remove the native drivers Debian provides by default. However I'm going to say that the simplest method is to open Synaptic (Linux software manager) search for "NVIDIA" or "AMD" and mark all of the packages involved with those words and UNINSTALL THEM. afterwards press CNTRL+ALT+F5 to go into the command line mode witouth graphic environment and Disable the graphics manager for Debian by typing
$ sudo service gdm stop(write this down in real paper)Afterwards locate yourself in the Downloads folder and install your private driver.
cd ~/Downloads
./Drivername
Double check that the installation finishes with 0 errors. Otherwise you are doing it wrong and you should try downloading another version of the driver.
4: INSTALLATION - PRE CONFIGURATION OF BOTTLES
So you already have your latest driver ready to play some games! Congratulations!
Now its time to install bottles
To install: flatpak install flathub com.usebottles.bottles
Why Bottles? Why not Play On Linux? or Lutris?
After trying all of them I choose Bottles as the best option available.
The reasons.
- It is really performant.
- Comes with the latest pre-configurations available (To mention 1 of it's greatest features Bottles automatically installs you DXVK which is ultra important to run games smoothly on Linux)
- The UI is intuitive and easy to use
- It does separate properly each bottle in a private / secure environment so in case you mess up with your configurations you can easily create another bottle.
And it has a lot of more features ... Overall it is a great tool! and also I take the time to say a big THANK YOU to the Bottles Team for providing such an amazing tool.
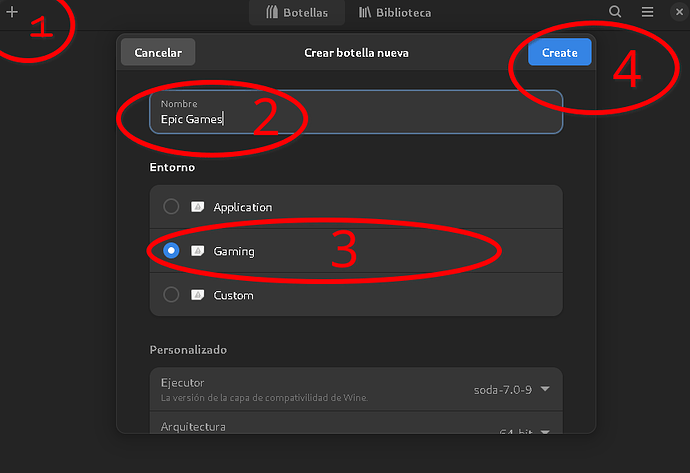
So run Bottles, create a new bottle and select the Gaming prefix
Wait until Bottles configure your new bottle!
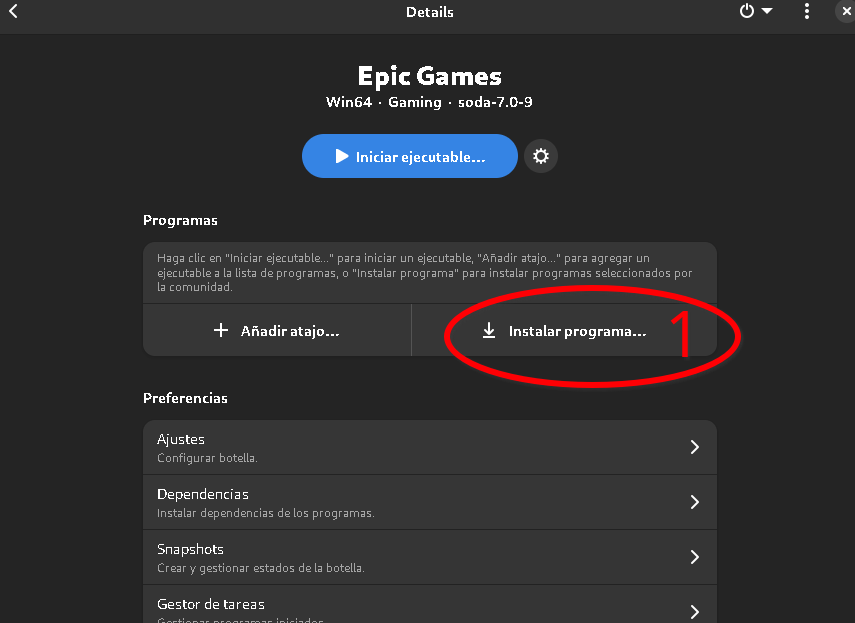
And afterwards click on Install Program
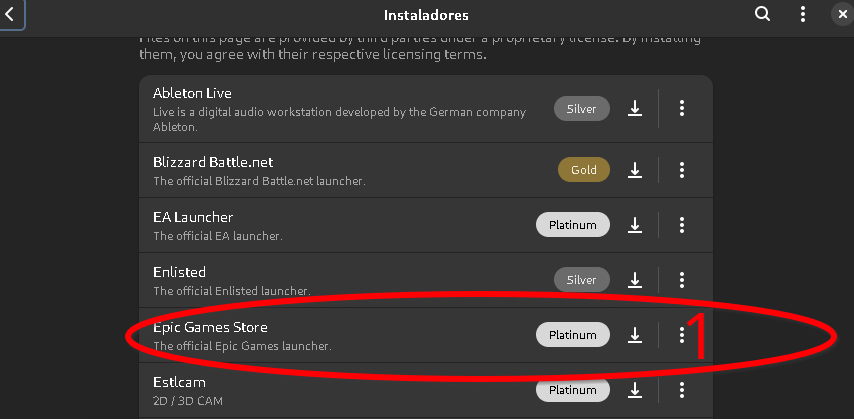
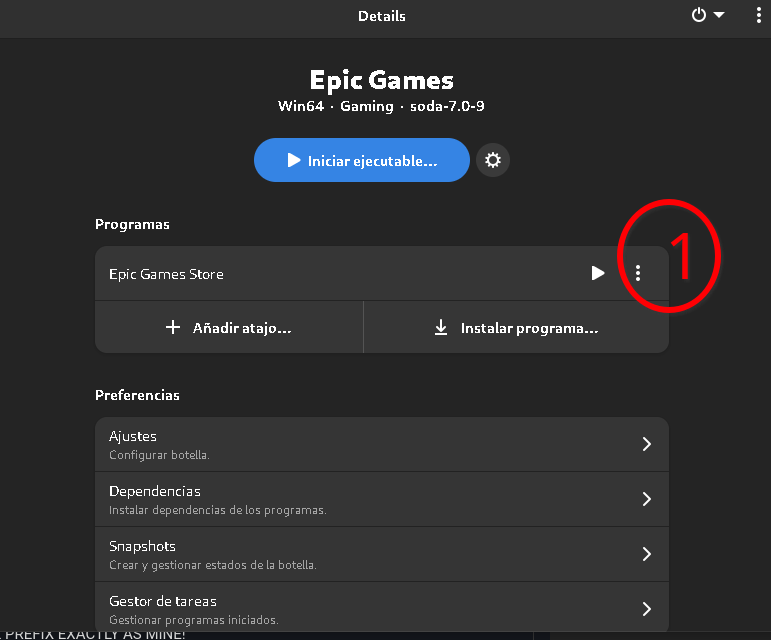
Then click on Epic Games Store To install Epic!
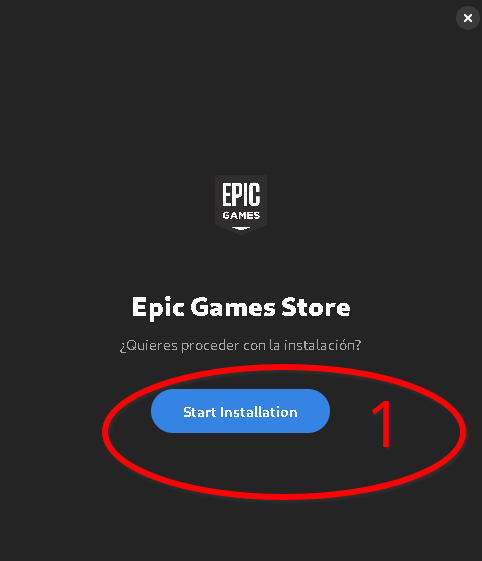
The installation menu will show up - Click on " Start Installation"
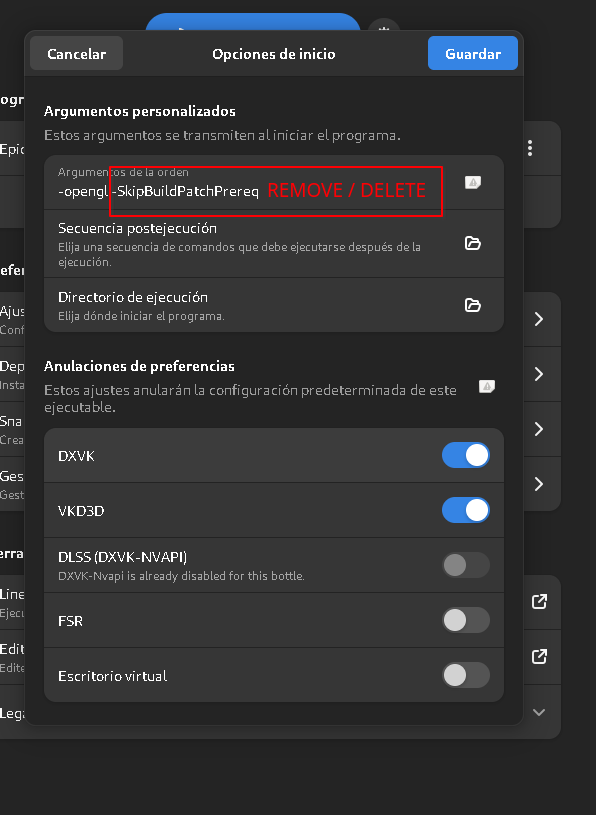
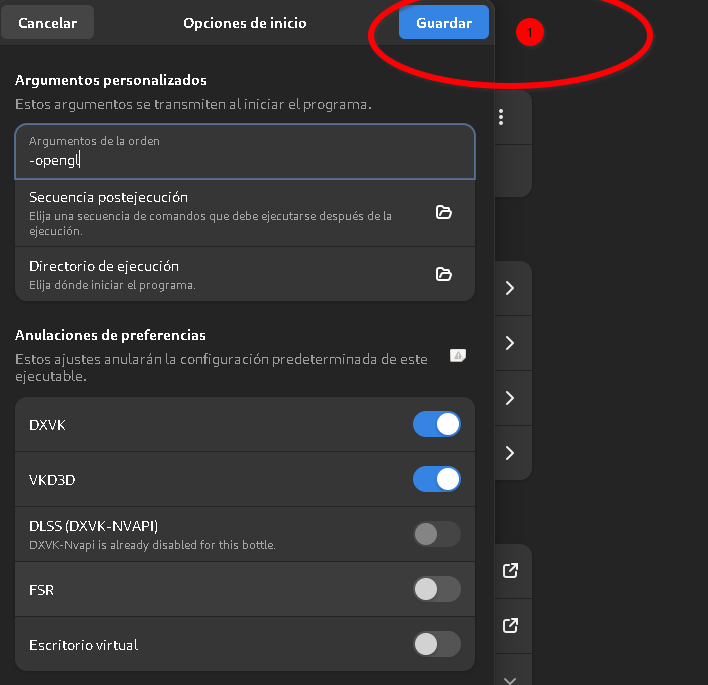
After the installation has finished - change the launching options to Epic properly updates and runs smoothly.
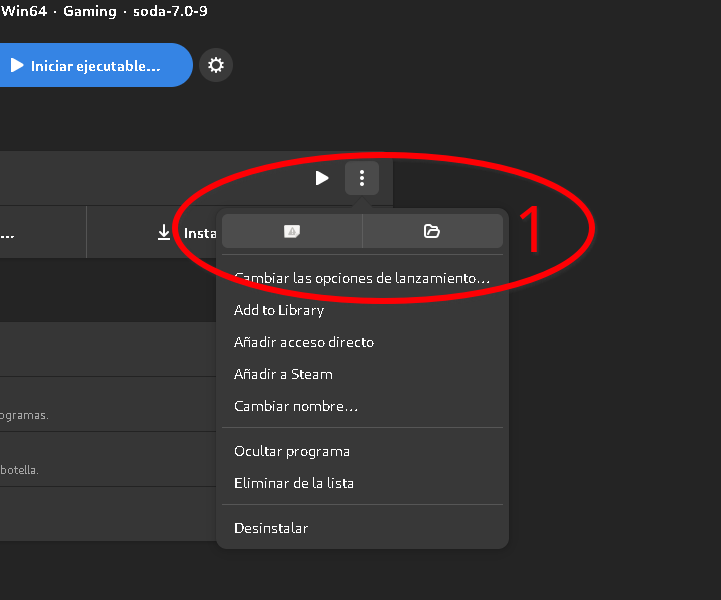
Click on the 3 dots
Click on "Change launching options"
Remove the outlined text "-SkipBuildPatchPrereq" since is not needed and we will require epic to update properly.
Click on Save
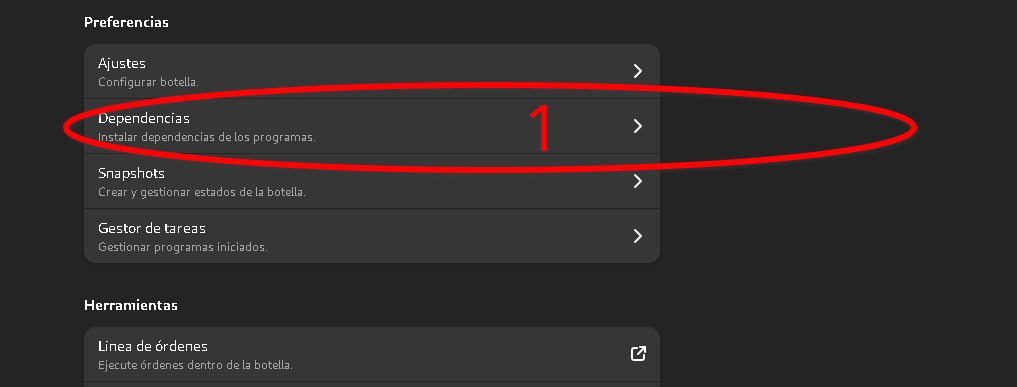
Now enter the dependencies category to install additional software needed for the bottle to run Core.
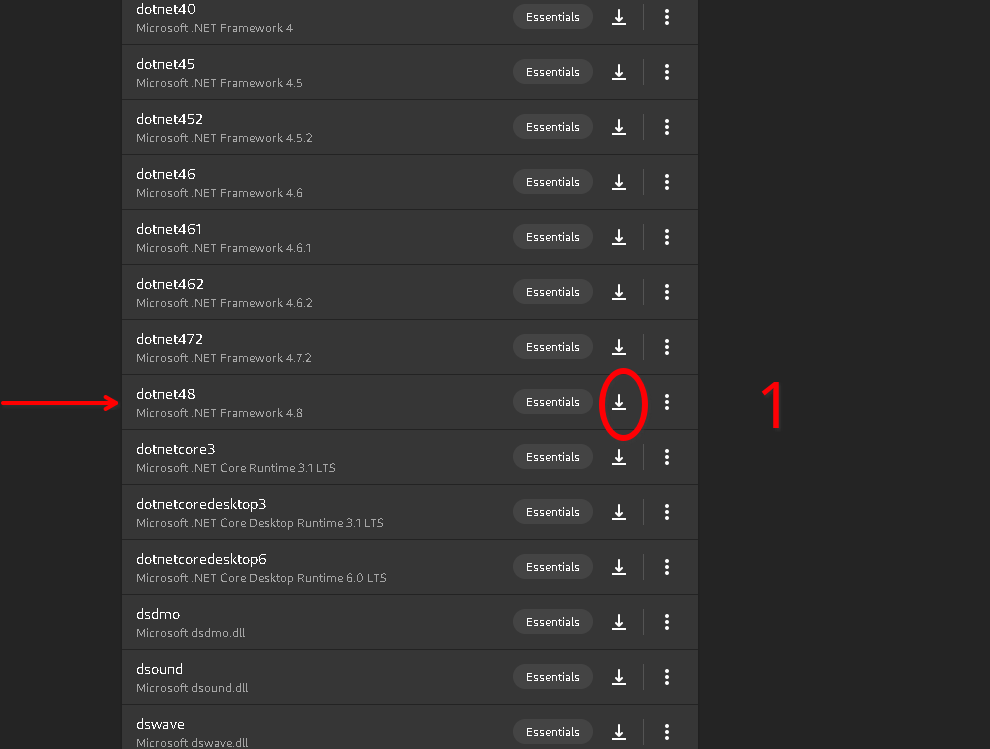
Install dotnet48 and wait until it finishes the installation (it might take a while since Bottles will download dotnet48 and afterwards install it)
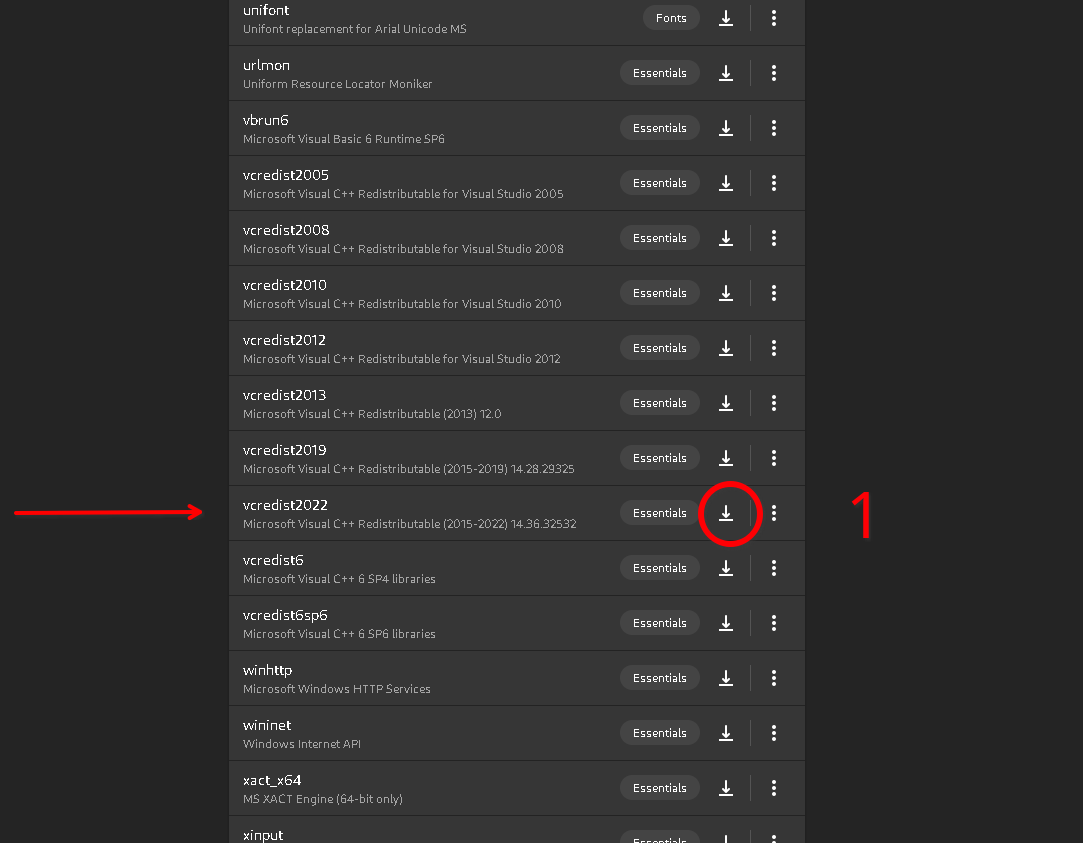
Install vcredist2022 and wait until it finishes the installation (it might take a while since Bottles will download vcredist2022 and afterwards install it)
This will allow Core to work.
Final steps: Simply launch epic and install Core as you normally would.
(Go to the library, search for Core and click on the Install button)
Launch Core and Play!
I honestly hope that after finishing this tutorial everyone will be able to install and play Core on any Linux distribution. Share your thoughts using the reply feature below!
