GUIDE TITLE: Debris Physics Epicness
ESTIMATED COMPLETION TIME: 15 Minutes
SUGGESTED:
Learn the basics about Use Debris Physics from the reference document
SCRIPTING: Low-code. Beginner friendly.
TUTORIAL SUMMARY:
Learn to setup a vehicle to be damageable by a rifle. After taking lots of damage the vehicle explodes. Use Debris Physics is leveraged to make the truck's pieces fly everywhere.
Video version of this tutorial:

SETUP
- Start from a blank project.
- Search in Core Content for "Basic Assault Rifle". Drag it to the main view to add one.
- Search in Core Content for "Advanced Car - Pickup Truck". Drag it into the game to add a copy.
If press play now, you'll notice that shooting at the truck does nothing.

Dragging objects from Core Content into the main view adds them to the game
_
DAMAGEABLE SETTINGS
- In the Hierarchy, select the truck. In the Properties view, scroll down to the "Damageable" section. Change the following properties:
- Change "Max Hit Points" and "Starting Hit Points" to 200
- Disable "Start Immortal"
- Enable "Destroy on Death"
Now, if you shoot the truck it will disappear after it takes 200 damage (about 6 shots).
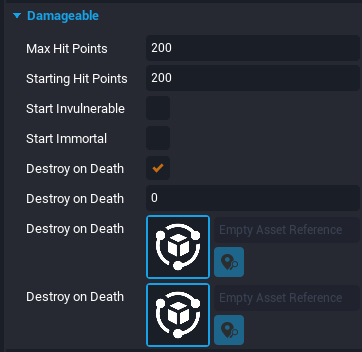
When a damageable object is selected, this category appears in the Properties view
_
EXPLOSION VFX
- In Core Content, search for "Damageable Hazard Barrel".
- Drag it into the scene to add it-- then delete it!
We do this because we don't want the barrel itself, but the extra templates that it contains. By adding it momentarily, Core imports all of its dependencies into our project. - Select the truck in the hierarchy and locate "Destroy on Death" at the bottom of the properties view.
- Double-click the icon next to "Destroy on Death" to open the template selection dialog.
- Search for "Hazard Barrel Explosion Effect" and select it.
If you play the game now, you'll see that a VFX appears when the truck is destroyed. There may also be an audio of the explosion, as VFX templates often contain sound as well.
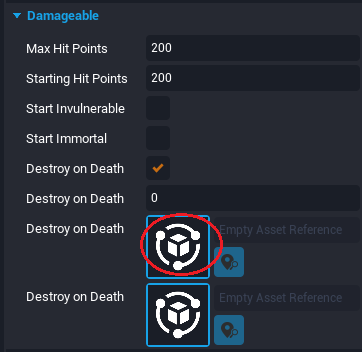
For properties that have an icon, one way to change them is by double-clicking the icon
_
DEBRIS PHYSICS
Next, we can make this effect more epic by scattering the pieces of the truck when it's destroyed, instead of it disappearing. To do this, we add two scripts to the truck, a pair of server and client scripts.
- In the hierarchy, right-click the truck and select "Deinstance This Object".
- Locate the "ServerContext" group that is a child of the truck.
- Right-click "ServerContext" and select "Create... > Create Script > Create New Script".
- Name the script "ScatterMeshOnDeathServer" or something else if you'd like.
- Still in the hierarchy, double-click the script object to open it.
- Add the following code, then close and save the script:
local DAMAGEABLE = script:FindAncestorByType("Damageable")

function OnDied(_, _)
    -- Detects the death and forwards it to clients
    Events.BroadcastToAllPlayers("Scatter"..DAMAGEABLE.id)
end
DAMAGEABLE.diedEvent:Connect(OnDied)
Now let's add the client script:
- Locate the "ClientContext" group that is a child of the truck.
- Repeat the steps from above to create a new script. Name it "ScatterMeshOnDeathClient".
- Double-click the script object to open it.
- Add the following code, then close and save the script:
local DAMAGEABLE = script:FindAncestorByType("Damageable")
local EXPLOSION_POWER = 2000
local RNG = RandomStream.New()

function OnDied()
    -- The client script receive the death event
    -- Finds all Static Meshes in the local hierarchy
    local childMeshes = script.parent:FindDescendantsByType("StaticMesh")
    -- Finds the new parent, a Client-context named "DebrisParent"
    local clientContext = World.FindObjectByName("DebrisParent")
    for _,mesh in ipairs(childMeshes) do
        -- Change parent, as we assume the old one is being destroyed
        mesh.parent = clientContext
        -- Enable debris physics
        mesh.isSimulatingDebrisPhysics = true
        -- Some Static Meshes don't support debris physics, so we must check
        if mesh.isSimulatingDebrisPhysics then
            -- Additional collision settings
            mesh.collision = Collision.FORCE_ON
            mesh.cameraCollision = Collision.FORCE_OFF
            -- Set a life span, so the mesh destroys itself after a few seconds
            mesh.lifeSpan = RNG:GetNumber(3, 5)
            -- Give a random velocity to the mesh, away from ground
            local vel = RNG:GetVector3FromCone(Vector3.UP, 90) * EXPLOSION_POWER
            mesh:SetVelocity(vel)
        else
            -- Destroy meshes immediately if they don't support debris physics
            mesh:Destroy()
        end
    end
end

Events.Connect("Scatter"..DAMAGEABLE.id, OnDied)
As you can see, most of the logic is happening on the client side because Debris Physics is a client-only operation. The server script is only responsible for detecting that the truck died and telling the clients about it. When the clients get the message, they search through the entire truck's hierarchy, locating all Static Mesh objects and enabling their Debris Physics.
The property EXPLOSION_POWER at the beginning of the script is what sends the pieces flying in all directions. The value of 2000 can be adjusted to different numbers, or even made into a custom property in case you want different gameplay objects with varying degrees of explosion.
Give it a try! The explosion should now include Debris Physics.
NOTE 1: In the Event Log you'll see errors such as
Object "Spring Coil" does not support physics.This is normal. As of this writing there is no way to detect if a Static Mesh is capable of supporting Debris Physics. We have to try with all of them. When it fails, that piece simply disappears, as it did originally.
NOTE 2: You can make the "Scatter" script more robust and future-proof, add a new client context to the root of the hierarchy and name it "DebrisParent". The script looks for this and uses it, if it exists.
_
PLAYER DAMAGE
The last thing to consider is that you may want a player who is driving the truck to take damage at the same time the truck takes damage. To accomplish this, we'll add one more server script to the truck:
- Locate the "ServerContext" group under the truck's hierarchy.
- Create a new script and name it "VehicleDamageDriver".
In this case we don't suffix the name with "_Server" because there is no corresponding "_Client" script needed, for damage to pass through to the player driving the vehicle. - Open the script.
- Add the following code, close and save it:
local VEHICLE = script:FindAncestorByType("Vehicle")
local CHANCE_TO_PASS_DAMAGE = 0.5
local DAMAGE_REDUCTION = 0.2
local ON_DEATH_DIRECT_DAMAGE_TO_DRIVER = 75

function ApplyDamageToDriver(newAmount, vehicleDamage)
    -- Create new damage object for the player
    local damage = Damage.New(newAmount)
    -- Copy properties from the vehicle's damage object
    damage.reason = vehicleDamage.reason
    damage.sourceAbility = vehicleDamage.sourceAbility
    damage.sourcePlayer = vehicleDamage.sourcePlayer
    damage:SetHitResult(vehicleDamage:GetHitResult())

    local player = VEHICLE.driver
    -- If we think the player will die from this damage, eject them and
    -- wait a bit, so they will ragdoll correctly
    if player.hitPoints <= damage.amount then
        VEHICLE:RemoveDriver()
        Task.Wait(0.15)
    end
    -- Apply it
    player:ApplyDamage(damage)
end

function OnDamaged(_, damage)
    if damage.amount <= 0 then return end
    if not Object.IsValid(VEHICLE.driver) then return end

    -- Chance to apply damage to the player or prevent it completely
    if math.random() >= CHANCE_TO_PASS_DAMAGE then return end

    -- Reduction of the original damage amount
    local newAmount = damage.amount * (1 - DAMAGE_REDUCTION)
    newAmount = math.ceil(newAmount)

    -- Apply reduced damage
    ApplyDamageToDriver(newAmount, damage)
end

function OnDied(_, damage)
    if not Object.IsValid(VEHICLE.driver) then return end

    -- Apply the on-death damage
    ApplyDamageToDriver(ON_DEATH_DIRECT_DAMAGE_TO_DRIVER, damage)
end

VEHICLE.damagedEvent:Connect(OnDamaged)
VEHICLE.diedEvent:Connect(OnDied)
Some of the properties at the beginning of the script, such as CHANCE_TO_PASS_DAMAGE can be configured to your design goals, or modified into custom properties to give vehicles in your game a range of defensive capability.
And that is one way to control Debris Physics with Lua! Make kitbash pieces fly everywhere when the object is destroyed!