Learn Scenes by Implementing a Main Menu
ESTIMATED COMPLETION TIME: 20-40 Minutes recommended
CORE VERSION: Current Version at the Date: 12/5/2021 1.0.224-prod-s
SUGGESTED PREREQUISITES: None except knowing the basics of the Editor & Basic scripting even though i will try to cover this part the best i can so in case that you have 0 knowledge in coding you will understand it.
TUTORIAL SUMMARY:
With this Tutorial you will learn how to successfully implement a Main Menu to your Games. We will use the Scenes system to achieve this. Additionally after finishing the tutorial you will completely understand what is the Scenes feature and how to use them for different purposes.
EXPECT TO LEARN:
- Create a main menu
- Create multiple Scenes
- Implement new areas to your game (PVP, Single Player, Tutorial)
- How to use scenes for multiple purposes.
- How to modify the example project to fit your needs.
- Scenes scripting.
TABLE OF CONTENTS
1: Introduction
2: Server Side Code / Functionality
3: User Interface / Art
END PRODUCT VISUALS:
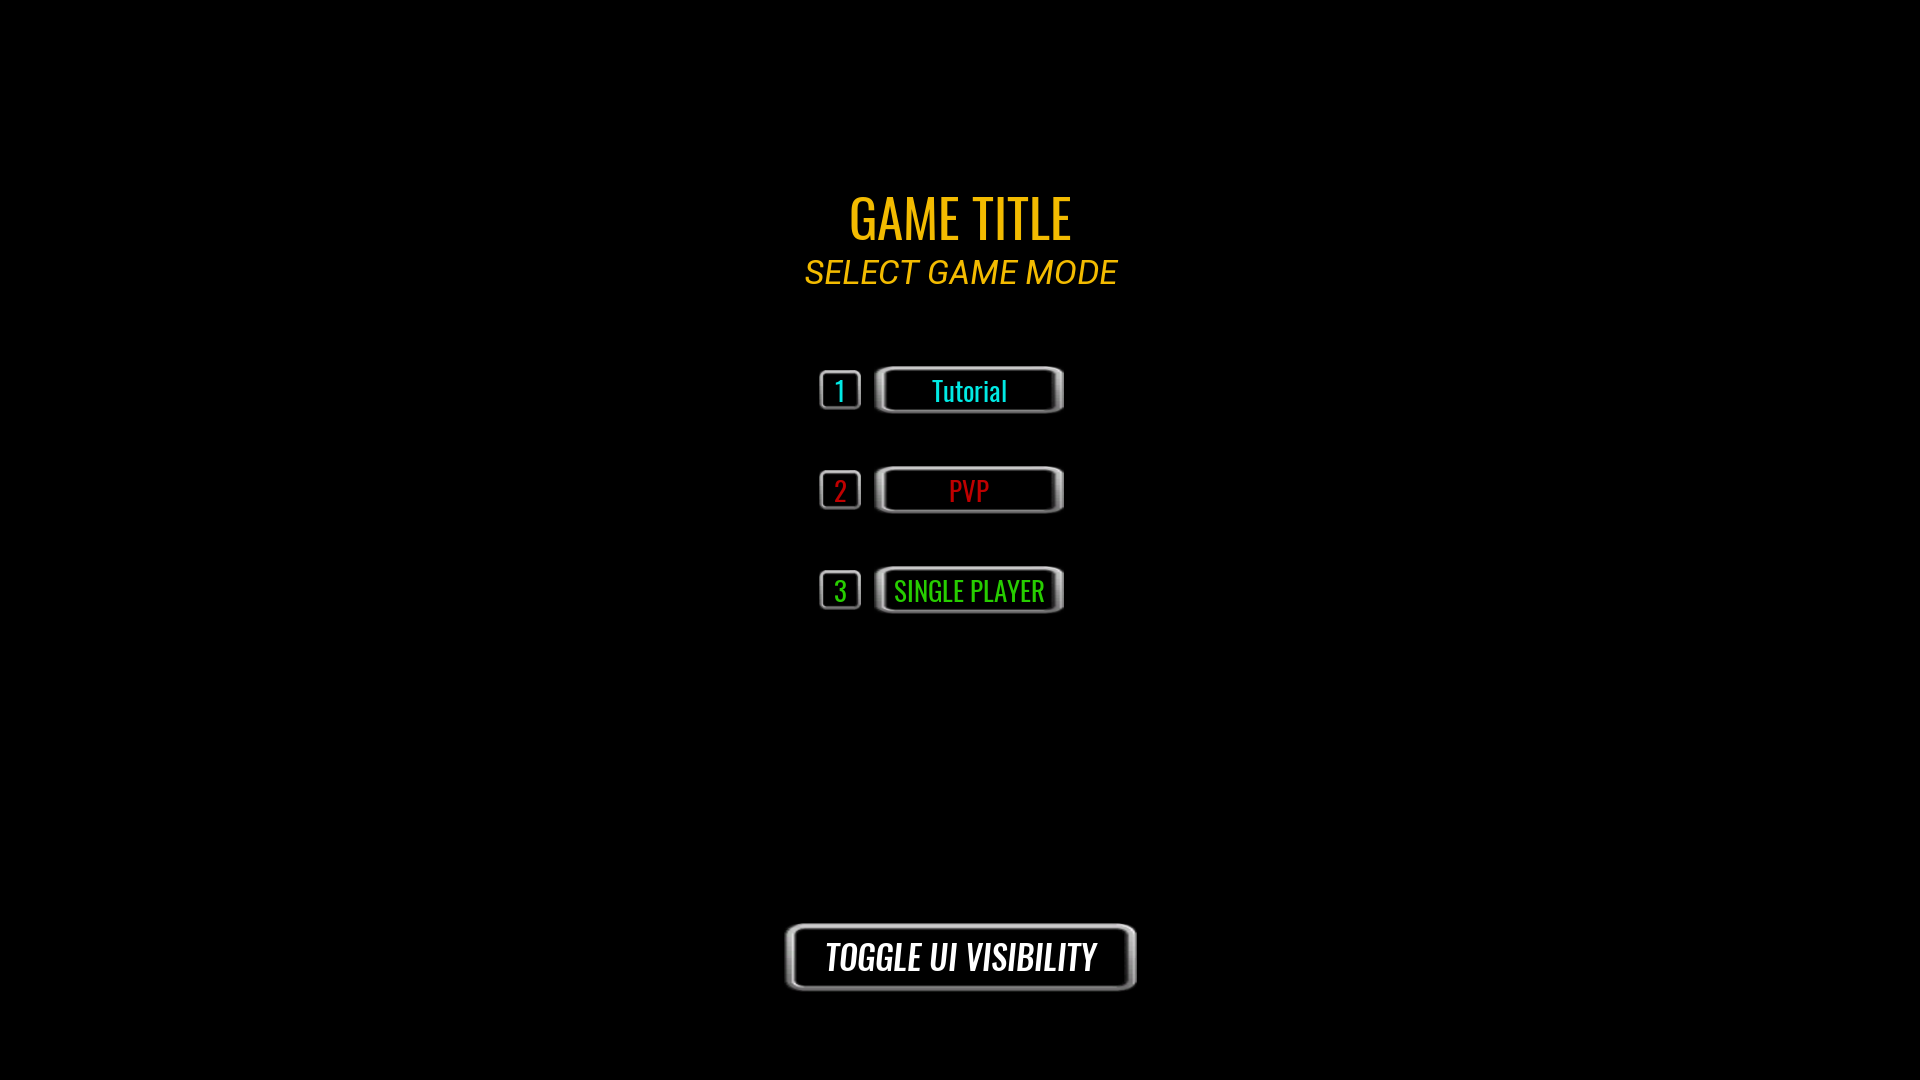
- Scenes is a new feature implemented by Core not so long ago. This tutorial is aimed to teach anyone how to use it, providing as an example a really common thing seen in all video games known as Main Menu / Title Screen.
[ 1]
TUTORIAL:
Before starting. Play it! Scenes Example by LumenDev - Core Games So you see how it works.
Prelude: I must explain to you what a scene is: A scene is another part of your game, as simple as that. You can in fact, develop 1 game in 1 scene and develop a whole different game in scene 2, for example. Which is not recommendable, unless your game is something similar like mario party for example (So each scene could be 1 different minigame) and it does contain certain limits that must be taken into consideration before starting to develop any thing.

Enough Prelude! Let's get started!
1: Download the sample project first.
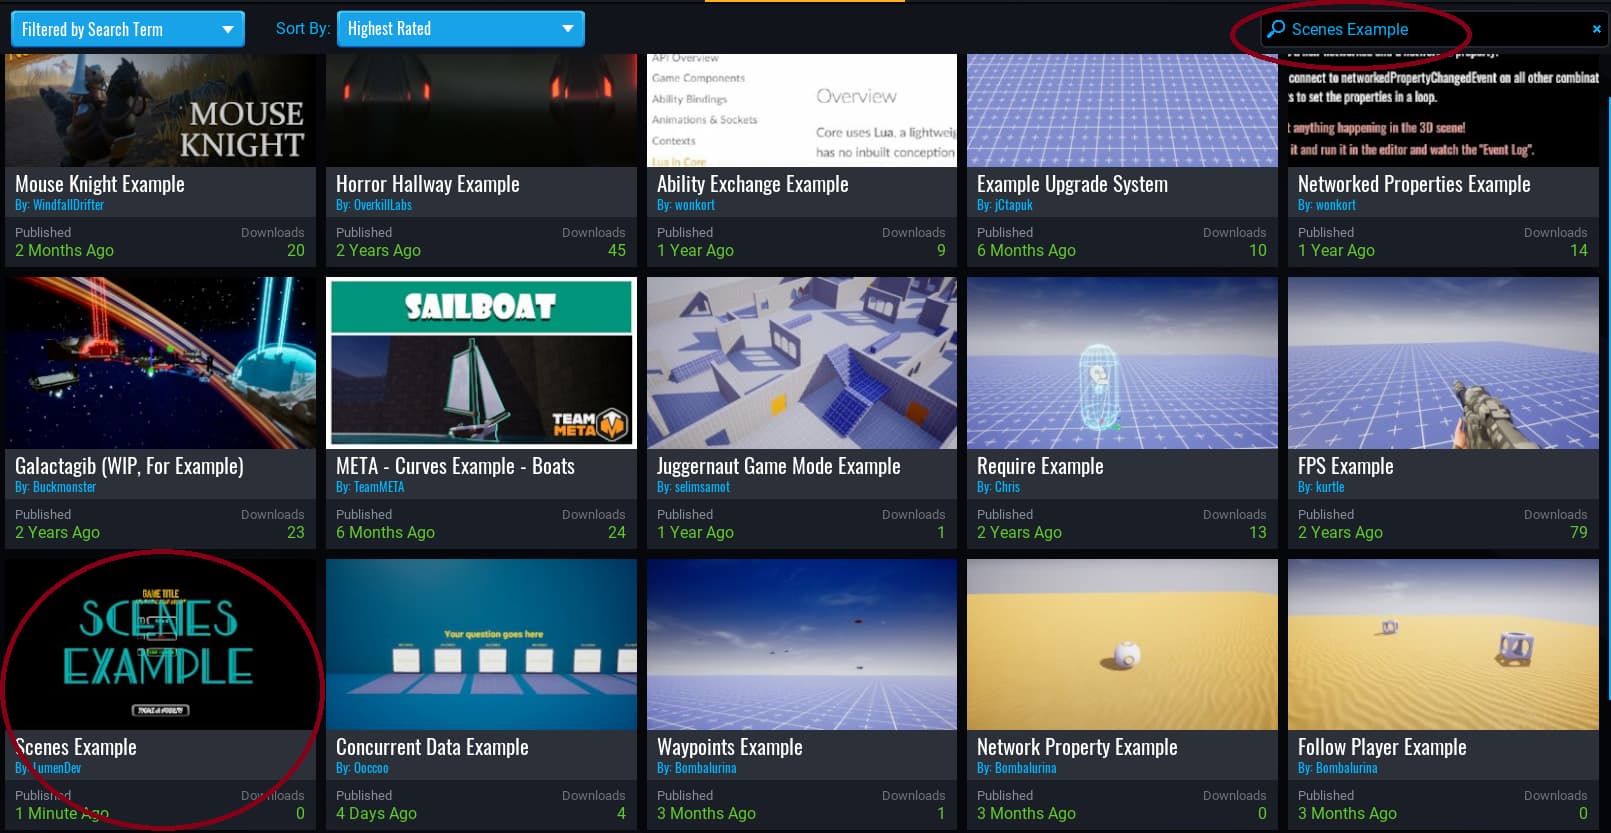
Now that you have downloaded the sample project you will see these 2 main templates

- Basic Scenes Swapper
- Basic Scenes Swapper LOCKED
Explanation about the Templates Provided: These 2 templates contain basically the whole system and they are basically the same, except for 1 thing. the LOCKED one is used for the Main scene. And is named "LOCKED" for a reason... meaning you are locked in the main scene. Forcing your players to select what they want to play pretty similar as any video game that has touched this land... "single player, multiplayer, options, settings, exit game" those are commonly and frequently used in any video game out there & Basic Scenes Swapper is literally the same as the LOCKED one but without locking you, it does contain the feature to press "f" and hide / show the system making anyone able to play.
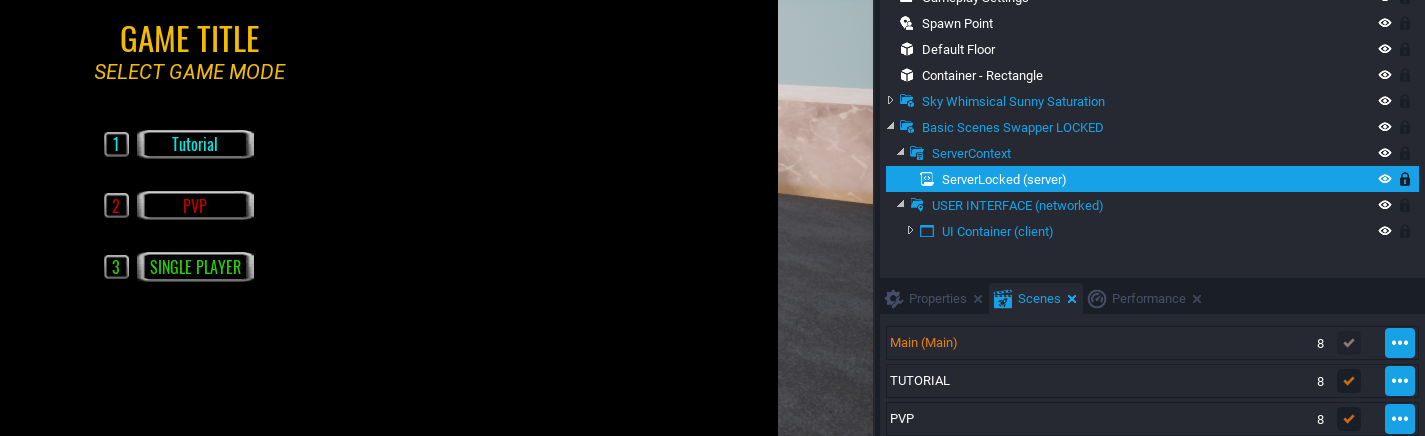
So we are using "Basic Scenes Swapper LOCKED" only on the MAIN scene, the rest scenes use the other template "Basic Scenes Swapper" As shown in the image below.
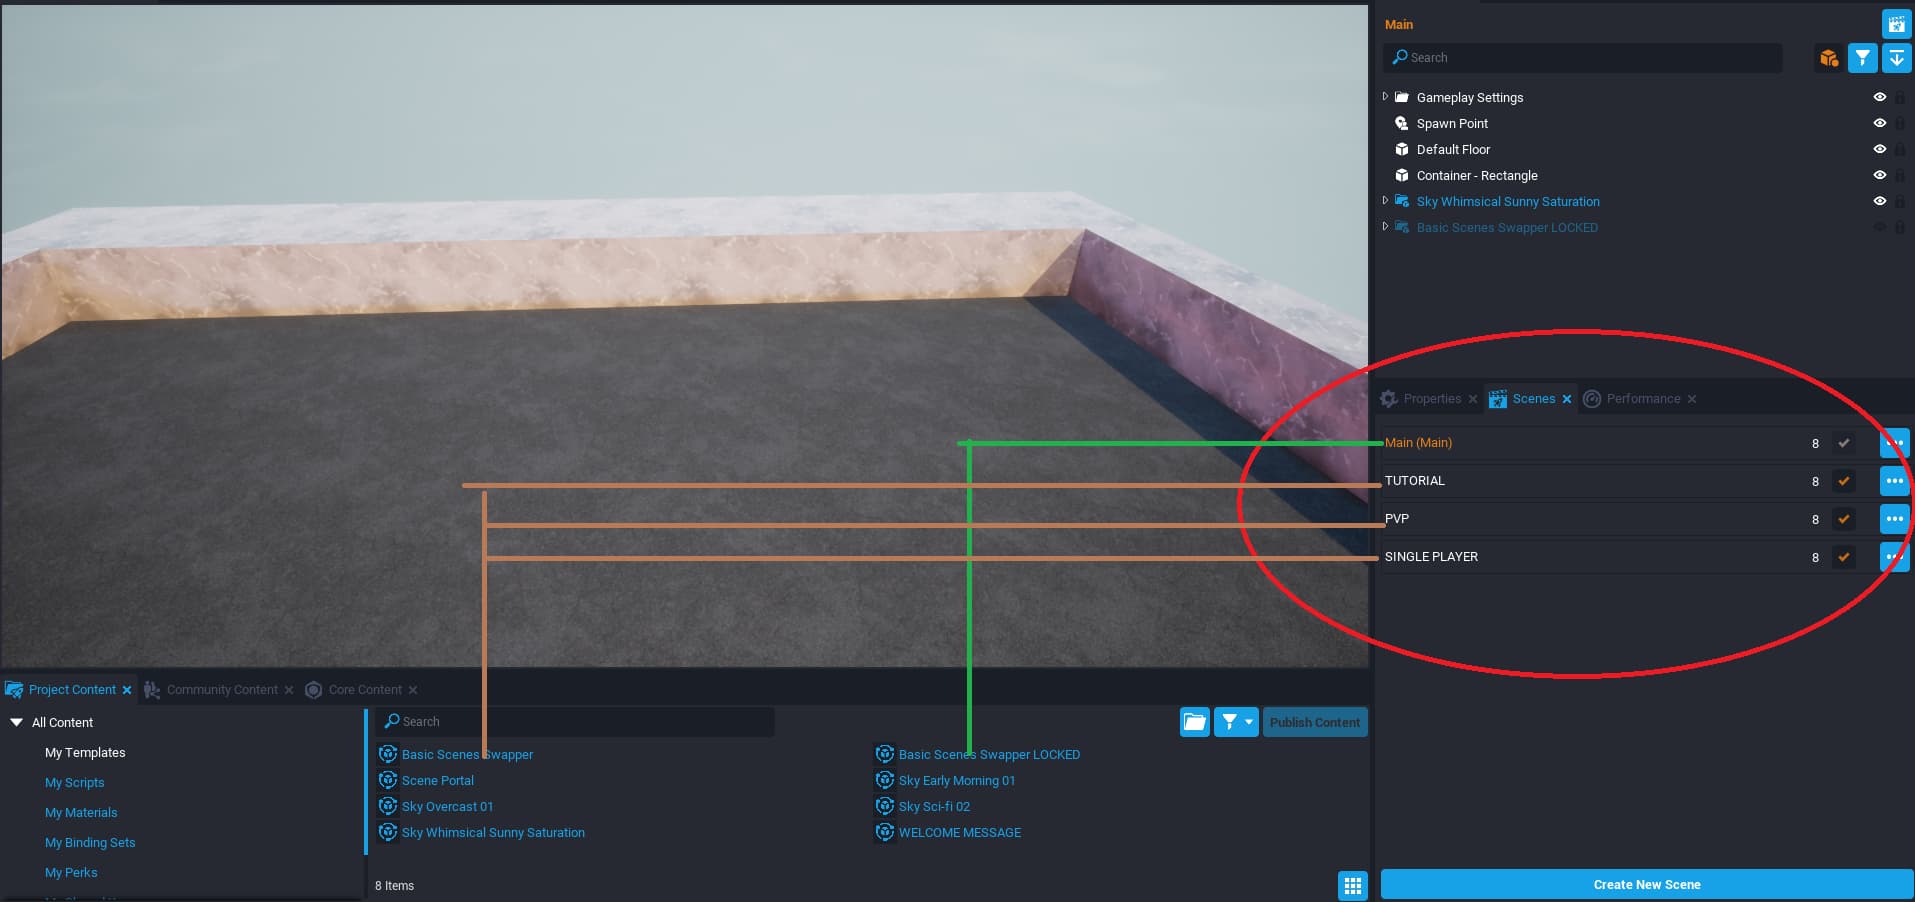
- The scenes can be named as you want, in this specific case i named them, "TUTORIAL" "PVP" & "SINGLE PLAYER"
- You can create up to 64 scenes as a maximum allowed by Core.
- Scenes Names are referenced as
"strings"for the LUA editor.
So if you feel like "TUTORIAL" "PVP" & "SINGLE PLAYER" is not enough for you, or does not fit the needs of your game, then you can create a new Scene, by simply clicking on that big blue button literally saying "Create New Scene" and name it as you want. I recommend that you stop a little and think what do you need ? a Dungeon? (Make that scene!) A secondary Game Mode? (Make it as well!!) An easter egg scene? (you can make it also!!) A lobby area? and so on... any of these examples can be Scenes. So sticking with the sample I provided, I tried to focus on the 3 main things anyone wants for their games. The main one is a TUTORIAL, so your players know how to actually play... the second one is the PVP (in case your game supports PVP) and the third one is another game mode! SINGLE PLAYER. So i do really hope these 3 examples are enough to give you a global idea of how you can implement the scenes system into your game. In the end it will depend on you and on your game. Is valid also having a game with only 1 scene or with 64, again it will depend on you and your project needs. Here are some great ideas that could be implemented as scenes.
- Dungeons
- Special Events / Easter Eggs
- Additional Game Modes
- A single player game using each scene as each level.
- A jail/ban mechanic (in case someone is misbehaving inside your game send them to the jail!)
And I could continue giving more ideas but we must continue with the lessons on the sample project...
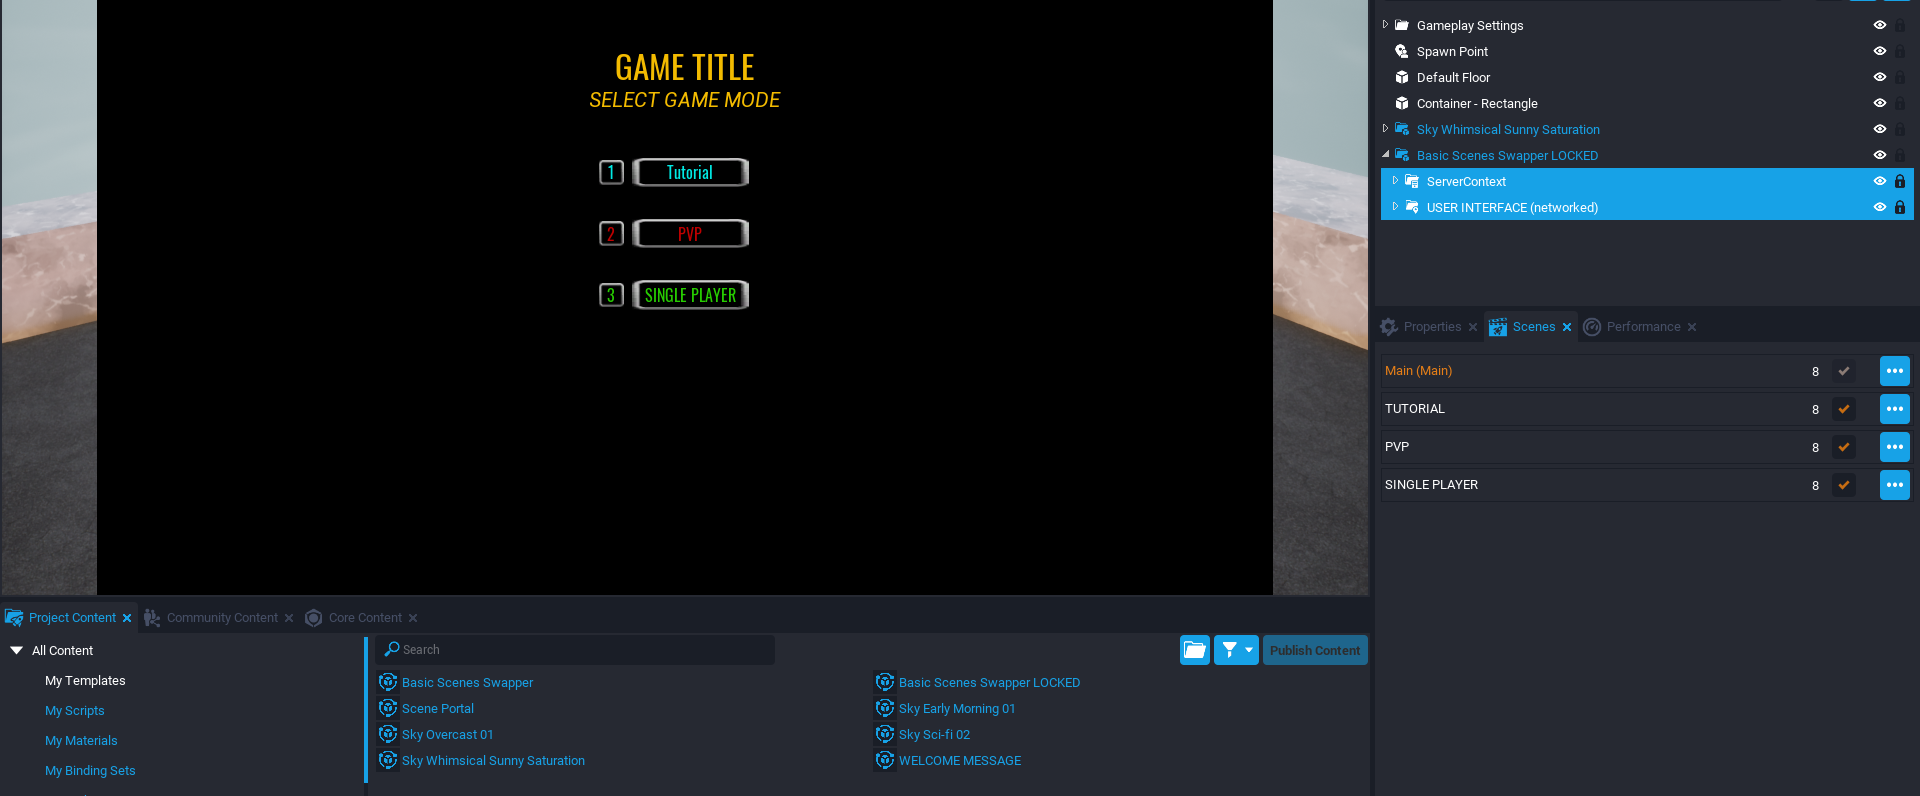
- Server Context
- USER INTERFACE
Those are the Main Folders that work in conjunction to grant the final experience of having a Main Menu.
The Server Context: Contains "simply" 1 script that handles the interactions of the player. (is the functionality)
USER INTERFACE: Contains... well it's pretty obvious... the art... and not only that!... In this case of the user interface the UI buttons contains as a child a script that makes the animation of the UI work! (This does suggest which bindings to press in order to change between scenes) we will see this later on.
First we will see the Script, how it works? how does it actually make us go to another scene after pressing a certain key binding? Why am I facing a level 99 boss inside a dungeon? We will answer all of these questions now.
[ 2]
SERVER SCRIPT / FUNCTIONALITY OF THE PROVIDED SYSTEM.
Double click on the ServerLocked Script in order to open it.
--YOU WILL SEE SOMETHING LIKE THIS.
--[[ SCENES BASIC CONTROLLER LOCKED
             BY
          LUMENDEV          ]]--


--local ROOT = script:GetCustomProperty("ROOT"):WaitForObject() -- " ANYTHING COMMENTED IN GREY/GREEN IS NOT BEING USED"
local controller=script
--------------------------------------------------------------------------
local propDestinationScene1 = script:GetCustomProperty("DestinationScene1")--> NAME MANUALLY WRITTEN OF OUR DESIRED SCENE
local propDestinationScene2 = script:GetCustomProperty("DestinationScene2")--> SAME CODE, BUT IS THE SECOND DESIRED SCENE
local propDestinationScene3 = script:GetCustomProperty("DestinationScene3")--> SAME CODE, BUT IS THE THIRD  DESIRED SCENE
--> WE COULD ADD HERE AS MANY SCENES AS WE WANT!!!!!!!!!!!!!!!!

local Binding1 = "ability_extra_1" --> NUMBER [1]
local Binding2 = "ability_extra_2" --> NUMBER [2]
local Binding3 = "ability_extra_3" --> NUMBER [3]
--> We could also add more Bindings!! and change them accordingly to your needs...

local Binding4 = "ability_extra_4" --> NUMBER [4]
local Binding5 = "ability_extra_5" --> NUMBER [5]


function OnBindingPressed(player, bindingPressed)


if bindingPressed == Binding1 then
	print("I'M TRANSFERING " .. player.name .. " TO THE TUTORIAL ".. bindingPressed)
player:TransferToScene(propDestinationScene1)-->THE TUTORIAL SCENE


elseif bindingPressed == Binding2 then
	print("I'M TRANSFERING ".. player.name .. " TO THE PVP AREA ".. bindingPressed)
player:TransferToScene(propDestinationScene2)-->THE PVP SCENE


elseif bindingPressed == Binding3 then
	print("I'M TRANSFERING " .. player.name .. " TO SINGLEPLAYER MODE " .. bindingPressed)
player:TransferToScene(propDestinationScene3)-->THE SINGLE PLAYER SCENE


elseif bindingPressed == Binding4 then --"Binding has changed, note how is called Binding4"
	print("I'M TRANSFERING " .. player.name .. " TO ADDITIONAL MODE " .. bindingPressed)
player:TransferToScene(propDestinationScene4)-->THE ADDITIONAL SCENE
                                             --propDestinationScene has changed too now is propDestinationScene4

elseif bindingPressed == Binding5 then --"Binding has changed, note how is called Binding5"
	print("I'M TRANSFERING " .. player.name .. " TO ADDITIONAL MODE " .. bindingPressed)
player:TransferToScene(propDestinationScene5)-->THE ADDITIONAL SCENE
                                             ----propDestinationScene has changed too now is propDestinationScene5


  end
end
-----------------------[NOT IN USE]--------------------------------------------------------------------------------
---------------------[LOCKED VERSION]------------------------------------------------------------------------------
-------------------------------------------------------------------------------------------------------------------
--[[
local FTheKeyF="ability_extra_33"
function OnBinding_F(player, bindingPressed)

if bindingPressed == FTheKeyF and ROOT.visibility==Visibility.FORCE_ON then
ROOT.visibility = Visibility.FORCE_OFF --> UI VISIBILITY TURNED OFF
elseif bindingPressed == FTheKeyF and ROOT.visibility==Visibility.FORCE_OFF then
ROOT.visibility = Visibility.FORCE_ON --> UI VISIBILITY TURNED ON

 end
end
--]]
-------------------------------------------------------------------------------------------------------------------

function OnPlayerJoined(player)
print "WELCOME TO THE SCENES SAMPLE PROJECT!"
player.bindingPressedEvent:Connect(OnBindingPressed)
--player.bindingPressedEvent:Connect(OnBinding_F)
end
Game.playerJoinedEvent:Connect(OnPlayerJoined)
That program is making the scenes changing a working reality. Even though it looks kinda scary (especially if you have not done any kind of coding before in your life) it is not that scary... and not that hard to modify!
--local variables / Each variable represent 1 Scene.
local propDestinationScene1 = script:GetCustomProperty("DestinationScene1")--> NAME MANUALLY WRITTEN OF OUR DESIRED SCENE
local propDestinationScene2 = script:GetCustomProperty("DestinationScene2")--> SAME CODE, BUT IS THE SECOND DESIRED SCENE
local propDestinationScene3 = script:GetCustomProperty("DestinationScene3")--> SAME CODE, BUT IS THE THIRD  DESIRED SCENE
--[We are going to add this one in the next steps]--
local propDestinationScene4 = script:GetCustomProperty("DestinationScene4")--> SAME CODE, BUT IS THE FOURTH DESIRED SCENE
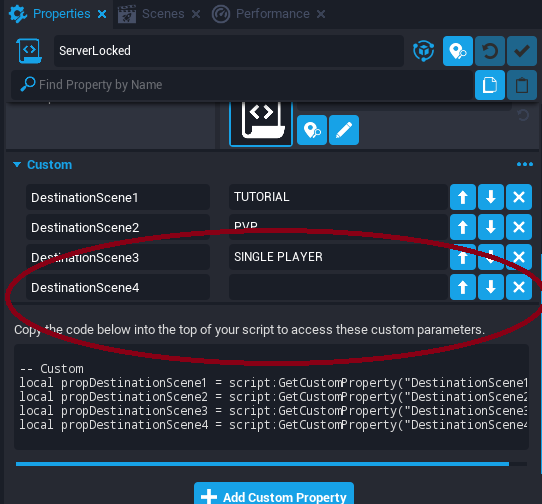
This part is the main one, you can simply add more scenes by simply copy & pasting all of those lines of code by adding 1 additional number at the end of each propDestinationScene
By example: propDestinationScene1 propDestinationScene2 propDestinationScene3 propDestinationScene4 and so on... propDestinationScene#99999999
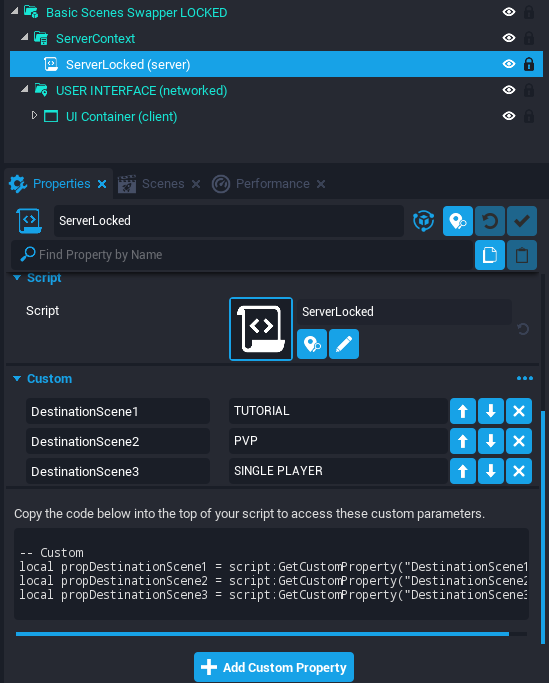
Each added
local propDestinationScene1 = script:GetCustomProperty("DestinationScene1")
will be seen in the editor as shown in the image above.
Where DestinationScene1 in this particular case is "TUTORIAL"
DestinationScene2 in this particular case is "PVP"
DestinationScene3 in this particular case is "SINGLE PLAYER"
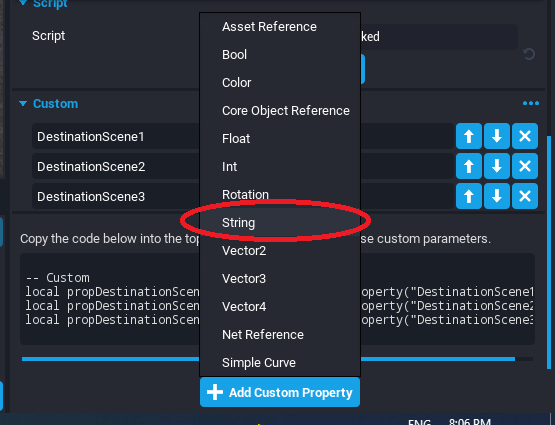
So you can add more, as many as you want by simply click on that big blue button named "Add Custom Property" and select the "String" one. as shown in the image below.
After that, name it as shown in the image below so it does match your line of code!
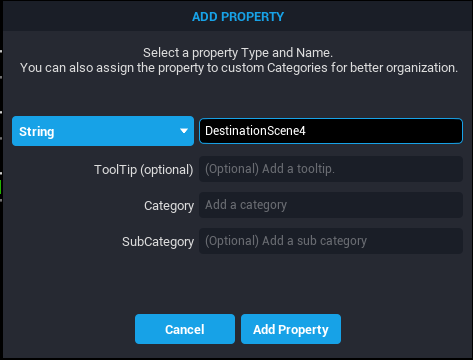
And click on "Add Property"
Now you can name that new DestinationScene4 as you want. it could be anything like "Dungeon" and it will work.
Repeat these steps as many times as you want per scene if you want to add 20 scenes referenced to the code and load them as local variables as we just did!
After adding as many scenes you have to add additional Bindings for each additional scene you might need. In this example I added 2 additional bindings ( 4 and 5) .
    local Binding4 = "ability_extra_4"
    local Binding5 = "ability_extra_5"
The same logic applies for the code that does the trick : add 2 additional
elseif --Statements.
as shown in the commented code below.
elseif bindingPressed == Binding4 then --"Binding has changed, note how is called Binding4"
	print("I'M TRANSFERING " .. player.name .. " TO ADDITIONAL MODE " .. bindingPressed)
player:TransferToScene(propDestinationScene4)-->THE ADDITIONAL SCENE
                                             --propDestinationScene has changed too now is propDestinationScene4

elseif bindingPressed == Binding5 then --"Binding has changed, note how is called Binding5"
	print("I'M TRANSFERING " .. player.name .. " TO ADDITIONAL MODE " .. bindingPressed)
player:TransferToScene(propDestinationScene5)-->THE ADDITIONAL SCENE
                                             ----propDestinationScene has changed too now is propDestinationScene5
So in a few words.
Per every additional scene (in case 3 scenes is not enough for your project) you have to add an additional keybinding and an additional elseif statement inside the function!
And that's it! no further modifications has to be done to your server script, unless you might want to add additional functions or modify the script in a way to behave differently (if that is the case, go ahead and do it!) i did provide this script as an example or guide even though is not an advanced one it might be difficult for newtimers in coding to understand what i just explained, if you are really new at coding and if you at this point didn't understand how to add new scenes into this small script i do recommend you 2 things 1: Read the whole thing again, step by step, with patience and even if after reading it once again is not clear enough then i'll recommend you to go check the basic scripting tutorials in the forums! They are great materials to learn the basics. But this is not an advanced thing and I truly believe I explained it well enough so anyone can understand it!
Ok at this point we are done with the Server side Script. Meaning you should be able to add as many scenes as you want into the provided system.
So it is time to learn how to modify the UI Provided.
[ 3]
USER INTERFACE
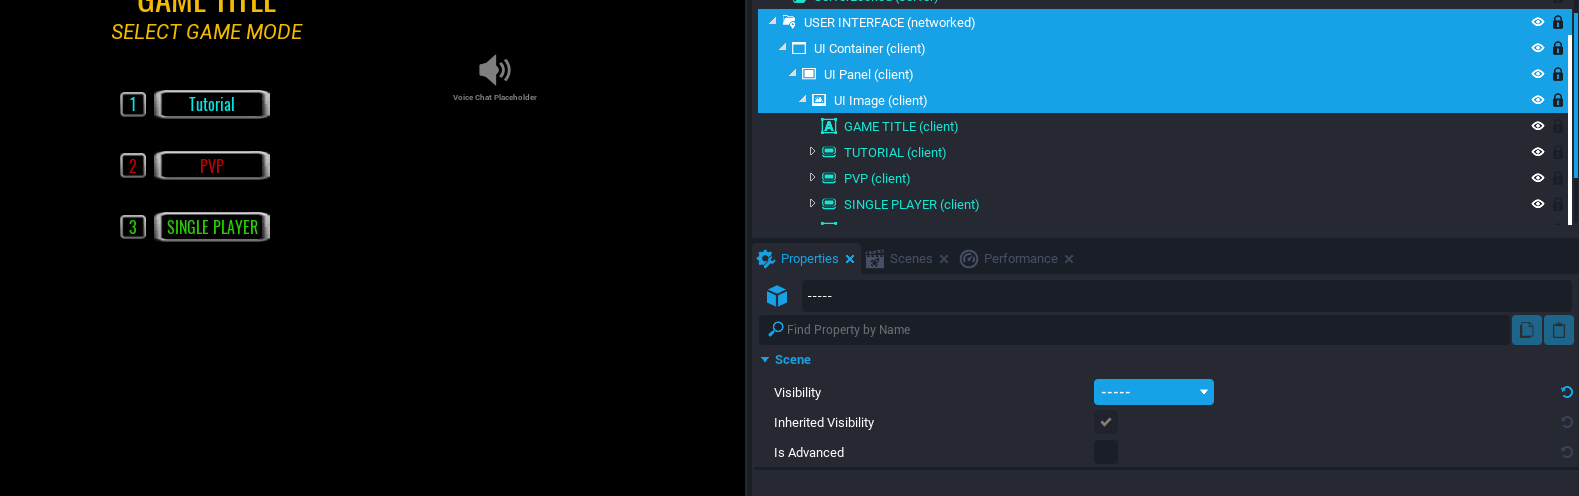
--USER INTERFACE ( client context folder)
---UI Container
-----UI Panel
-------UI Image.
In order to create any kind of UI you have to first place the container... then the panel... and after the panel... any kind of object you want as siblings of each other. As shown in the image above .
Order is crucially important in the code and in the hierarchy, if your order fails... you won't see your UI object displayed on your screen viewport.
-
UI Image is just a black screen, adjusted the pixels to fit any conventional monitor 1920 x 1080
-
Game title is just a UI Text, adjusted at the center of the screen and manually adjusted the height (Remember that you probably want to change the colors of it, and overwrite GAME TITLE with your actual title of your game!! )
-
TUTORIAL,PVP AND SINGLE PLAYER are just a UI buttons (not being used, actually, since our code works differently, it does calls directly to the key bindings we tell it to work on, so these buttons are merely artistic and do not affect our script functionality)
-
1, 2, 3 Are just decorative UI buttons as well, they do exist to put emphasis on which key binding to press.
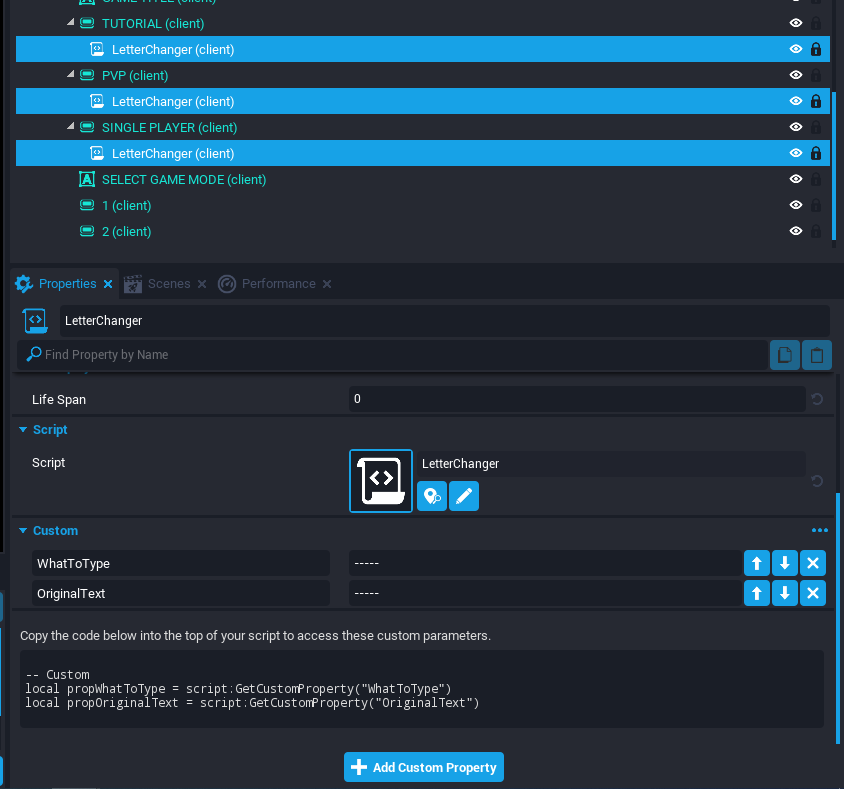
- LetterChanger is a small yet powerful script I made, it is in charge of the animation of the changing letters meanwhile you are on the main screen. The custom properties "WhatToType" and "OriginalText" must be typed manually, both custom properties are strings.
Open that file, it is time for you to learn how it works. (you know how already, double click on it or simply click on the pen)
local Object=script.parent --The object our script has to access (more specifically the UI OBJECT)
local propWhatToType = script:GetCustomProperty("WhatToType") -- Our manually typed string
local propOriginalText = script:GetCustomProperty("OriginalText") -- Another Manually typed string on the Custom propertys


function Tick(deltatime) -- Main function, it does a TICK every frame
  Object.text = propOriginalText --Here we are overwriting the text of the object, to our string "Original Text"
  Task.Wait(1.2) --Here we set the amount of time we want it to stop... so it does not become really flashy/annoying.
  Object.text = propWhatToType --Again another overwriting for the text but this time, it will write for us what we typed on
  Task.Wait(1) --Again, amount of time the animation will display our desired text                      --WhatToType string.
end
Read every commented line of code is not a super big script either. But it does work, and even though it is a basic animation it looks great!
You can change the amount of time of the words being displayed by changing the numbers inside every Task.Wait() function.
The script has as a first line of code the object being referenced as the script parent! so that means we can use that script with infinite kinds of objects without having to manually referencing them! the only thing we have to do is simply put that script as a child of each UI object we want its letters to change in real time, and type different text according our needs inside "WhatToType" and "OriginalText" string custom properties.
CONGRATULATIONS!
You have Finished The tutorial!! At this point you should be able to modify the UI and the Server side script, as well as adding more scenes to fit the needs of your project! Allowing you to implement a Great Main Menu into your project.
Additionally i will dedicate this final space of the tutorial to talk about the versatility of the Scenes System that core provided to us.
As I previously mentioned, an Scene could transform or be literally anything we want. So be clever! and before implementing new scenes, think about it, give yourself a moment and ask you this question What kind of new scenes do my game need? it could be an additional level... a completely new game mode. or simply the part 2 of your game/current main scene. The use might depend on your actual needs, this means you don't have to forcefully implement new game modes either. And finally I will leave you some tips and tricks before finishing.
Tips & Tricks
- Don't stick with this exact same prototype as the only way to implement scenes. ( If you are a coder, play around with it! you could also transfer players after a certain event happened! for example, after defeating a final boss!)
- Be creative! UI is not the only way to interact in a video game, actually Manticore provided a big 3D portal with a trigger on it as a great way to teleport into another scenes! if you feel like a 3D environment is better for you, use that instead!
- This prototype I provided can be improved and modified to fit your needs, i did it generic on purpose so any creator can implement it and improve it / add its personal touch! (You can reference the Ui to a different key bindings for example, instead of F, another thing like F1,F2,F3. Less common key bindings, also check the bindings list!! Key Binding List - Core Documentation )
- Remember that Scenes are only strings !
- The main line of code that does the trick of transfering the players is this one!
player:TransferToScene("SCENE NAME GOES HERE") - Additionally you can transfer all your players into any desired scene as this example shows
local bossKilled = true
-- Since this is a sample code, it is assuming the boss has always been killed.
-- If you want to implement something like this, reference what is a boss properly.
-- If bossKilled is true, after 10 seconds transfer all players
-- to the Lobby scene.

if bossKilled then
    Task.Spawn(function()
        Game.TransferAllPlayersToScene("Lobby")
    end, 10)
  end
end
--Note: This script will always be TRUE, since no boss is being referenced on it.
--Created for merely educational purposes.
- The line of code that will transfer all players is
Game.TransferAllPlayersToScene("THE NAME OF YOUR SCENE GOES HERE")You can set the parameters via scripting to fit your needs, it could be after defeating a final boss, or after reaching certain amount of kills or after entering one area, so 1 player won the game meanwhile the other 3 where dead spectating in the hope the cooperative friend won! and grant a victory for the 4 players and transfer those 4 after that. (The possibilities are endless , remember! be creative! )
And finally... i do really hope this Tutorial is useful for all kinds of creators out there if you are not a coder but you did understand how to use this sample project, feel free to modify it and implement it into your game, just change the bindings to something less common F1,F2,F3 Could work since literally no one uses those keys for playing purposes, that translates into avoiding the error of a player being transferred into another scene by mistake. Also if you have any questions! leave a comment! I'm not always active on the forums but sooner or later I will answer you in case you need help regarding this matter.