GUIDE TITLE: Audio Properties & Kitbashing
ESTIMATED COMPLETION TIME: 15-20 Minutes recommended
CORE VERSION: 1.0.226-prod-s
TUTORIAL SUMMARY:
In this tutorial, we will learn what each setting on an audio object does, how to use these settings effectively as well as how to 'kitbash' audio in Core and the various ways to play it.
EXPECT TO LEARN:
Different types of Audio in Core
Audio properties and their meaning
Audio Kitbashing
Ways to play audio
Accessing Audio
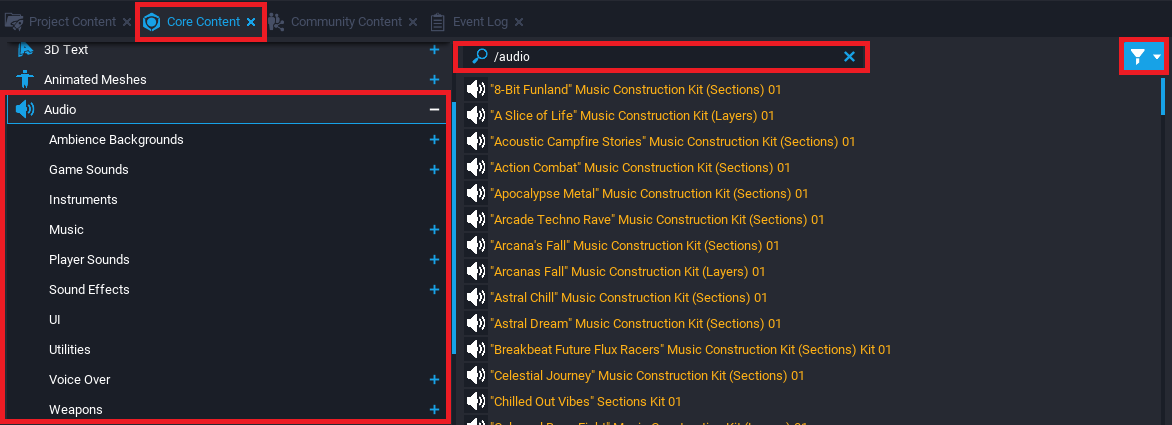
Core provided us with many different types of audio which can be accessed by going into Core Content and selecting Audio from the list or by filtering for audio by typing "/audio" in the search bar. Alternatively you can also filter by clicking the filter icon to the right hand side of the search bar.
The Screenshot below shows how audio can be accessed inside of Core.
Types of Audio
There are a few different types of audio which we can use depending on our needs, lets go over some of them.
Music:-
Sections vs Layers
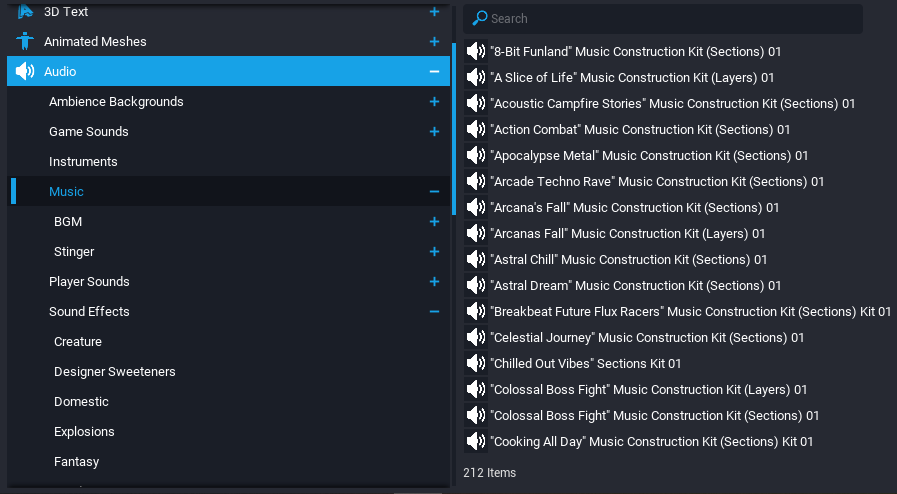
Sections - Think of sections like a certain part of the song for example the verse or chorus or the bridge section. Any audio file with (Sections) at the end allows you to choose which part of the song should play. Lets try an example.
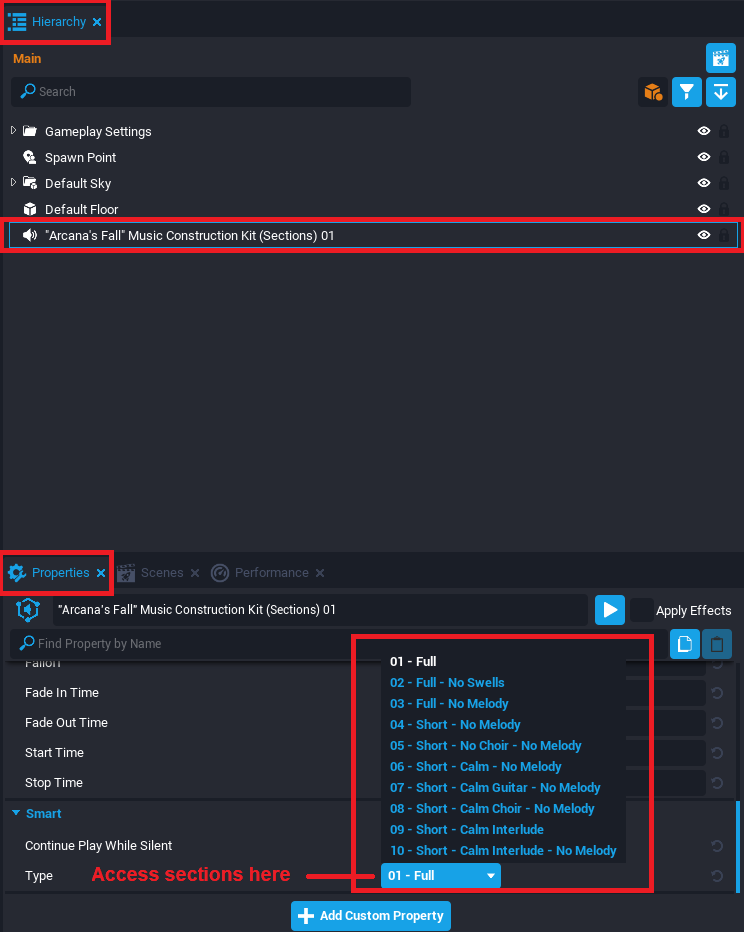
Drag any music with (Sections) tag out into the hierarchy, select it and scroll all the way down in its properties and click the Type button to see all the different sections the audio file contains. Select and audition different sections of the audio by clicking the Play button. Any selected section will be the one that gets used for your game.
Layers - Layers on the other hand give you access to each individual instrument used within an audio file. This allows creators to adjust the volume of all the instruments and even mute certain instruments should they choose to. Another advantage of layers is by using Lua, creators are able to increase or decrease the volume of certain layers depending on the intensity of the gameplay to make the audio feel dynamic!
The screenshot below shows the same music used earlier but this time using the Layers type which gives us access to each individual instrument used within the song for some audio mixing.
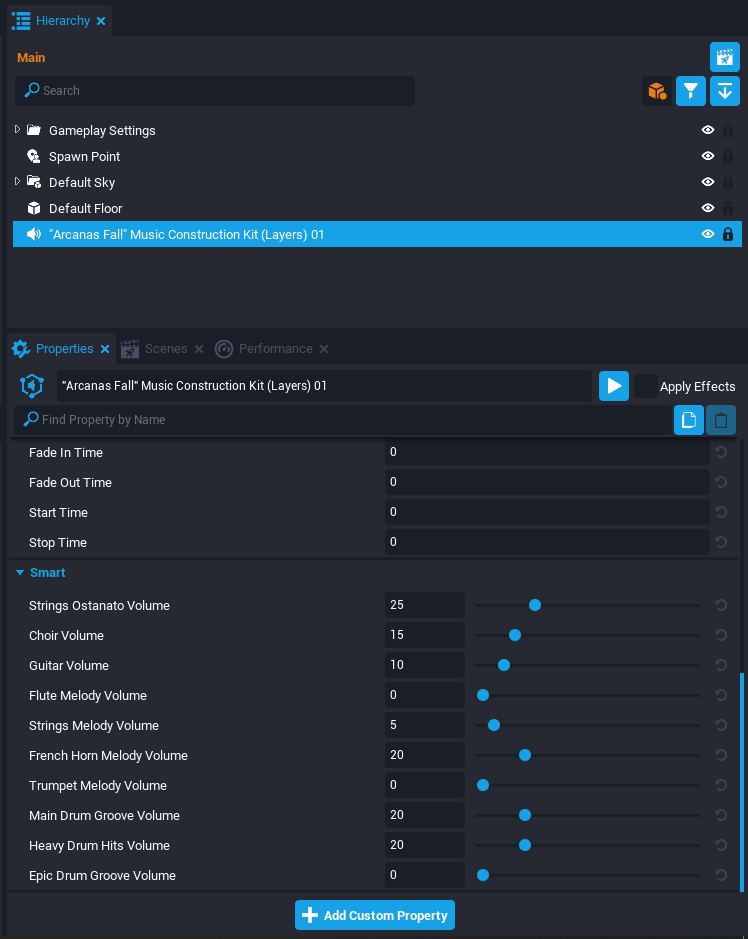
Go ahead and change the sliders and keep auditioning using the Play button to see how the sound changes!
Note:- Please be aware that if you have a layer at 0 volume while the audio is being auditioned and you increase the volume, it will be out of sync, click the play button to stop the audition and hit play again for all the layers to be in sync. This is caused by the Layers not having the Continue Play While Silent option, more on that later.
Stingers - Stingers are short audio clips which can be used as an intro/outro or even as a sound effect.
Audio Properties
Audio in Core comes with various properties which we can use to have a proper audio design for our games. Lets see what each of these properties do.

Important Note
- Apply Effects - If this is left unchecked, no custom settings will be applied to the audio during preview. Make sure to check this box if you want to hear the changes in preview. The following tooltip describes with Apply Effects does best.

-
Enable Spatialization - If enabled, the player will hear the audio louder from the left speaker if the audio source is to the left or the player. Similarly, should the audio source be to the right of the player, the player will hear the audio louder from the right speaker. This is especially useful to creating depth and making the environment feel alive. Make sure to uncheck this for Background Music (BGM) though as BGM should almost always be played equally loud on left and right speakers.
-
Enable Attenuation - If enabled, sound will be heard louder the closer the player is to the audio source and gently decrease in volume as the player moves further away from the audio source. Useful for pretty much all kinds of audio except Background Music (BGM) as in most cases, BGM needs to play at the same volume no matter where the player is within the game.
-
Enable Occlusion - If enabled, anything between the audio source and player will reduce the volume of the audio dynamically. For example, if a player is standing by a wall and the audio object is to the other side of the wall, the sound will get 'muffled'. Again, useful for sound effects but leave unchecked for sounds such as BGM which need not be occluded.
-
Auto Play - If enabled, the audio will start playing automatically as soon as it gets added to the world. This means that if the audio is sitting in the hierarchy (for example BGM) or the audio is spawned into the world by any means, as long as Auto Play is enabled, the audio will start playing automatically.
-
Transient - If enabled, once the audio file has finished playing, it will automatically destroy itself and clean up the hierarchy.
-
Repeat - If enabled, this will loop the audio back from the start once it has finished playing.
-
Pitch - Decreasing this slider will make the audio go down in pitch (this also increases the total length of the audio) while increasing this slider will make the audio go up in pitch (this shortens the total length of the audio) At most, this slider can go to a lowest pitch of -2400 (two octaves down) or a highest pitch of 2400 (two octaves up).
-
Volume - Self explanatory. Sound plays at normal levels when set to 1, half the volume if set to 0.5 double the volume if set to 2, etc.
-
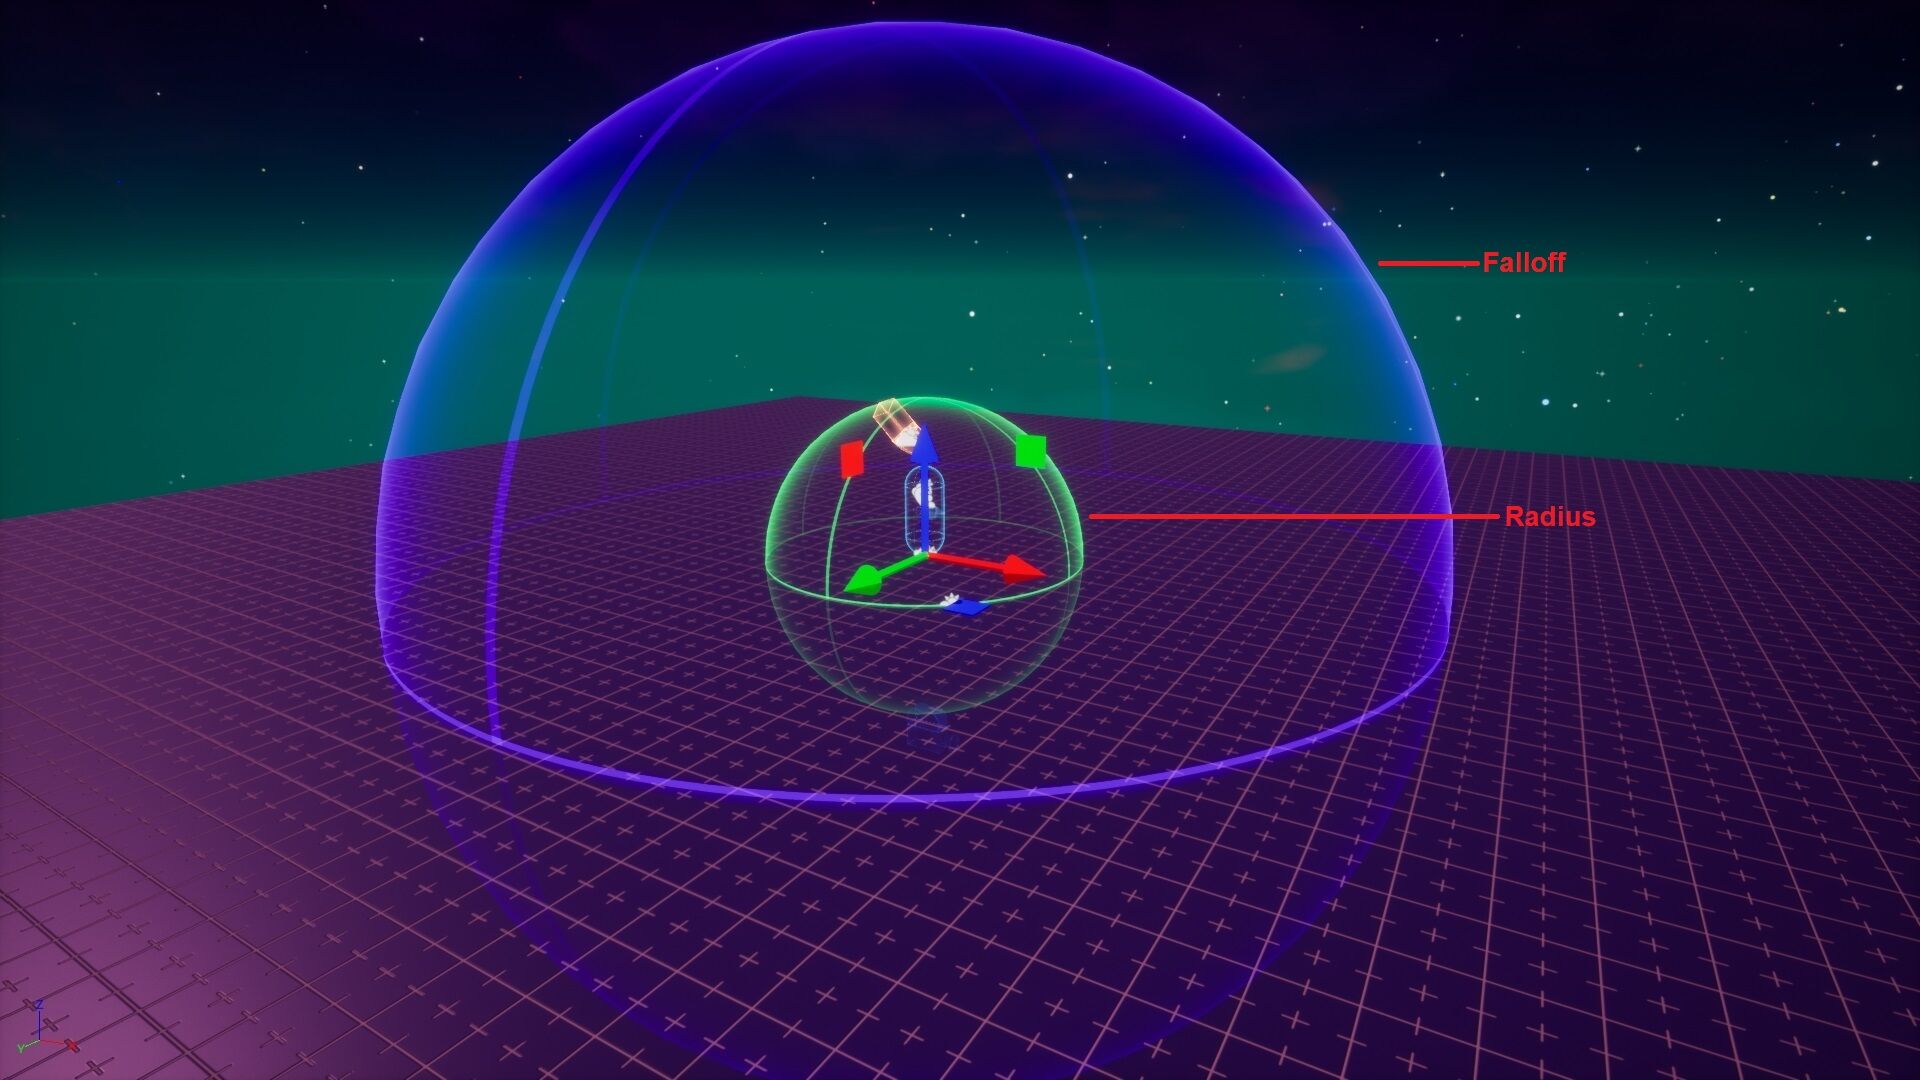
Radius - While the player is inside this radius, the sound will be heard at full volume, moving further away from the radius will reduce the sound based on the Falloff setting. Only works if Enable Attenuation is checked. Click to select the audio file from the hierarchy and press V if widgets are disabled. This will turn widgets on and allow you to see the green radius.
-
Falloff - While the player is inside the falloff radius, sound will continue to diminish the further the player moves away from the audio source. Only works if Enable Attenuation is checked. Click to select the audio file from the hierarchy and press V if widgets are disabled. This will turn widgets on and allow you to see the purple falloff.
-
Fade in Time - Time in seconds in order for the played audio to reach its given Volume. For example if instead of 0 we enter 1 in this field, the played audio will start at a volume of 0 and take 1 second to smoothly reach the given Volume.
-
Fade out Time - Time in seconds in order for the played audio to smoothly reach a Volume of 0 after it has stopped playing.
-
Start Time - Setting a number here will make the audio skip that many seconds ahead. Useful for if you only want a certain part of the audio file to play or skip the intro for example.
-
Stop Time - Time in seconds. Setting a number here will make the audio stop playing once it has played for that many seconds. Can be used in conjunction with Start Time to trim an audio file according to your needs.
-
Continue Play While Silent - By default, if a player moves outside of the hearing range of an audio or an audio file is made to go down to a Volume of 0 and increased again, it will play from the very beginning. Even if the player sets the music volume to 0 from Core Settings and increases it again, this behavior will occur which can be immersion breaking. By having Continue Play While Silent checked, the audio will not get interrupted and the music will play seamlessly without restarting.
Audio Kitbashing
Now that we have learned how to access audio in Core, what different types of audio are available to us and what each of the audio properties do, lets try and make use of this knowledge to merge multiple sounds together for our sound design. This process is known as "Audio Kitbashing".
For this tutorial, we will be kitbashing and designing the sound of a gun to make it sound like a laser gun.
Step 1 - Find and drag the Advanced Pistol into the hierarchy as shown in the image below.
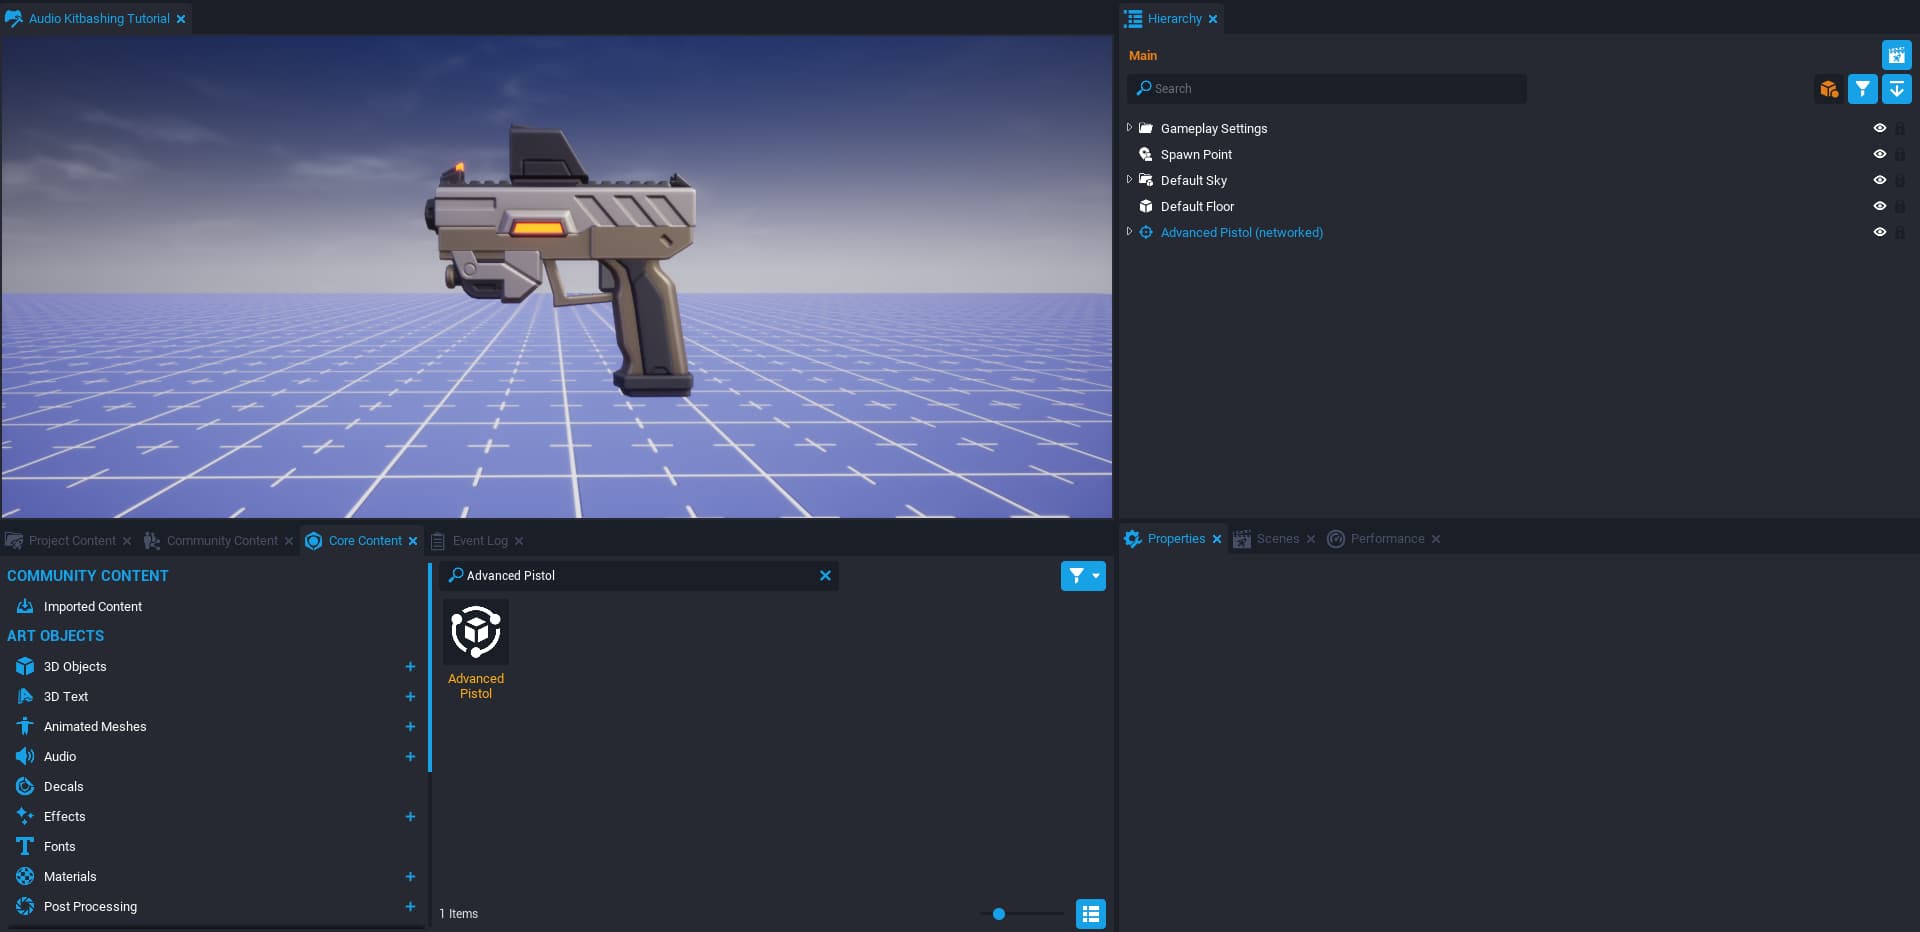
Play the game, equip the pistol and shoot it to hear what it sounds like by default.
Step 2 - Scroll Down in the properties of the Advanced Pistol to find Attack Sound Template. Right click on the provided template Pistol Attack Sound and click on Find in Catalog which should automatically find and select the template for you in your project settings. Drag this template out into your hierarchy and delete the default sound that comes with it.
Step 3 - Find Gunshot Laser Pistol Set 01 SFX from Core Content tab and drag it into the hierarchy as a child of the Pistol Attack Sound template. Scroll down in its properties and make sure Auto Play is checked and select Zappy and Deep as shown in the picture below.
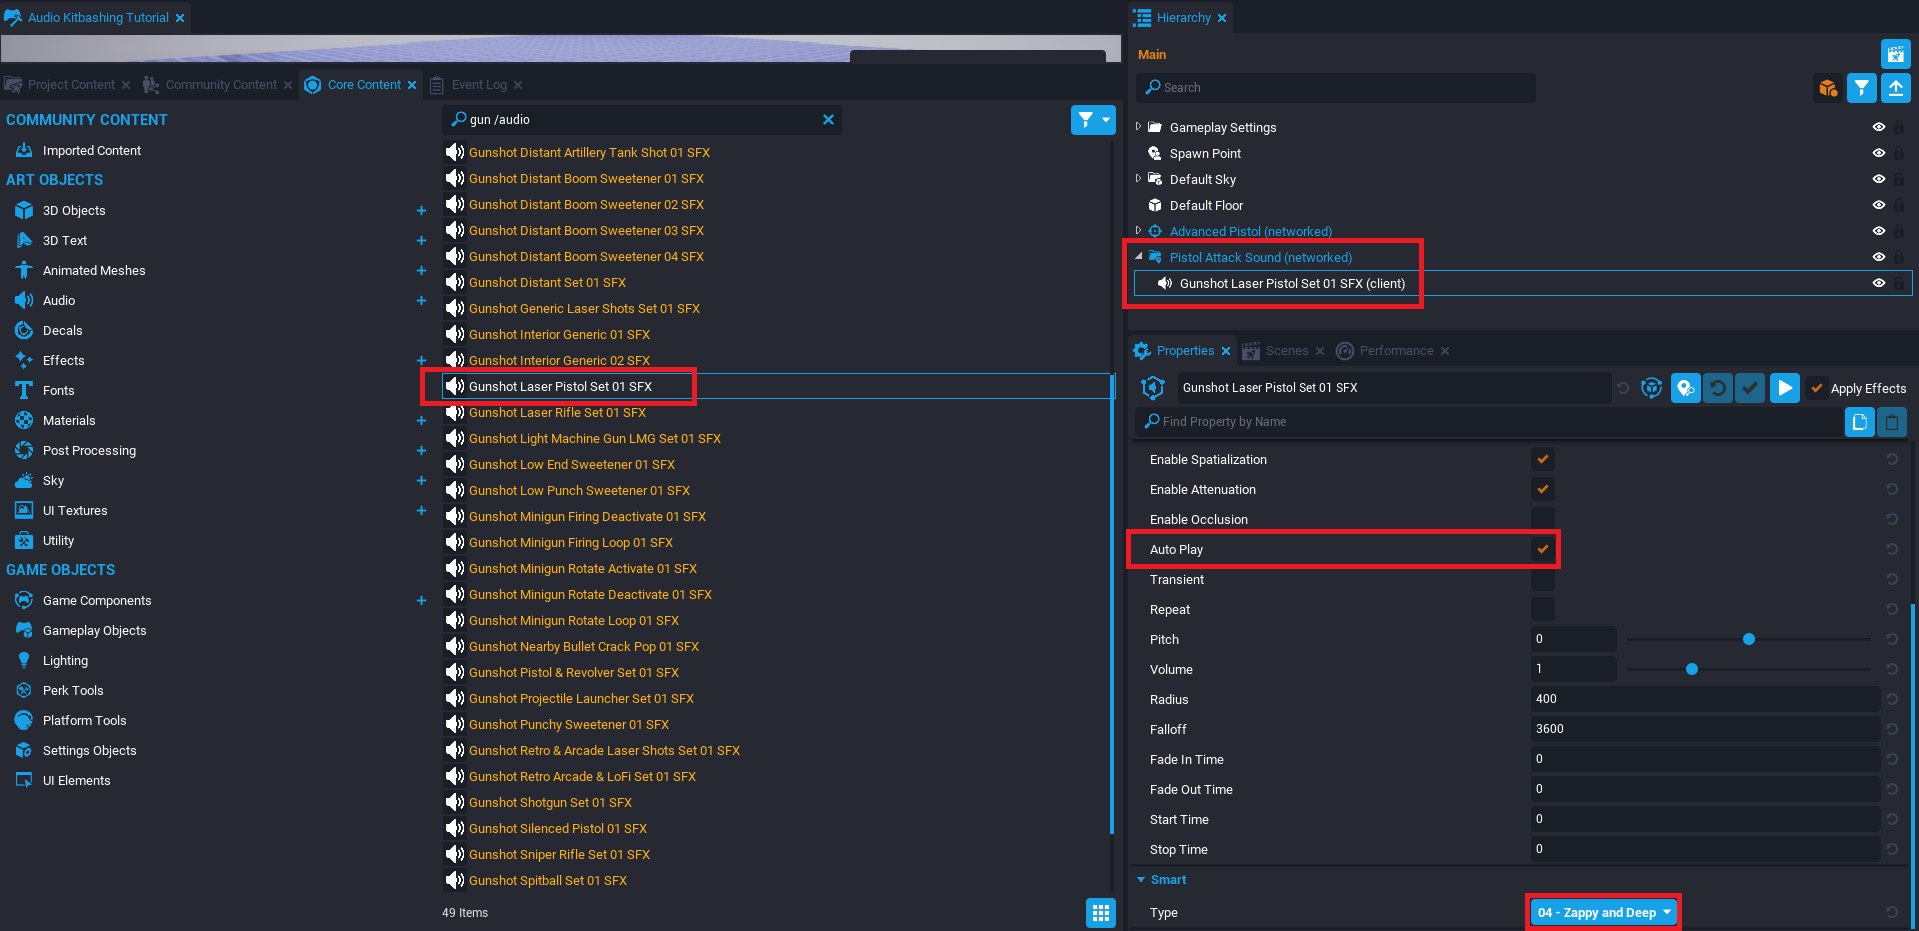
Check Apply Effects to audition the sound with the play button next to it to hear what it sounds like. The Zappy and Deep SFX has a nice base sound.
Next, search Core Content for Gunshot Generic Laser Shots Set 01 SFX and add that as the child of the Pistol Attack Sound as well. Again, make sure Auto Play is checked and for the Type select Laser Thin Power Shot. This will add a higher pitched sound on top of our base sound, go ahead and audition it to hear what it sounds like.
Finally, search for Designer Sub Bass Drop 02 SFX from Core Content and add that in as the child of Pistol Attack Sound. Enable Auto Play on it, reduce it's Pitch down to -1200, set the Fade Out Time to 0.5 and Stop Time to 0.7. Ensure you have Apply Effects enabled and audition the sound. Due to how we set this up, the sound should be very deep and end earlier than it normally would as we just need to hear it for the short duration for when the bullet is fired.
The final setup in the hierarchy should look like the picture below.
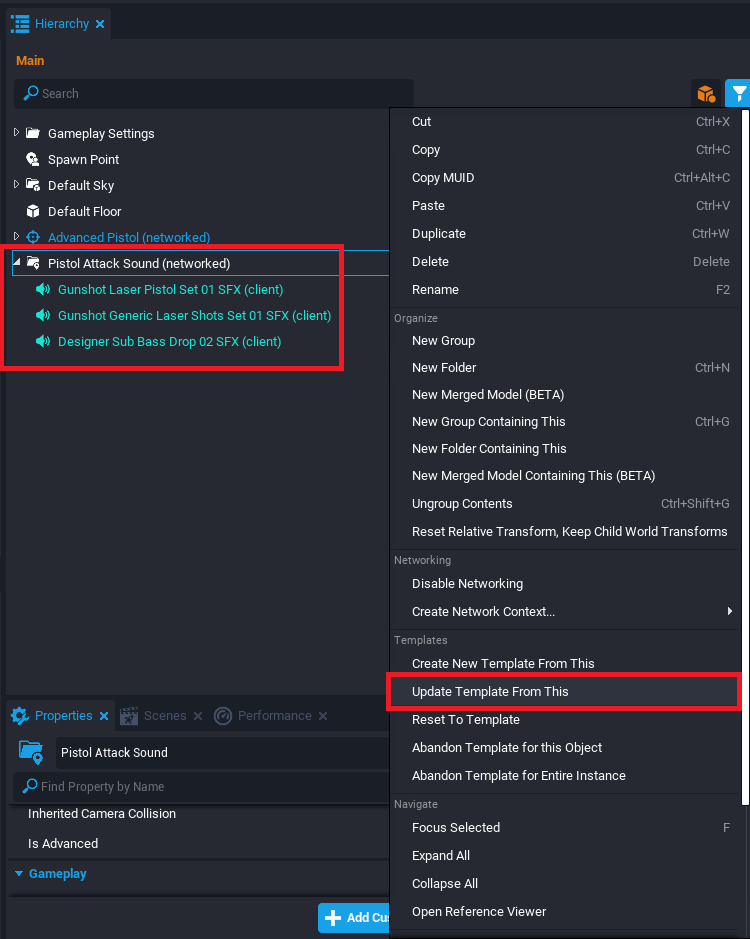
Right click Pistol Attack Sound and click Update Template From This and then delete Pistol Attack Sound from your hierarchy. Play the game, equip the Advanced Pistol and shoot it to hear the kitbashed audio play out.
Playing Audio via Script
In Core, audio can also be played and stopped via lua scripting. Lets learn how we can achieve that. In the following example, we will be using the Player Launcher and adding a sound to it for when the player enters its trigger volume.
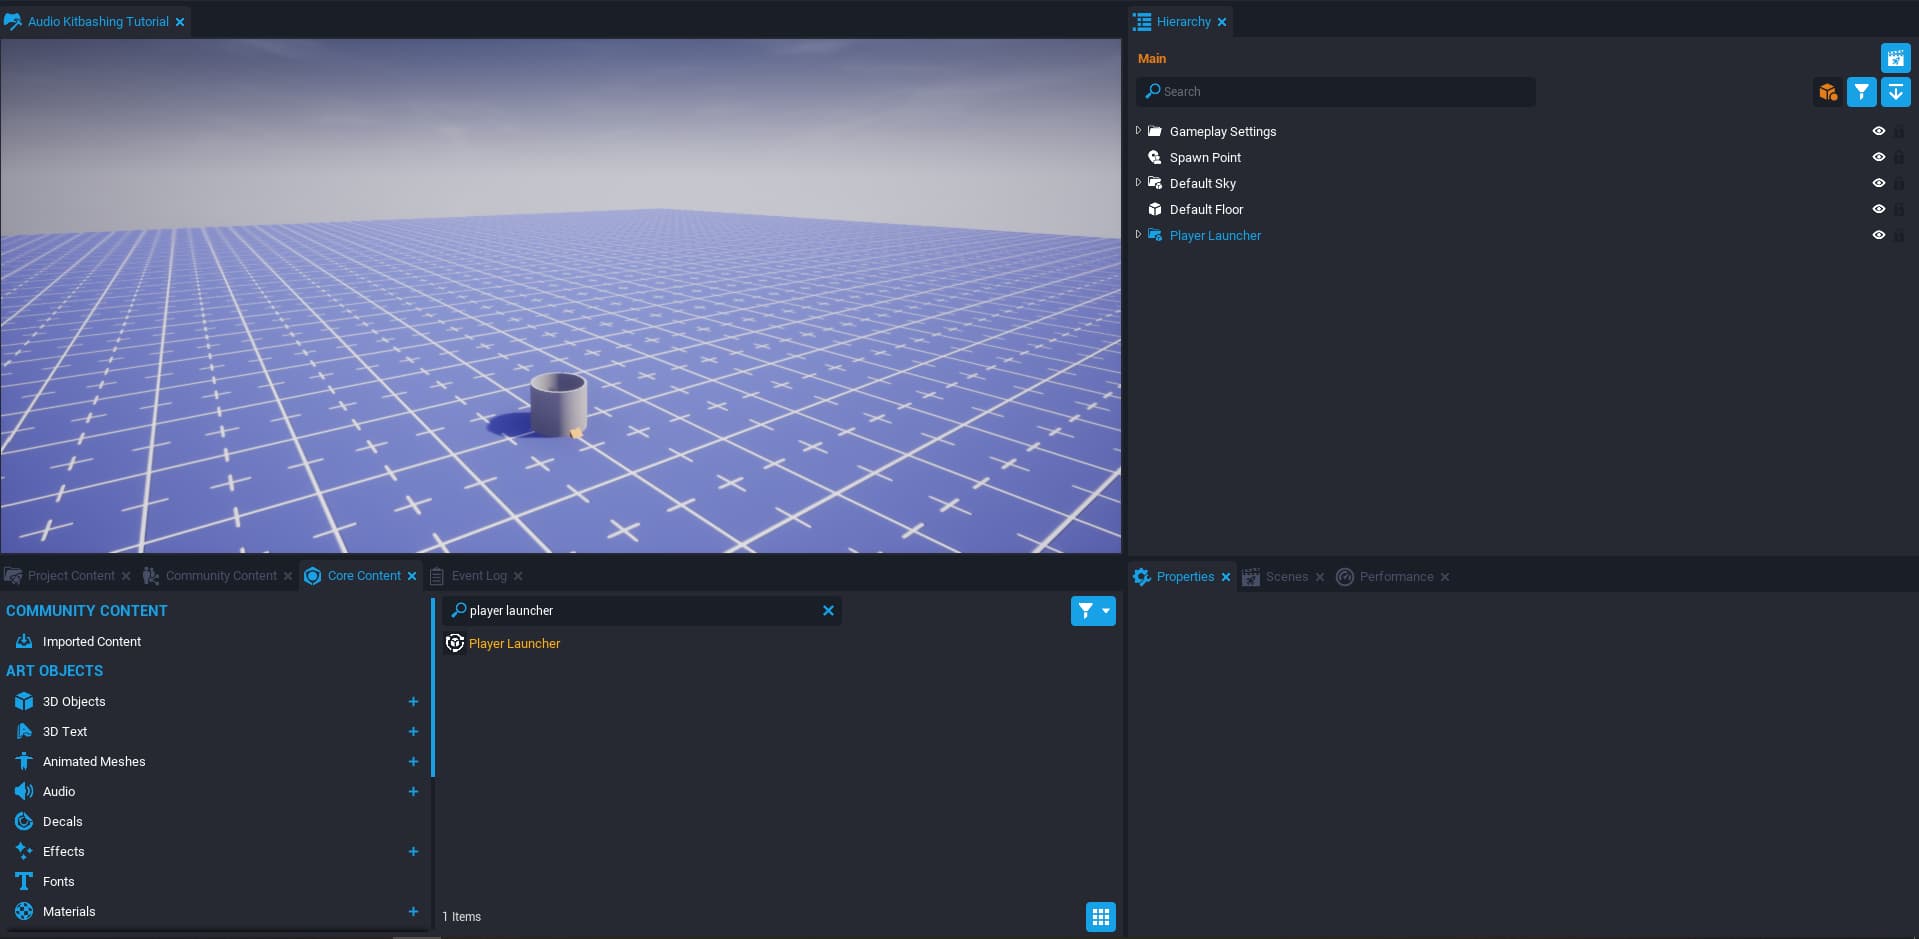
Step 1 - Search Core Content for Player Launcher and add it to your hierarchy as shown below.
Step 2 - Expand the Player Launcher from the hierarchy, then the Server Context, right click on PlayerLauncherServer script and click Edit Script.
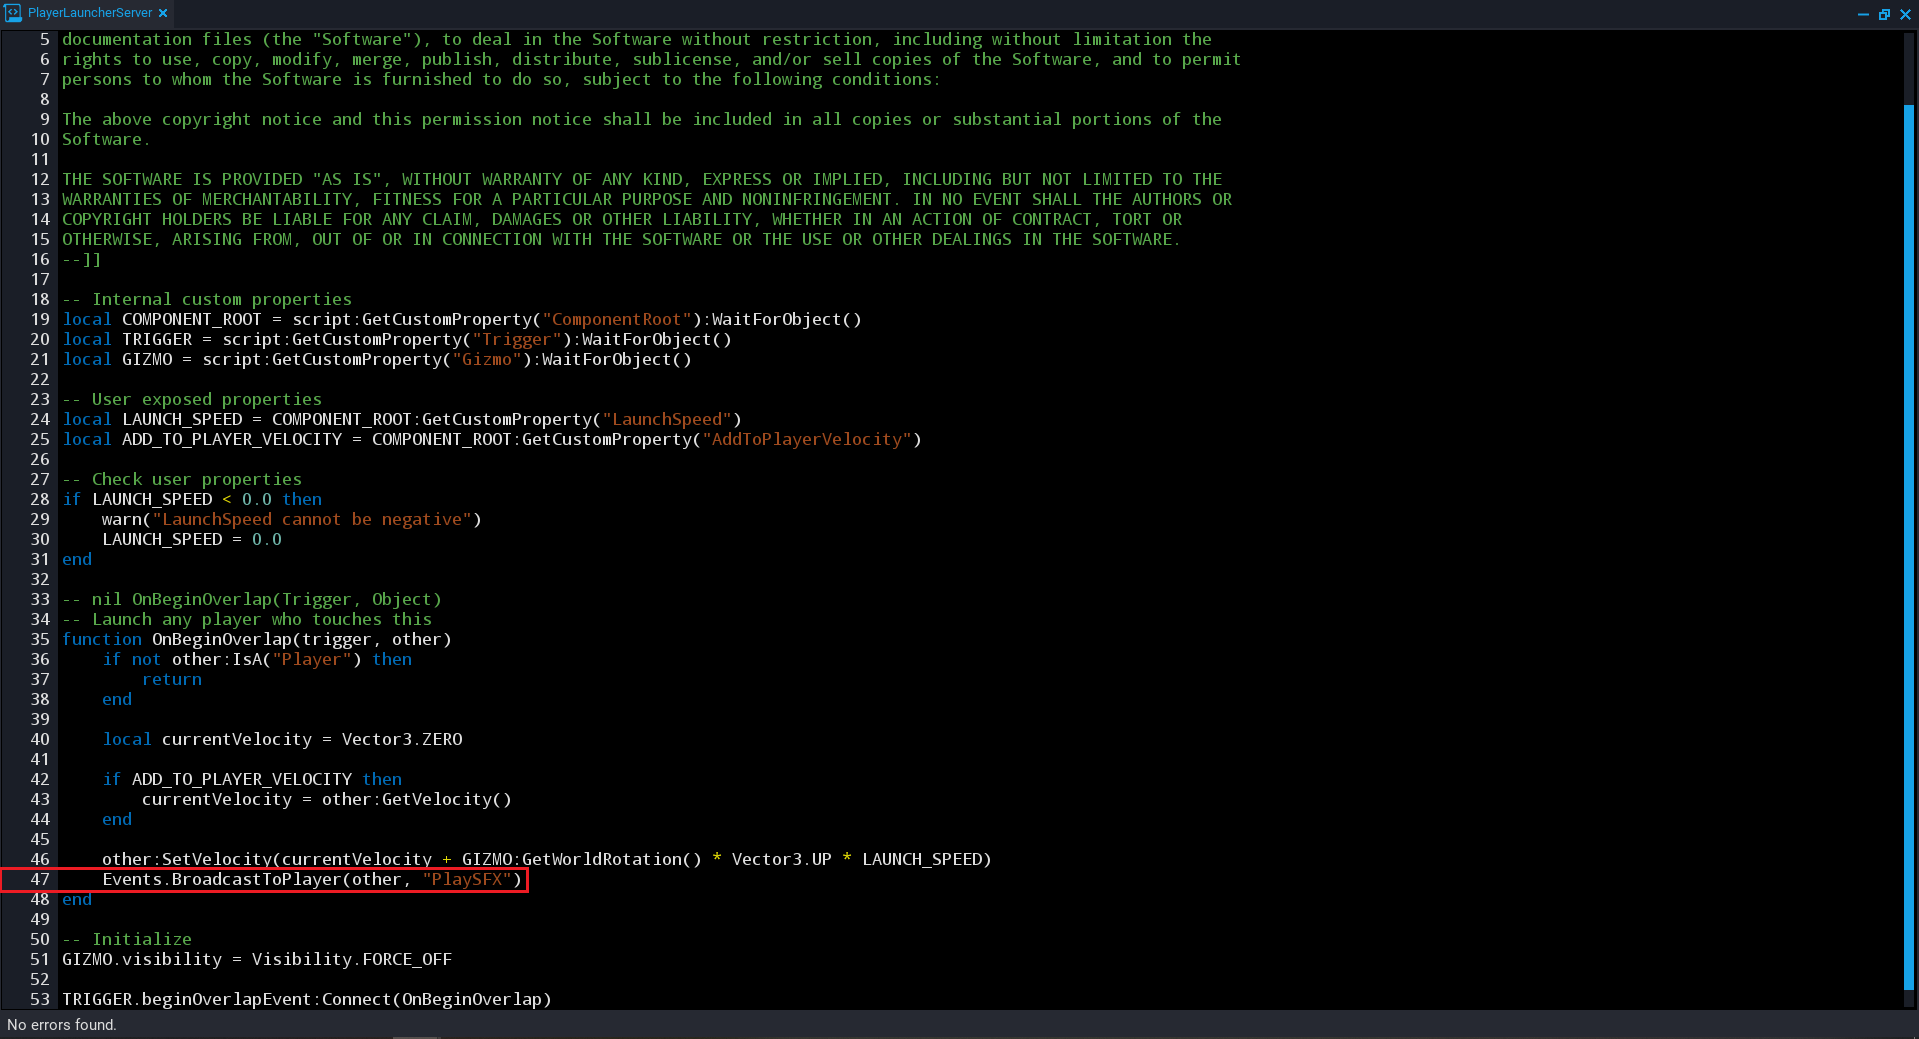
Step 3 After line 46, make a new line and add the following code there.
Events.BroadcastToPlayer(other, "PlaySFX")
Compile the script by pressing F5. The script should now look like the image below.
The reason why we have done this is because this is a server side script and we need the audio to play on the client. More on that later.
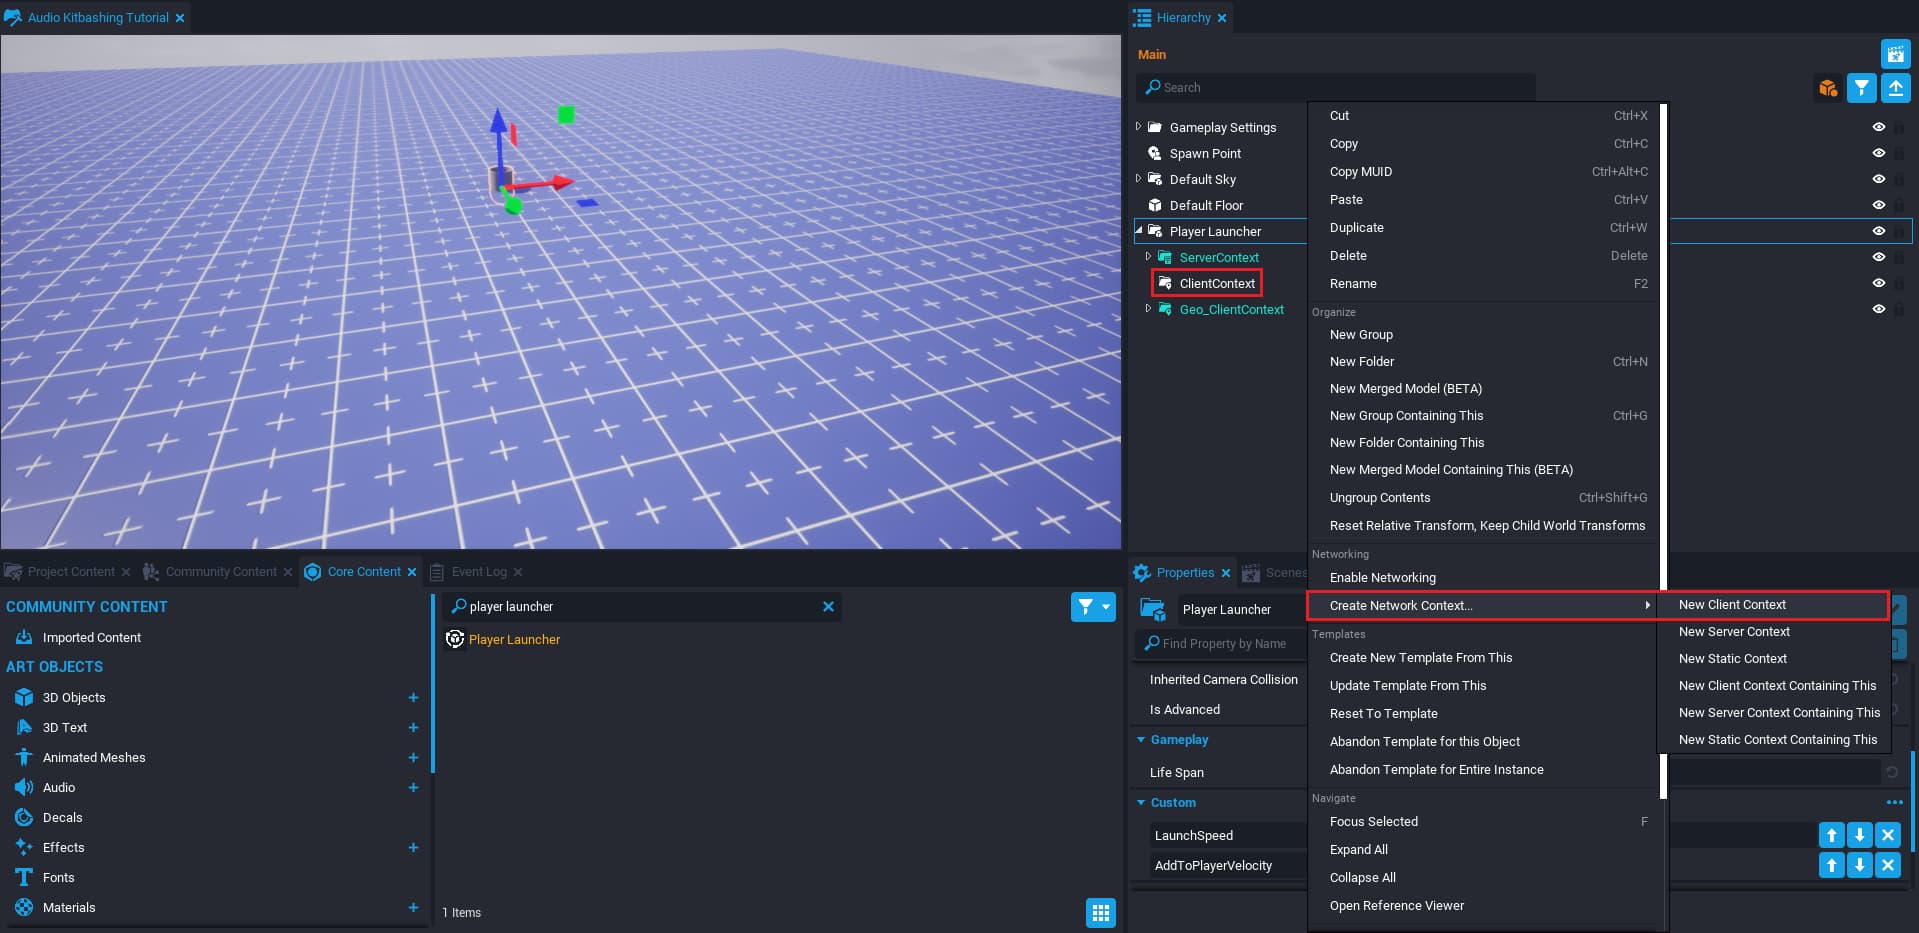
Step 4 - Right click on Player Launcher, scroll down to Create Network Context and select New Client Context.
Step 5 - Right click our newly created Client Context, scroll down to Create > Create Script and click on Create New Script and name it SFX Controller.
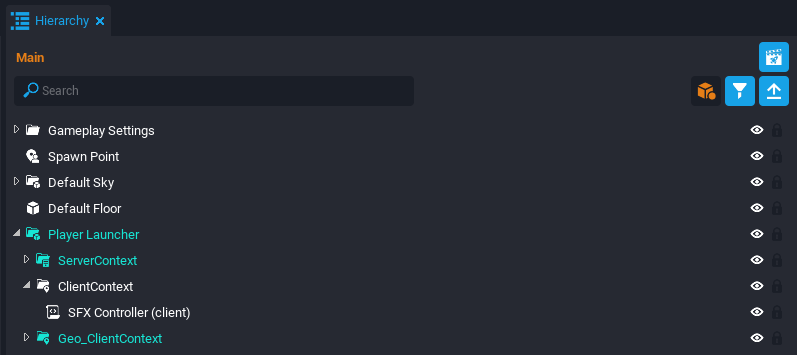
Step 6 - Search Core Content for Cartoon Twang Spring Bounce Jump 02 SFX drag it into your hierarchy as a child of the Client Context we created, rename it to JumpSFX. Make sure that Auto Play is checked OFF since we only want the sound to be heard once the player is inside the player launcher. Select the script and drag to add JumpSFX as a custom property on the script as shown below.

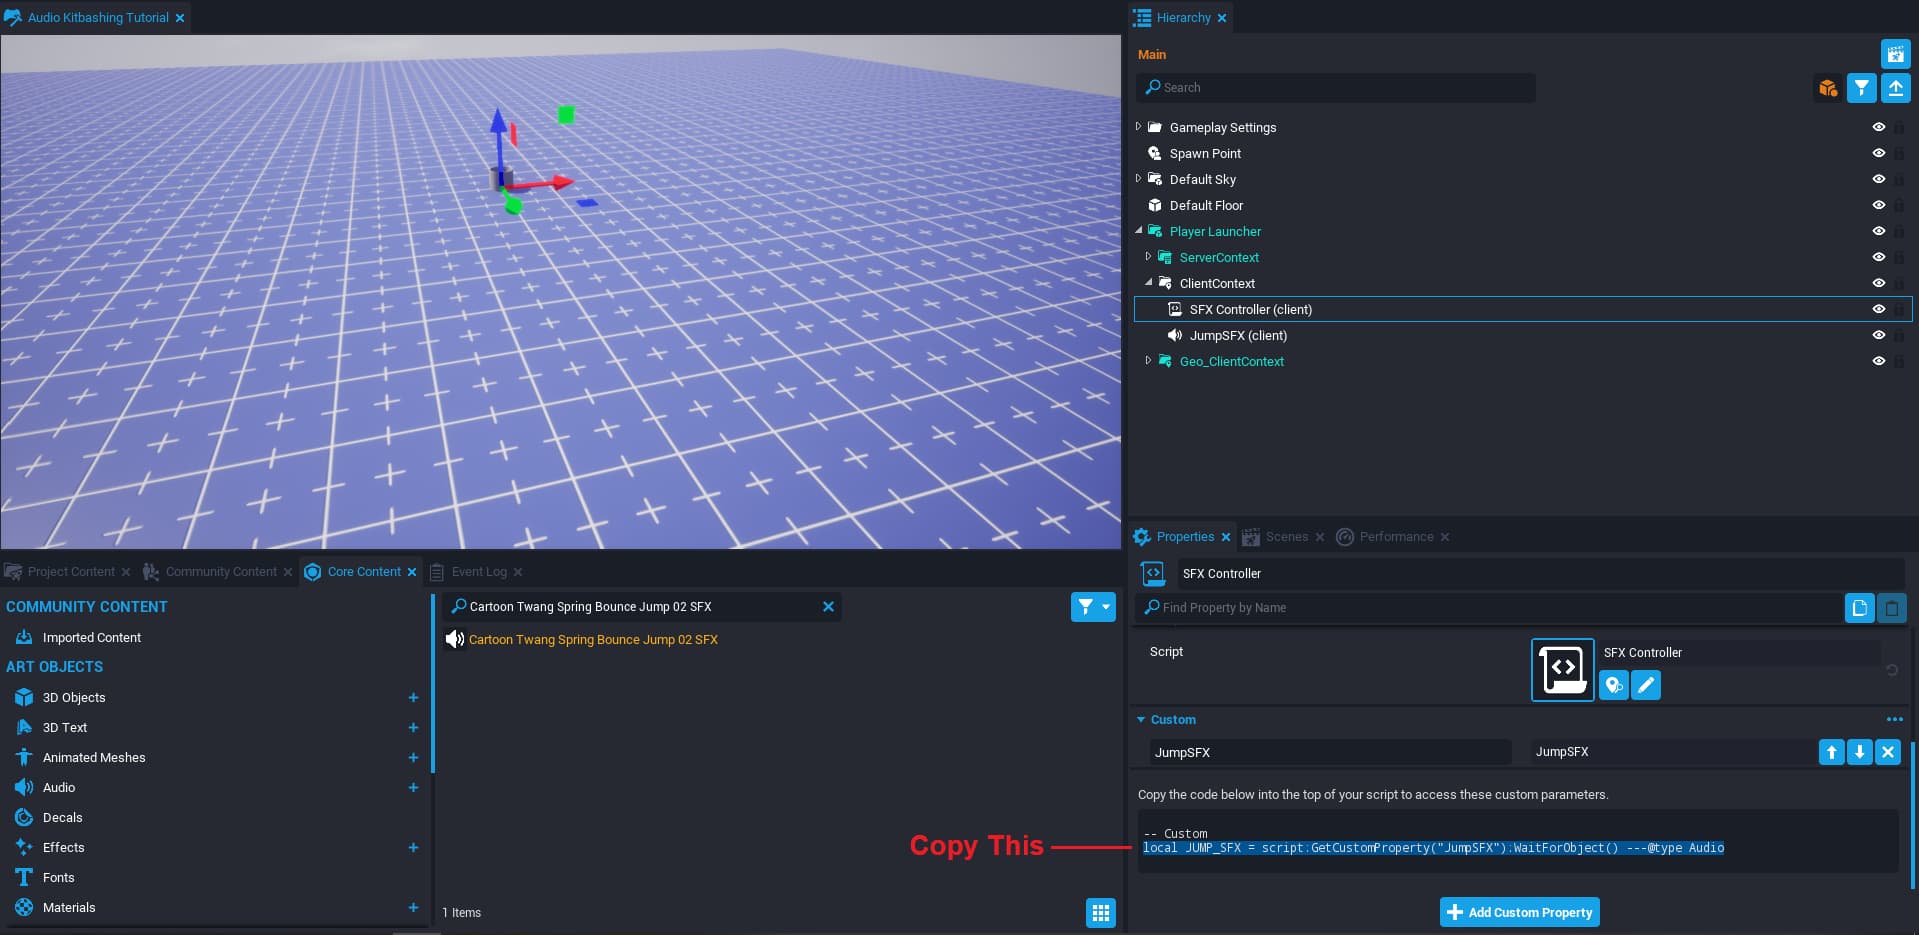
Copy the custom property as shown in the image above then right click the SFX Controller script and click Edit Script to open it up.
Step 7 - Add the code below into the script.
local JUMP_SFX = script:GetCustomProperty("JumpSFX"):WaitForObject() ---@type Audio

function PlaySFX()
	JUMP_SFX:Play()
end

Events.Connect("PlaySFX", PlaySFX)
Compile the script by pressing F5. Play the game and try moving onto the Player Launcher to hear the sound we just added get played everytime the launcher makes the player jump.
Audio & Triggers
We can also make audio play when a player enters or interacts with a trigger. In this example, we will learn how to play music when a player enters a trigger and stop the music once the player leaves.
Step 1 - Right click on any empty spot in the hierarchy then go to Create Network Content and select New Client Context.
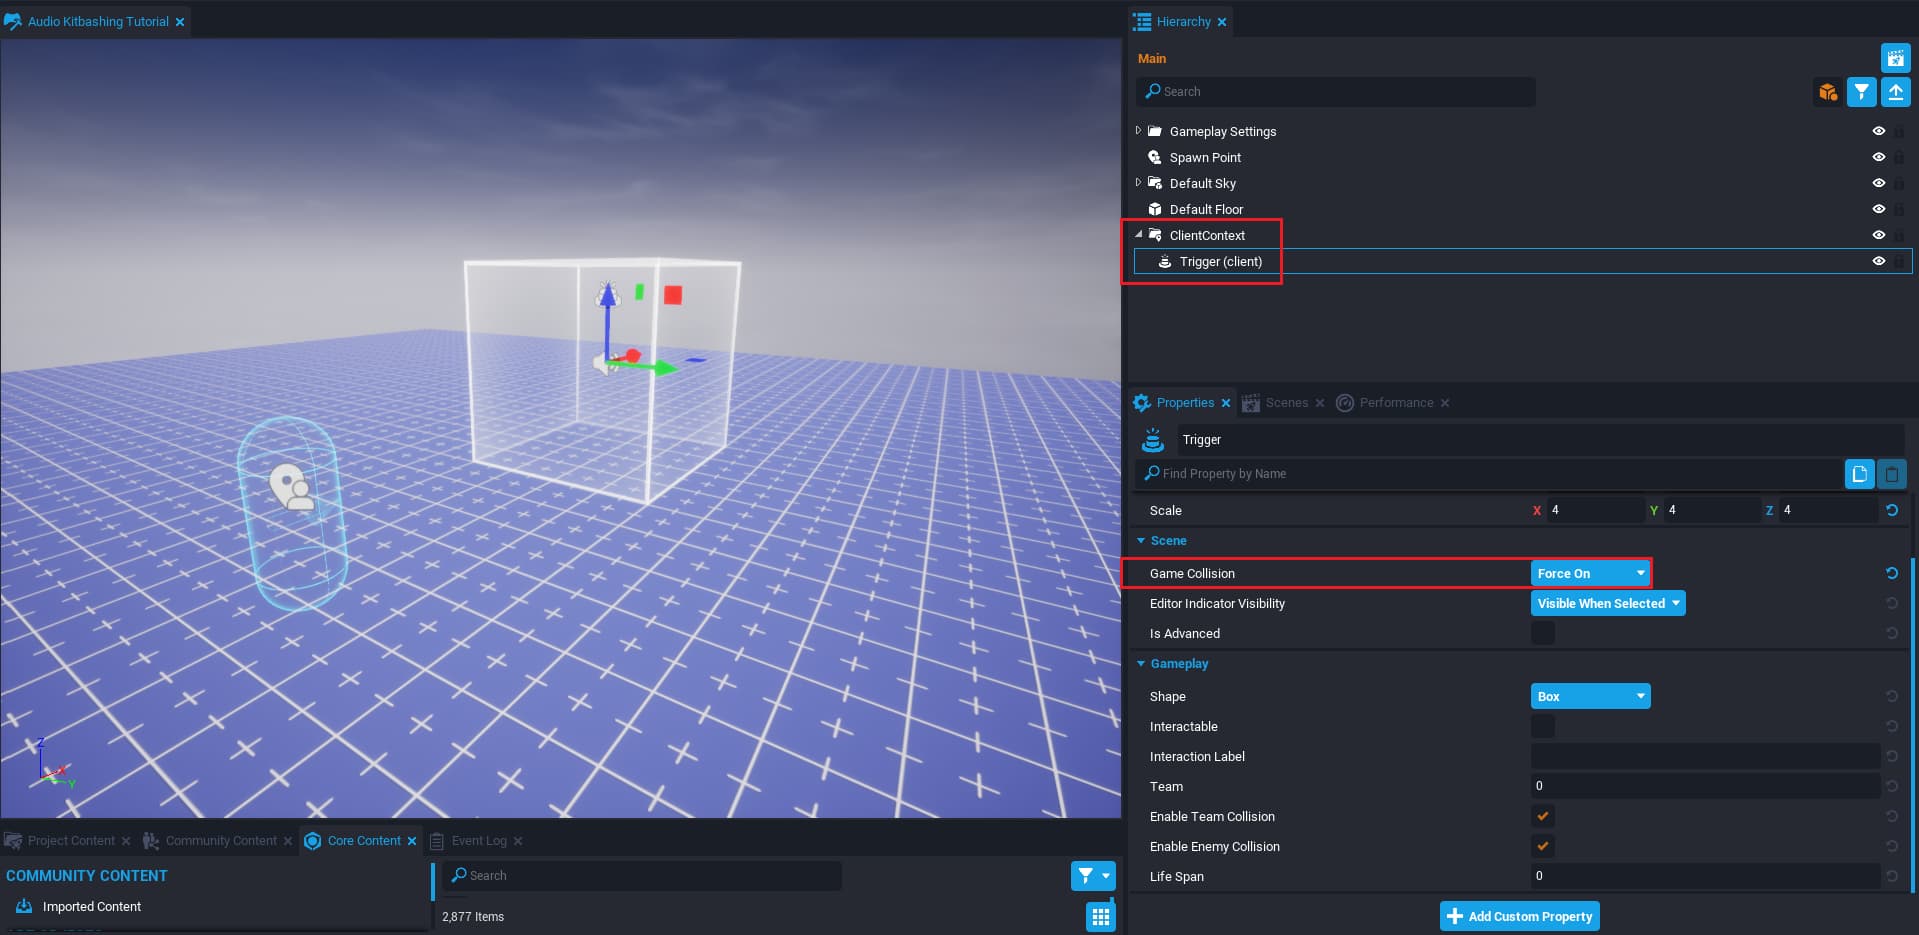
Step 2 - Search Core Content for Trigger and drag it into the hierarchy as a child of the Client Context we just created. Due to the trigger being in a Client Context, we need to turn its Collision to Force On in order for it to work and for us to be able to see the trigger volume. Note that if you are still unable to see the Trigger volume after forcing collision on then press V to enable widgets, this will allow you to see the trigger box.
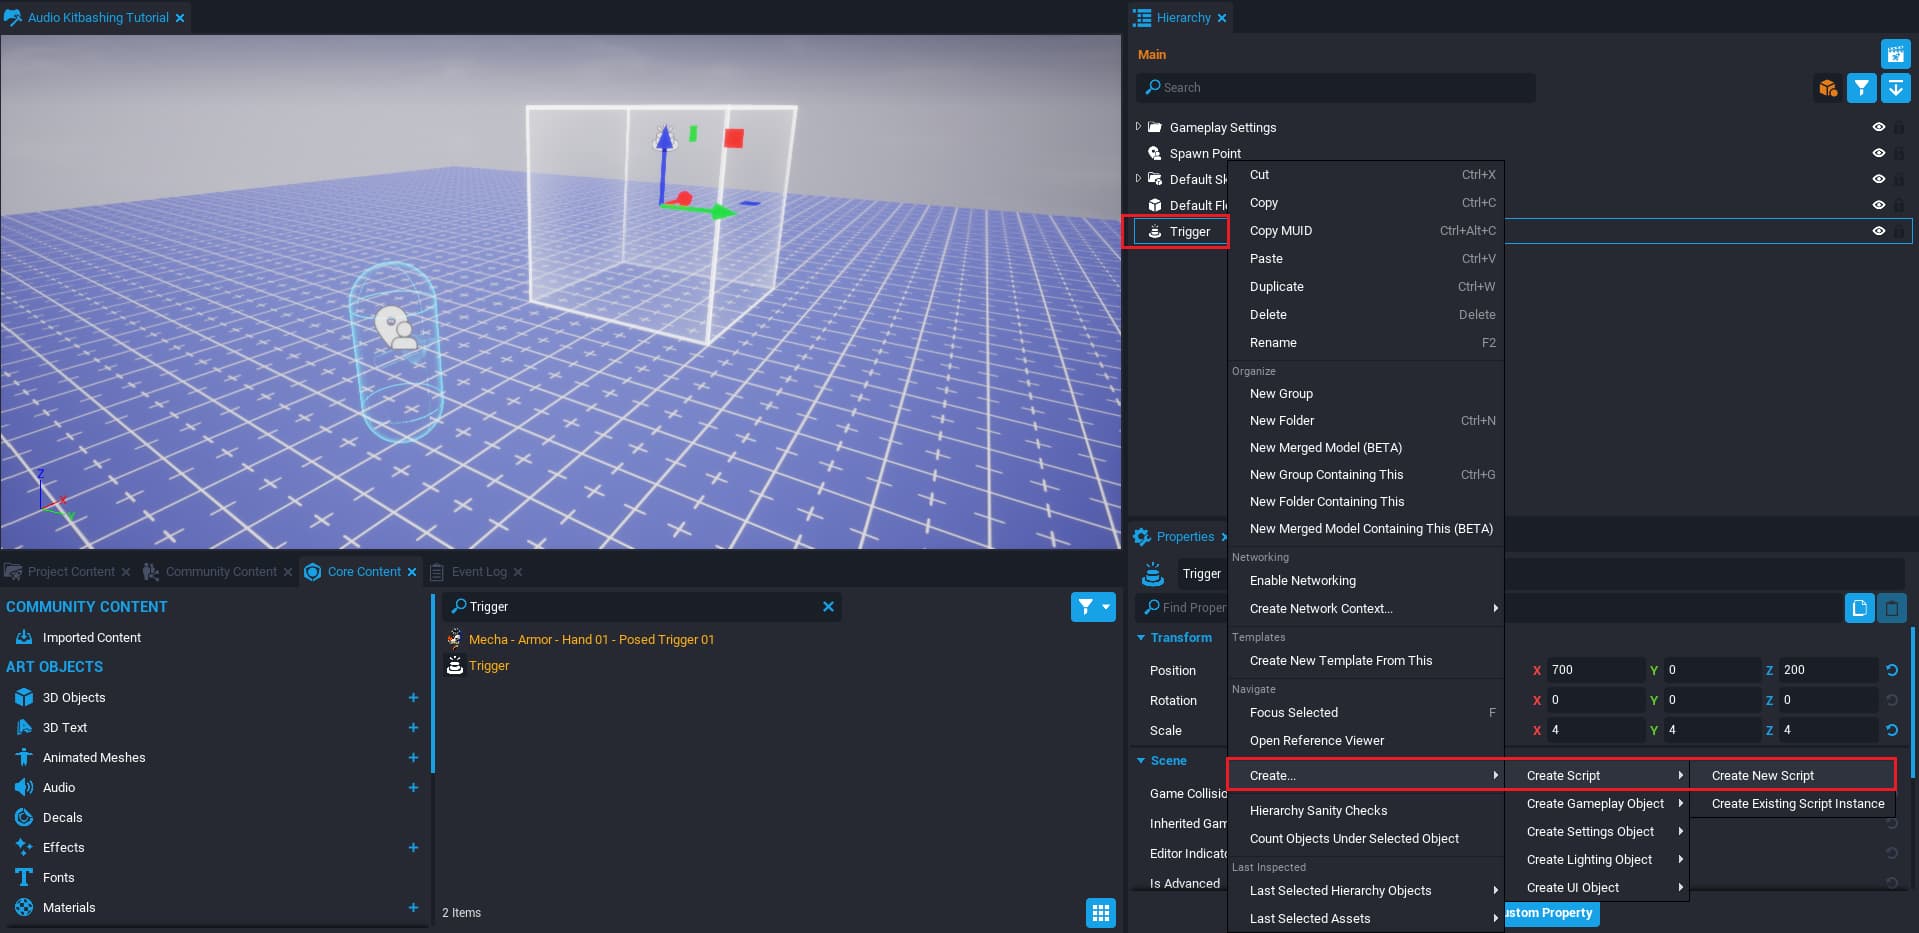
Right click the trigger from the hierarchy, then hover over Create > Create Script and click Create New Script.
Name the script Play BGM.
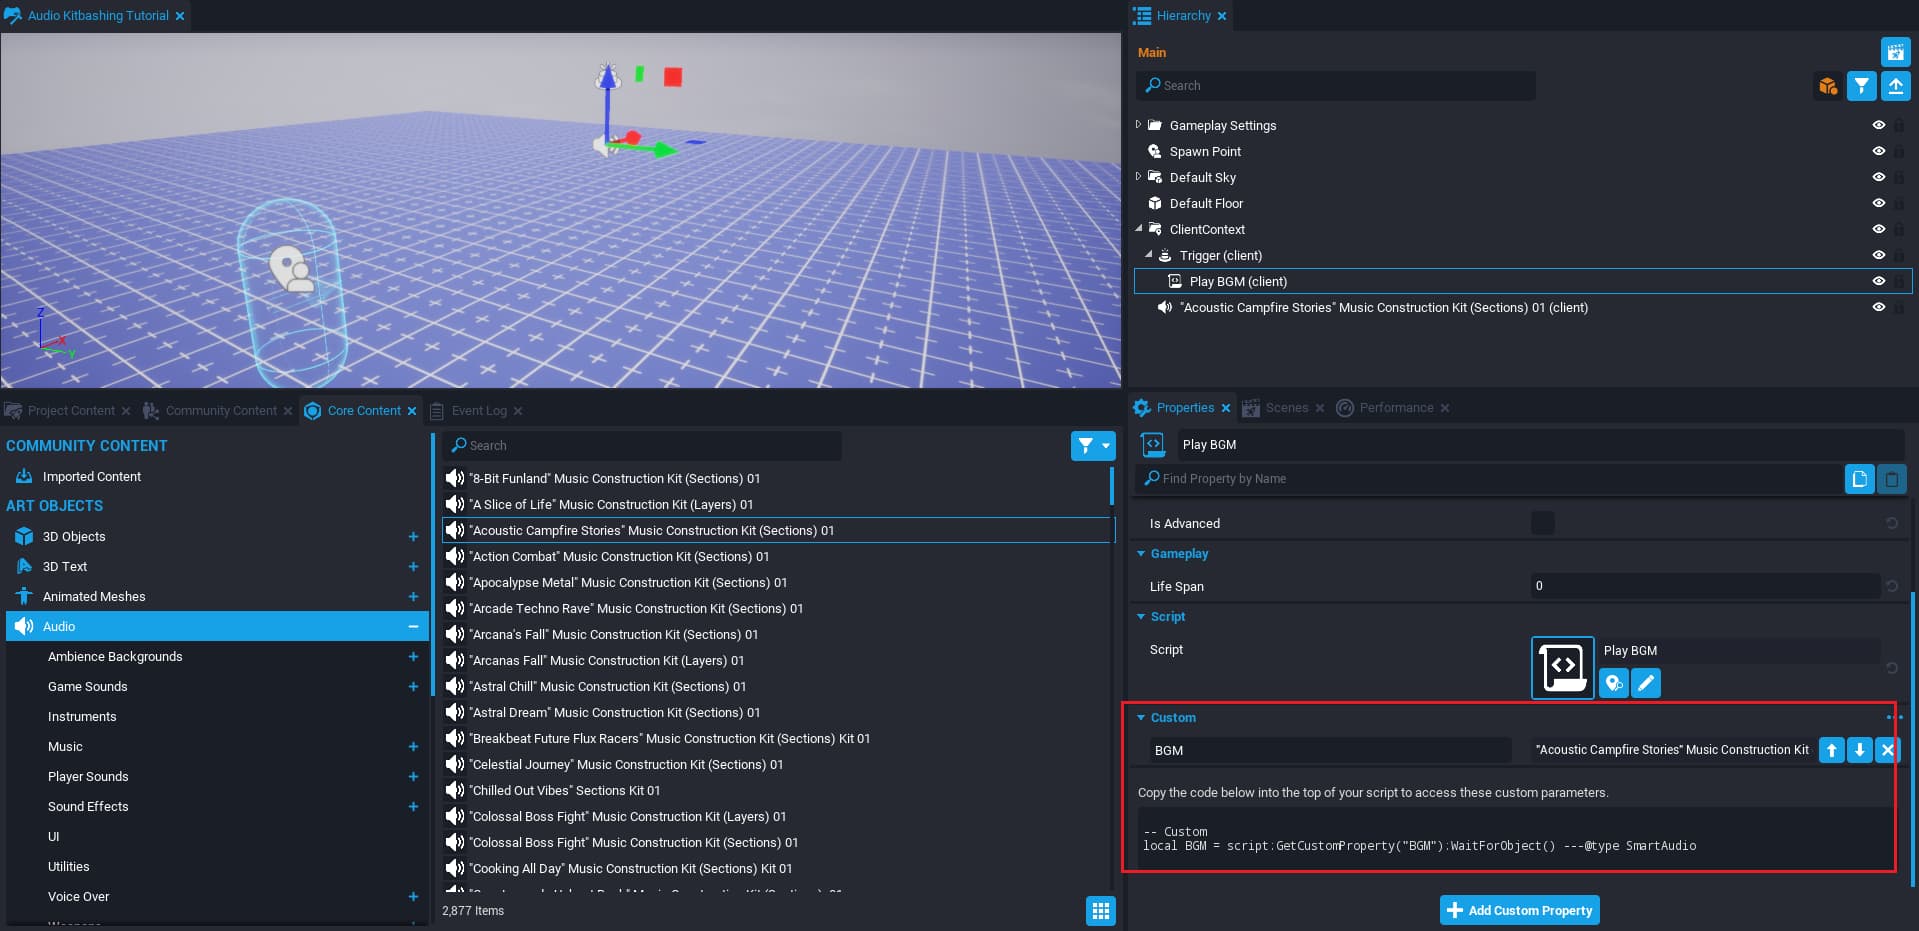
Step 3 - Search Core Content for "Acoustic Campfire Stories" Music Construction Kit (Sections) 01 music and drag it into the hierarchy as a child of the Client Context. Adjust the properties of the audio as shown below.
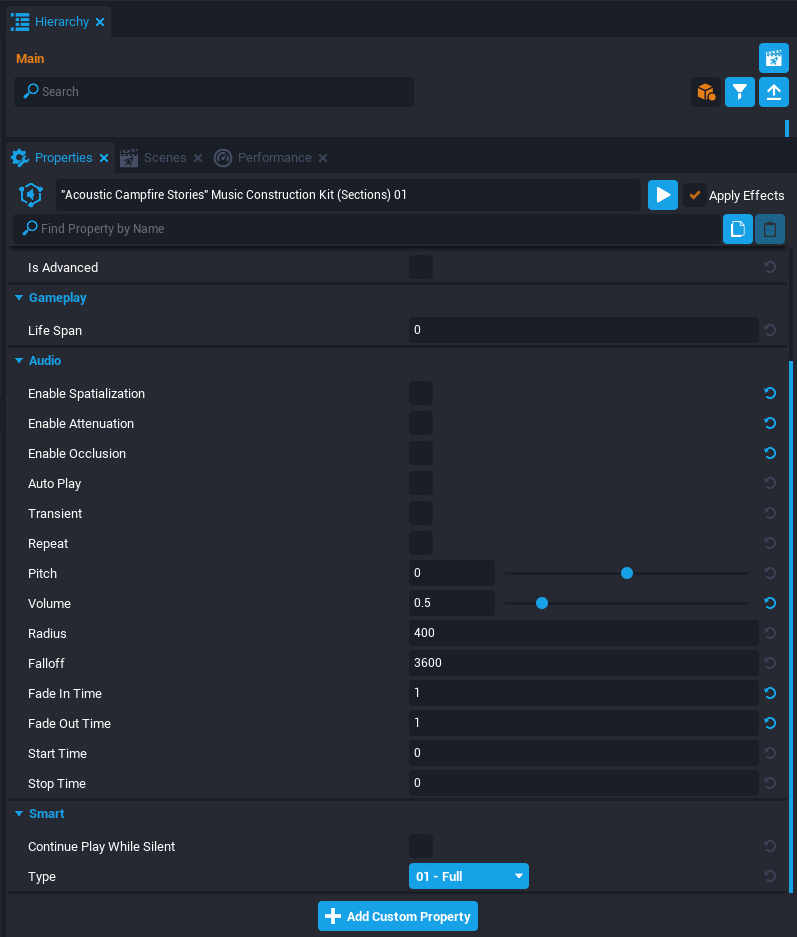
Next, click on the Play BGM script once and drag "Acoustic Campfire Stories" Music Construction Kit (Sections) 01 down as its custom property, name the custom property BGM.
Again, notice how Auto Play is checked off since we only want to enable and disable the sound via the script when the player enters or leaves the trigger.
Step 4 - Paste the following code in the Play BGM script.
local PLAYER = Game.GetLocalPlayer()
local TRIGGER = script.parent

local BGM = script:GetCustomProperty("BGM"):WaitForObject() ---@type SmartAudio

function OnBeginOverlap(whichTrigger, player)
	if PLAYER:IsA("Player") and TRIGGER:IsOverlapping(PLAYER) then
		BGM:Play()
	end
end

function OnEndOverlap(whichTrigger, player)
	if PLAYER:IsA("Player") and not TRIGGER:IsOverlapping(PLAYER) then
		BGM:Stop()
	end
end

TRIGGER.beginOverlapEvent:Connect(OnBeginOverlap)
TRIGGER.endOverlapEvent:Connect(OnEndOverlap)
Now play the game and enter the trigger zone to have the music play, leaving the trigger zone will stop the music. Notice how the music fades in nicely when we enter the trigger and stops when we leave. It is a good idea to use Fades for smoother transitions.
Why Client Context?
While audio can be played over the network, you almost always want to exclusively play audio in a client context. There are multiple advantages to this as stated below.
- Audio will play instantly over the client, no risk of networked delay.
- Saves on networked object count which is precious.
- No risk of audio skipping should there be a spike in the connection.
Additional Info
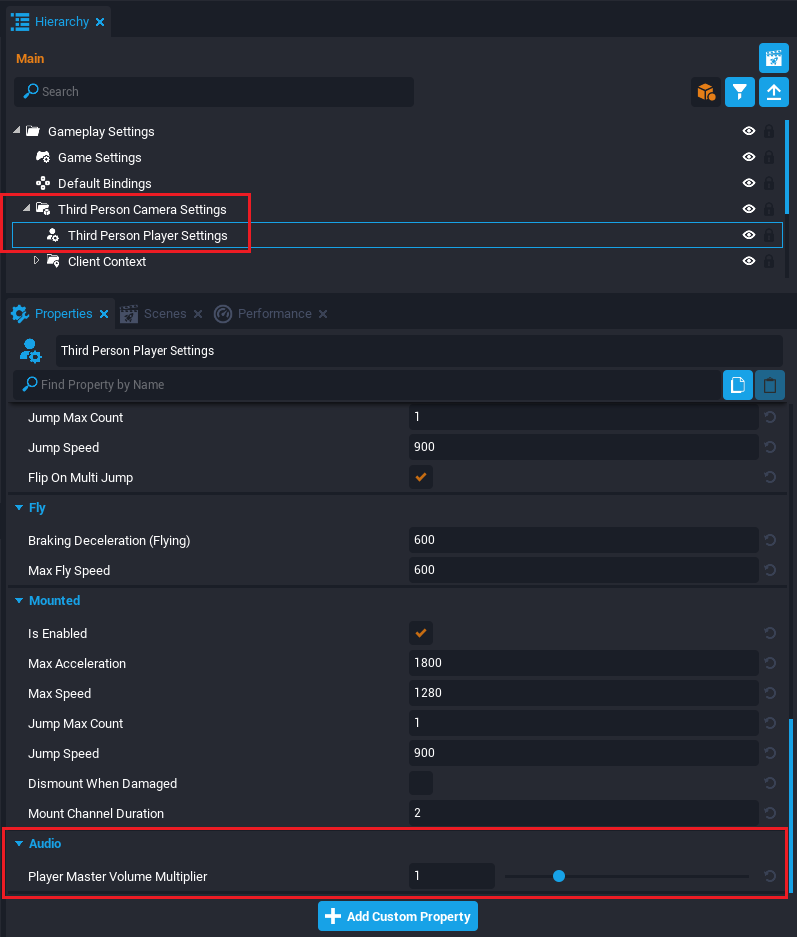
The Third Person Player Settings under Third Person Camera Settings has a slider setting called Player Master Volume Multiplier this allows you to make player sounds louder, quieter or even completely mute all player audio (including footsteps!)
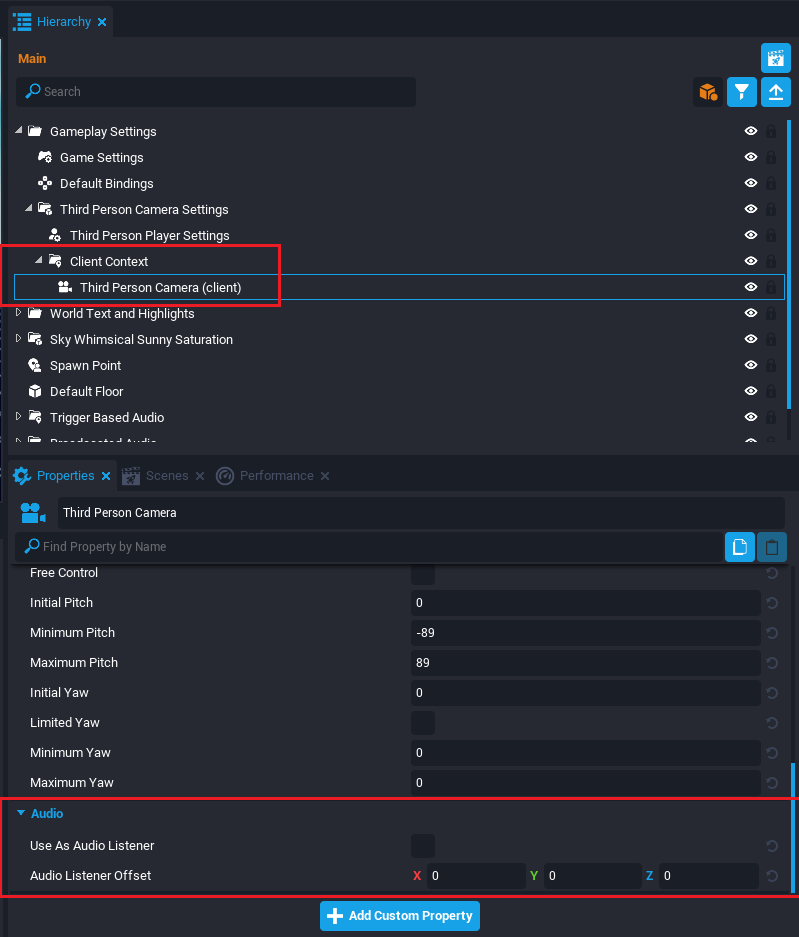
The Third Person Camera object (or any camera for that matter) has a tick box for the camera to be used as the listener for audio instead of the player position. It even has an offset setting for more control.
There is a Reverb Zone object found inside of Core Content but unfortunately it does not seem to be working as intended at the time of this writing. This tutorial will be updated once the bug is fixed.