Beginner level scripting tutorial
TUTORIAL SUMMARY:
This tutorial is intended for people who have no coding experience. The approach taken in this tutorial is more holistic than detail focused. As such, a lot of information is left hidden so that your brain won't drown under too much new information.
TUTORIAL:
INTRODUCTION
Welcome to this tutorial in which I will try to help you understand the basics of scripting in Core. This tutorial will no just be about scripting, but scripting in Core specifically. There are already thousands of freely accessible tutorials on the internet which will teach you how to code.
The qualities that you need in order to understand this tutorial are confidence and attention. You need to have the confidence that you can understand these things, that you can learn how to code. Programming might be intimidating for some, you might even think that it is not made for you, but I will show that it is more easy than it seems. There are key elements that you have to understand, and the rest is mere detail and subtleties. This is what I will try to make you acquire in this tutorial: a solid base. As such, my goal is not to flood your mind with too much information, but only the strict necessary amount of information in order for you to understand scripting as a beginner, which is the scope of this tutorial. Let’s begin right away!
_______________
CREATING A SCRIPT
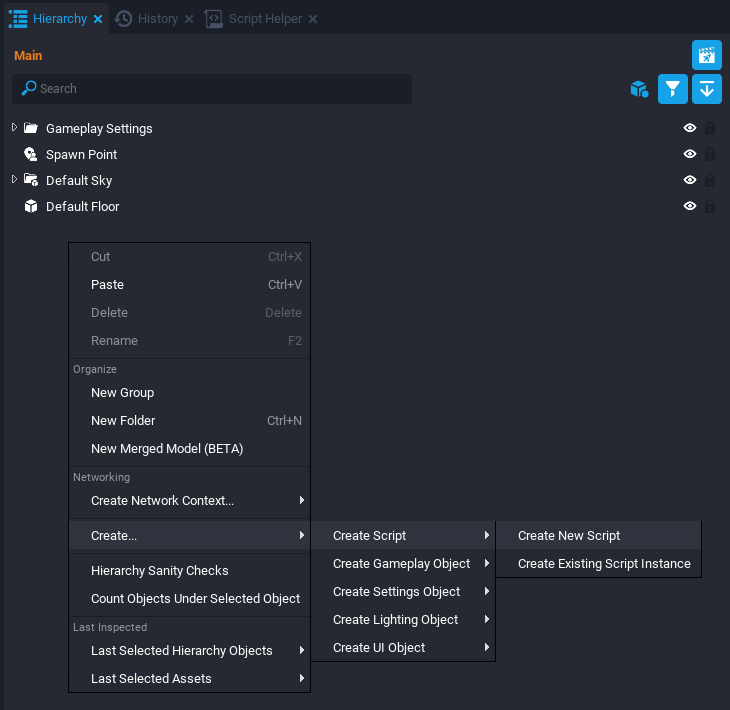
There are many ways to create a script in the Core editor, the one I use more often is right-click in the hierarchy > Create... > Create Script > Create New Script.
You will be prompted with a small window asking you to give a name to your script. You can leave the name by default and that's what I will do in this tutorial. And that’s it. If it’s the first script you ever created, well then congratulations!
What’s important here is this: you have to have the confidence that if you just drop a script in the hierarchy, it will be executed! Core will look inside it and execute whatever code you have put in there. It will work!
And BOOM!, this is your first confidence boost!
For now, you don’t have to worry about relations between objects, or where you should put your script in the hierarchy, as a child of another object or as parent of another one, or anything else. As long as your script is in the hierarchy, it will be executed!
But now what? Well, now you can start to put some code in your script. But don’t be afraid, you will see that Core comes packed with a lot of ready to use bits of code that you will use and reuse again and again! Isn’t life easy?
_______________
FIRST BITS OF CODE
Let’s say you want to do something to your players as soon as they join your game: give them a weapon, or make them run faster, or jump higher, or whatever. It’s very easy: Core has a built-in function exactly for when players join the game, it’s called the OnPlayerJoined function. Double click on your script in the hierarchy to open it and copy/paste the code below into it.
function OnPlayerJoined(player)

end
Game.playerJoinedEvent:Connect(OnPlayerJoined)
Don’t worry if you don’t understand exactly everything in the code that you just pasted, it is not important. What’s important here is that you are confident that you know what the code will do. In this case, it will give you the possibility to have an effect on any player that joins your game. If you press the Play button to start the preview, you will notice that your script does exactly… nothing. And it’s totally expected! The function is empty, but now is the time to add some of your own code. And as is the tradition in programming tutorials, we will print something in the event log! No, not “Hello world”, please no. We will print the name of the player who joins the game, simple enough! And thus, our new code looks like this:
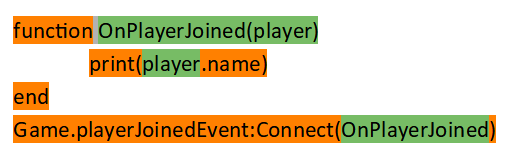
function OnPlayerJoined(player)
    print(player.name)
end
Game.playerJoinedEvent:Connect(OnPlayerJoined)
If you press Play again, you should see your player name appear in the Event Log.
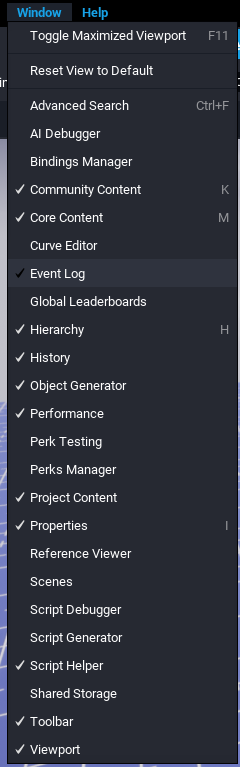
If for some reason, you don't see the Event Log, click on the Window menu of the Core editor and then click on Event Log.
Let me give you some tips to help you understand what is happening here:
Colored in orange are the parts of the code that is given to you by Core, thus that you cannot change. In green is the code that you can change, it’s the part of the code that contains the things that you can name the way you want. Many people learn coding this way: by copying and pasting bits of code without even a full understanding of the code that's being copied. The important thing is that you know what the code does, and the rest is just subtleties that you will learn along the way. It's like a maestro who is commanding a full orchestra: does he know how to play each instrument and every little subtlety and secret that each instrument hides? No, of course! But is he nonetheless capable of commanding the orchestra and able to create a satisfying harmony? Yes! And so, in green is the code that you can rename so it will fit your already existing code whenever you copy and paste code, whether it comes from the Core documentation and examples or discord.
A function has a name and sometimes it also has arguments. In this case, the function has only one argument and it’s the player who just joined the game. It's what is called in programming a variable, and it's just a container that is supposed to contain something. Notice how you must be consistent when you give names to things: it is very important. Here the player who joined the game is named player but you could name it anything you want, like for example thePlayerWhoJustJoinedTheGame, but now any time you need to refer to that player inside this function, you have to use the exact same name. The same for the function name, instead of OnPlayerJoined, you could call it WhatIWantToDoWhenAPlayerJoinsTheGame.
A very wise man once said: have the wisdom to accept the things that you can’t change, and the courage to change the things that you can actually change.
It is also very helpful to give names that are self-evident so that your code stays clear and easy to read. This function is of the event handler type and this fact is represented by line 4 in the code, and it just means that it waits for an event to happen in order to execute itself, in this case it waits for a player to join the game, and thus this function will execute every time a player joins the game. At line 2, this is where we actually do something: print(player.name) is a function itself, and is simply used to have some information printed in the event log, in this case the name of the player. That’s right, we can have functions inside other functions. This player has properties like a name, a team, and a whole list of other things that you can access by simply using a dot: player.name, player.team, player.kills, player.deaths, player.maxWalkSpeed, etc.. You can test it and see by yourself! Some of these properties are read-only, and some others you can modify. Try this code:
function OnPlayerJoined(player)
    print(player.maxWalkSpeed)
    player.maxWalkSpeed = 2000
    print(player.maxWalkSpeed)
end
Game.playerJoinedEvent:Connect(OnPlayerJoined)
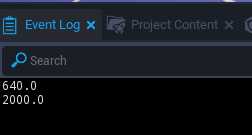
What this will do is the following: it will first print in the event log the default walking speed of the player(which is 640), then set it to 2000, then it will print again the walking speed of the player. If you start the preview, your character should be able to run much faster! And your event log should look like this:
So far, we have only used player properties, but now let’s use a function on the player. Let’s double the size of every player that joins the game with the following code:
function OnPlayerJoined(player)
    player:SetWorldScale(Vector3.New(2))
end
Game.playerJoinedEvent:Connect(OnPlayerJoined)
As you can see if you start the preview, your player character is now twice the normal size. SetWorldScale is a function that works on players as well as on any game object that has a geometry. To apply that function to an object, instead of using a dot like we do to access properties, we use two dots. The Vector3.New part is what the function needs in order to set the 3 dimensions of the object. In this case, we use a shortcut by just typing ”2”, which will set the scale of the player twice as big on X, Y and Z axis.
Let’s recapitulate what we have seen so far:
- If you drop a script in the hierarchy, the code inside the script will be executed
- Core offers a very long list of properties and functions that are ready to use and can help you accomplish all the basic tasks that you may need, and then some more!
- The code is roughly made of 2 parts: the code that you have to use as is, that you cannot change, and a part that you can change, that you can rename to your liking
- Objects have properties that can be read-only or read and write. Objects can also be affected by functions. If you want to read about all the properties and functions that Core offers you, go here: https://docs.coregames.com/api/. For example, if you want to know more about all properties and functions related to the player, go here https://docs.coregames.com/api/player/. The Core documentation is an integral part of your journey as a game developer in Core, consult it often!
_______________
CREATING YOUR FIRST FUNCTION
Now, let’s dive a little deeper and let’s create our own function! Delete all the code you have typed in your script so far and put the following code inside instead:
function MyFirstFunction()

end
To define a basic function, it’s as easy as that. I am sure you have noticed that the function is empty, so let’s print something in the event log to make sure our function works:
function MyFirstFunction()
    print(“my first functionn works!”)
end
If you start the preview, you will notice that nothing happens, nothing is printed. Why? Because the code above is only a function definition. It’s only the code that will define what the function will do and how it will behave. Then when the function is defined, we have to actually execute it, and to achieve that you have to type the name of your function anywhere in your code, as long as it is placed below the function definition, like so:
function MyFirstFunction()
    print(“my first functionn works!”)
end

MyFirstFunction()
If you start the preview, now “my first function works!” should be printed in the event log. Easy enough, right? Let’s spice things up a little bit and create a second function. Delete everything in your script and copy/paste the following code:
function MySecondFunction()
    print(“my first function works!”)
end

function MyFirstFunction()
    MySecondFunction()
end

MyFirstFunction()
Can you guess what is happening here? That’s right: one function is calling another function! So, first we define MySecondFunction and we tell it to print our little text, then we define MyFirstFunction and we tell it to execute MySecondFunction, then all that’s left to do is to tell Core to execute MyFirstFunction. The chain of events should be clear. If you start the preview, the result should be the exact same as the previous code example.
Let’s try with another example and this time let’s introduce a new factor. Replace your code with the following code:
function PrintThePlayerName(theNameToPrint)
    print(theNameToPrint)
end

function OnPlayerJoined(player)
    PrintThePlayerName(player.name)
end
Game.playerJoinedEvent:Connect(OnPlayerJoined)
What’s new here is this: when you define a function, you can prepare it to receive arguments that it will process. Here, every time a player connects to the game, the OnPlayerJoined function executes the PrintThePlayerName function and it feeds it the name of the player so PrintThePlayerName knows what it has to print. When defining PrintThePlayerName, we tell it to expect a player name with the help of theNameToPrint. Don’t forget that you can rename these things to your liking to give them a name that makes sense to you, or those who work with you and who might read your code. Also, don’t forget to stay consistent: don’t change a name half way, otherwise Core will tell you that there is an error. Clarity and consistency!
There are many advantages in creating a function to gather together many bits of code. Imagine that you have to print the name of a player many times in your game: it is easier and more efficient to define once and for all a function that will only do that. Imagine that you not only need to print the name but you do many other things, like coloring the name in a different color depending on the team the player is in, and playing a different sound, etc.: it is so much more efficient to define that function once and use it often, rather than type all the code again everywhere it is needed. Not only it will spare you many lines of code, but think about the fact that at some point, you might need to modify that code: how much more efficient is it to have to modify the code just once compared to having to modify it in many different places?
-------------------
CONDITIONAL CODE
Let’s introduce an important new concept: conditional code. It is simply code that will execute under certain conditions. Replace your code with the following code:
function OnPlayerJoined(player)
    if player.name == “typeHereYourPlayerName” then
        print(player.name)
    end
end
Game.playerJoinedEvent:Connect(OnPlayerJoined)
What this code does is simple: it checks if the player that just connected to the game has a specific name before printing anything. To do so, we use the if keyword, and to check if the name corresponds, we use the == symbol to check for equality. Other useful symbols are:
< for smaller
> for greater
<= for smaller or equal
>= for greater or equal
~= for unequal
In the code above, we are comparing words together, or strings as they are called in programming. But you can use the if statement to compare numbers too, and other things. Strings must always be surrounded by quotes. typeHereYourPlayerName is supposed to be your player name, so replace it with your player name, and don’t forget that it is case sensitive! If you start the preview, your player name will be printed in the event log only if typeHereYourPlayerName corresponds exactly to your player name, otherwise it will do nothing. Clever, isn’t it? Let’s add one more touch to that code:
function OnPlayerJoined(player)
    if player.name == “typeHereYourPlayerName” then
        print(player.name)
    else
        print(“I don’t recognize you!”)
    end
end
Game.playerJoinedEvent:Connect(OnPlayerJoined)
Here is the same code but with the orange and green colors. It is a good idea to learn to recognize the code that can change and the code that you can name to your linking.
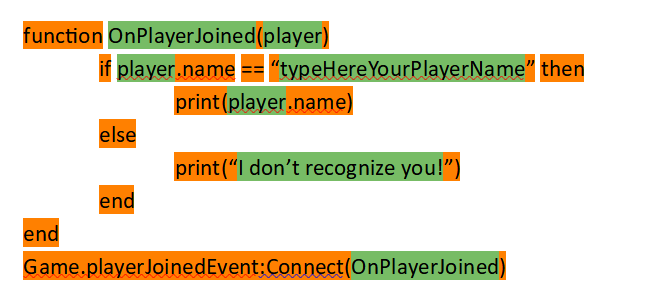
We have simply added one more instruction to our code and we have made it a bit more intelligent: now if typeHereYourPlayerName doesn’t correspond to the name of the player who just connected, the code won’t just do nothing but it will print a message saying that the name doesn’t correspond. Even more clever! The keyword else is what we have used to achieve that.
-------------------
MANIPULATE OBJECTS THROUGH SCRIPTS
Scripts in a Core game are where the magic happens. It's the birth place of any game mechanic that you can imagine. It's where you will manipulate every other "non-intelligent" object in your game. But in order to manipulate these objects, you first have to have a way to give them your orders, you have to bring them somehow into your scripts. There is more than one way to achieve that, and we will use here what is in my opinion the simplest to learn: finding them by their name. And here again, Core provides us with exactly what we need. Delete any code you might have in your script then copy and paste or type the following code:
local myCube = World.FindObjectByName("My Beautiful Cube")
This code does the following: it first creates a variable named myCube, then it assigns to it an object in the game world that is named "My Beautiful Cube". World.FindObjectByName is another handy tool given to you by Core to help you find any game object with the specified name. But what if it cannot find an object with the specified name? Well then, myCube will have no value, or more specifically it will have a nil value. If you try to print the content of myCube with the following code:
local myCube = World.FindObjectByName("My Beautiful Cube")
print(myCube)
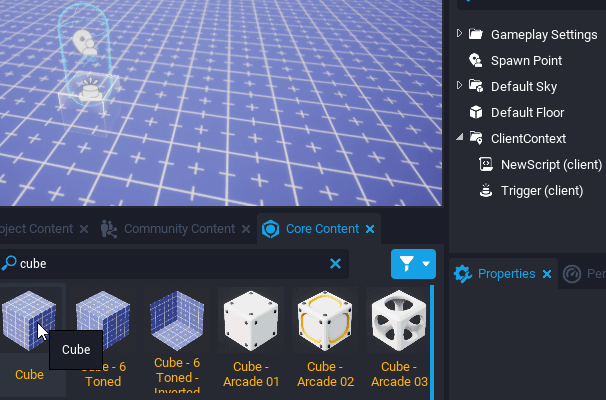
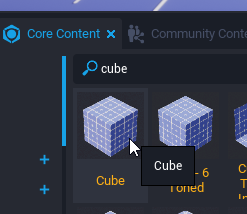
You will notice that instead of printing nothing, or printing a message saying the variable is empty, the event log just says nil. This is totally normal behavior and it's also totally expected because well... the object named "My Beautiful Cube" doesn't exist yet! But let's create it: in the Core Content tab, search for "cube", then just drag and drop a cube in the main 3d view.
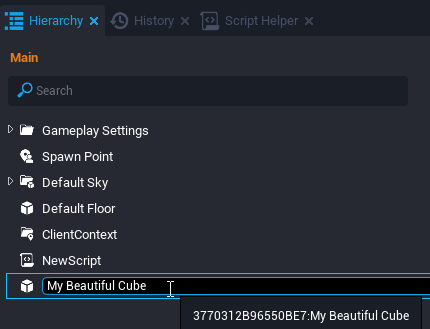
If you look at your hierarchy, the cube is named "Cube", but we need to rename it: select it, then press F2 and give it the name "My Beautiful Cube" , like so:
Now, if you start the preview again, you should have a result like this:
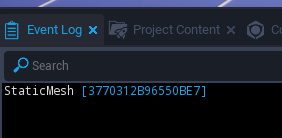
Which means that now our object has been found by World.FindObjectByName! Our object is of the type StaticMesh and then it has a unique ID number. Every object in a Core game has a unique ID number, and in fact, you can also find objects in the game world by using their ID with the help of World.FindObjectById. If you leave your mouse cursor for an instant on the object in the hierarchy, the ID of the object will be displayed:
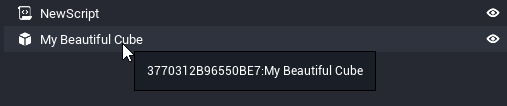
You can also right click on your object and copy the ID in order to use it in your scripts:
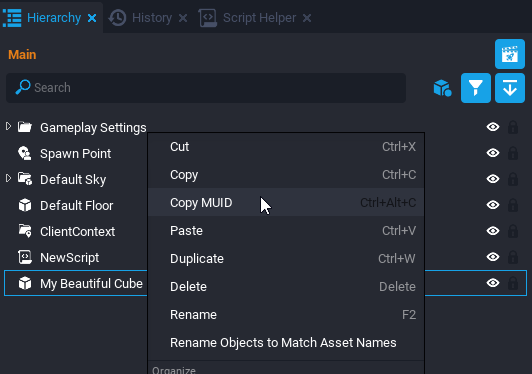
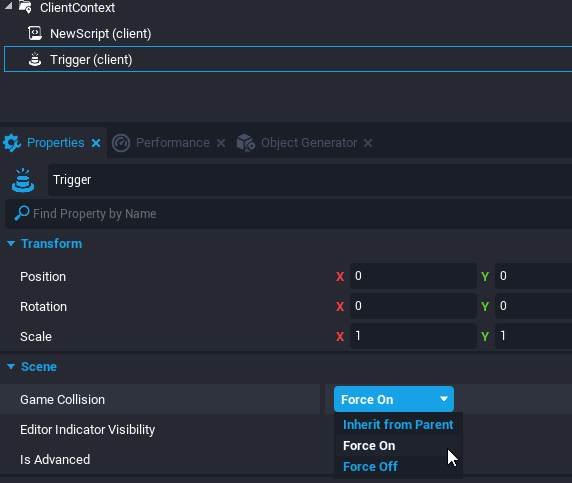
Now that our script knows how to talk to our cube, we will be able to manipulate it in any way we want. But before that, there is one more step and one more important concept to explain: in order to be modified by the server, objects have to be Networked. What does it mean? It simply means that in order to keep the game synchronized between all the players and the server, any change made by the server to the cube has to be replicated on all clients as soon as possible. And for that, the object needs to be simply marked as Networked. To achieve that, right click on your object, then click on Enable Networking.
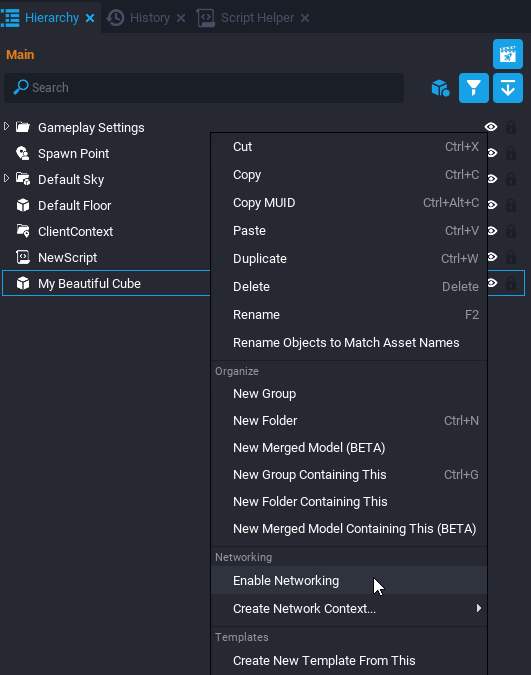
You will notice that the (networked) tag has been appended to the name of your object:
![]()
Be careful when you create networked objects: the more you have, the less performant the game is going to be. If you have too many, players might experience lag. The number of networked objects is also directly linked to the number of players your game will accept. So if you create only one networked object but your game can accept 16 players, you won't have only one networked object but 16 actually! Believe me, it goes up really fast and a good portion of your time as a developer on Core will be to try to find ways not to add too many networked objects. If you look at the top of the Core editor, you will see this bar:
Do you see the "8/4000"? I have only 1 networked object in my game but because the game accepts 8 players, 8 networked objects are actually counted!
And now that our cube is networked, let's have some fun! Want to change the cube's color to red? Replace your code with this then start the preview:
local myCube = World.FindObjectByName("My Beautiful Cube")
myCube:SetColor(Color.RED)
Want to triple the cube's size?
local myCube = World.FindObjectByName("My Beautiful Cube")
myCube:SetWorldScale(Vector3.New(3))
Want to change its rotation on a certain axis?
local myCube = World.FindObjectByName("My Beautiful Cube")
myCube:SetWorldRotation(Rotation.New(0, 60, 0))
What if we made an animation? It will also allow for the introduction of an important programming concept: the loop. A loop is simply a piece of code that will repeat as many times as you want, or indefinitely. Let's make our cube change color every 1 second, indefinitely. Replace your code with the following then start the preview:
local myCube = World.FindObjectByName("My Beautiful Cube")
while true do
    Task.Wait(1)

	myCube:SetColor(Color.RED)

	Task.Wait(1)

	myCube:SetColor(Color.BLUE)

	Task.Wait(1)

	myCube:SetColor(Color.GREEN)

	Task.Wait(1)

	myCube:SetColor(Color.YELLOW)

	Task.Wait(1)

	myCube:SetColor(Color.BLACK)
end
The while loop is very common. What it does is it checks if a condition is true before starting to execute the code inside the loop. Here, we didn't put any specific condition but we just typed true, and because true is by definition always true, the condition check is always successful and the while loop executes the code indefinitely. Task.Wait(1) is a very handy little piece of code given to you by Core that just allows us to have a pause(in seconds) between each color change. Without the pauses, the code would be executed so quickly that we wouldn't see any color change and Core might even throw an error to say that the code doesn't make sense!
There is another way to achieve the same effect without using a loop: the Tick function. It is a function that is given to you by Core which basically works like a loop. Unlike other functions, the Tick function is automatically executed as long as it is defined. If you replace your code with the following, the code will behave the same way:
local myCube = World.FindObjectByName("My Beautiful Cube")

function Tick()
	Task.Wait(1)

	myCube:SetColor(Color.RED)

	Task.Wait(1)

	myCube:SetColor(Color.BLUE)

	Task.Wait(1)

	myCube:SetColor(Color.GREEN)

	Task.Wait(1)

	myCube:SetColor(Color.YELLOW)

	Task.Wait(1)

	myCube:SetColor(Color.BLACK)
end
Be careful when you use loops: computers don't have unlimited computing power, and thus if you push them to make too many operations too quickly, strange results may occur!
-------------------
THE CLIENT CONTEXT
I hope you are comfortably following along because we are about to add a layer of knowledge to what we have learned so far: until now, what we’ve done is we’ve told the server to execute scripts, but now we’re going to tell the client to do it instead. What’s the difference you’re asking? Well, I was about to tell you: a client is simply the computer on which the player is… playing, and the server is well… the server, on which no one is playing.
Core is a multiplayer platform in which the server is all powerful. Only the server can kill a player, or make the player respawn, or give the player a weapon, etc., which is usually called an authoritative server. If two players are in the same game, and one player shoots at the other player, the information is first sent to the server, then the server decides if the target player was actually hit, if yes then it adjusts the target player hit points or kills the player if hit points have reached zero, and this effect is replicated to all the players around, so that all the players will see player A shooting player B.
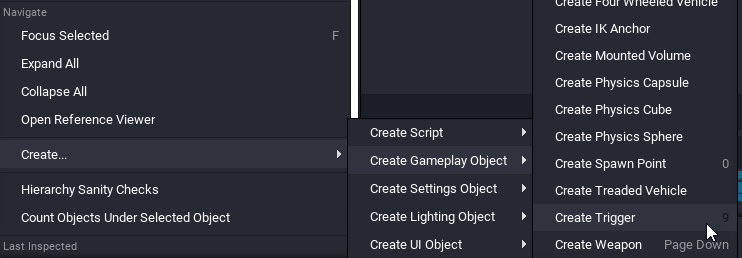
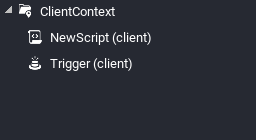
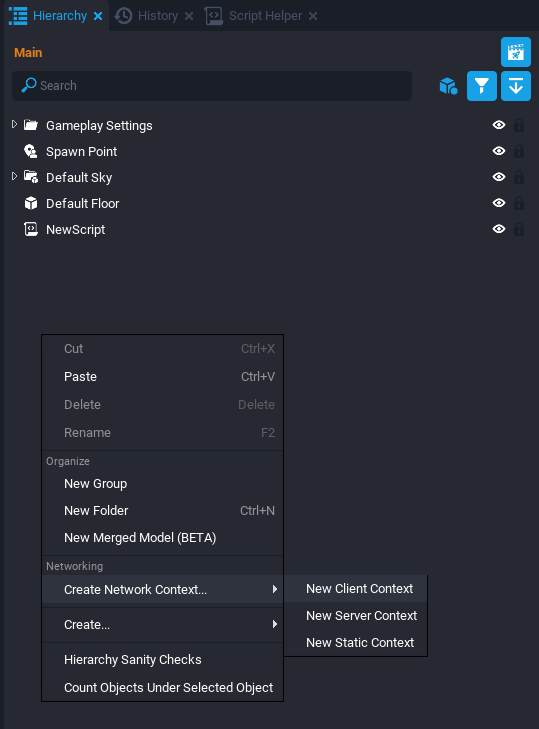
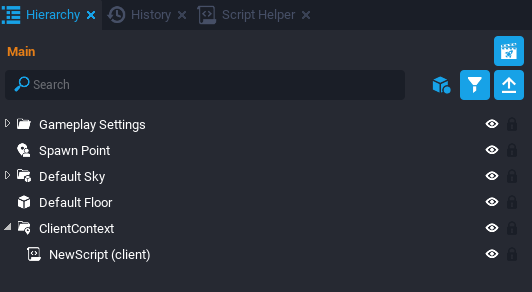
So as you can see, the server is the real master and everything has to go through it. Everything? Not really. There are some things that the server doesn’t care about and thus doesn’t need to know. Let’s imagine that in your game, players can customize the colors of their user interface: does the server need to know this? No, it doesn’t, because the colors of the interface have no effect on anything: it is not gameplay related, it is merely convenience. The other players around you don’t need to know that you have chosen light blue with a touch of purple for the color of your user interface. What if a player wants to lower the sound of the music: does the server need to be bothered with this information, or the other players around? Obviously not. And so was born the Client Context: it is a special folder that will tell Core that any script inside it will not be executed on the server, but rather on the player’s computer.To create such a folder, right-click in the hierarchy > Create Network Context > New Client Context.
Then simply drag and drop your script inside it. And voila! Your script is now a client script. You will notice that your script now has the (client) tag appended to its name in the hierarchy.
Important things to remember about the client context:
-
Some functions and properties only work in server scripts, some others only work in client scripts. Refer to the Core documentation to know which code can go in which context. Core will throw an error if you try to use server code in a client script or vice versa. And there is also a large number of properties and functions that work in both contexts.
-
The server is completely blind to what happens in a client context, unless you decide otherwise by transmitting information to the server. Core will throw an error if you try to manipulate a client object from a server script.
-
Every object that you spawn from a client context will be client only. A spawned object inherits the context of the script that spawned it, and this is also true for server and static contexts.
Now that your script has become a client script, it will be executed on the players computers, not by the server anymore. Each player computer will run its own copy of that client script.
Let's add some client specific code to our client script. One important thing to keep in mind is that because a client script is executed on a players computer, the code inside the script will be executed as soon as the player is loaded into the game. Delete everything in your client script and paste the following code in:
print(Game.GetLocalPlayer().name)
What this code does is pretty simple: it just prints the name of the player on whose machine the client code is being executed. Game.GetLocalPlayer() is the very handy little piece of code given to you by Core that does the job of retrieving that player. You will very often use it in all the client scripts of your future projects. And because you will use it often, let's put it inside a variable that will be much easier to type, read and remember. Replace your code with the following:
local THE_LOCAL_PLAYER = Game.GetLocalPlayer()
print(THE_LOCAL_PLAYER.name)
Here is the same code with orange and green colors:

What we are doing here is pretty simple: first we create a variable named THE_LOCAL_PLAYER and with the help of the = symbol, we assign to it Game.GetLocalPlayer(). And so from now on, every time you type THE_LOCAL_PLAYER, it's as if you typed Game.GetLocalPlayer(). Remember, variables are just containers supposed to contain a value. We call the player THE_LOCAL_PLAYER because it's the player on whose machine the code is being executed, the local machine, but you can give any name you want to that variable. Game.GetLocalPlayer() is typically the piece of code that works only inside client scripts because no one is playing on the server, which is just a computer in a data center somewhere in the world. If you're asking yourself what the first local means in the code at line 1, it simply says that this variable cannot be accessed from another script and it's a detail you should not bother yourself with right now.
If you start the preview, your player name should be printed in the event log, just like with the previous example.
-------------------
THE USER INTERFACE SYSTEM
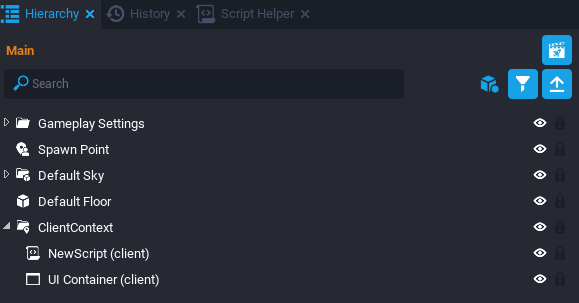
Something that you will be using very often is the Core UI system, which is 100% client side: buttons, text fields, progress bars, etc., all these objects are meant to be used in a client script. And thus, all UI objects must be placed inside a client context in order to be accessible from your client script. There is a UI object that you have to create first because it contains all other UI objects, it's called the "UI Container". If you don't place it first, all other UI objects will be invisible. In order to create one, right click in the hierarchy > Create... > Create UI Object > Create UI Container.

Once it's created, make sure the UI Container is inside your client context by dragging and dropping it on the client context:
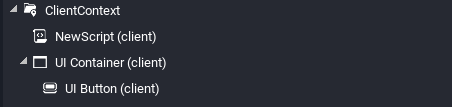
When an object is inside another object, we say that they have a parent/child relation. In your scripts, you can always find the parent of the script itself by using script.parent. Here, the client context which is the parent has 2 children: our client script and the UI Container. Now, let's add a button to our user interface: right click on the UI Container > Create... > Create UI Object > Create UI Button. By right clicking directly on our UI Container, our button has been made a child of it automatically.
If you look at the top left corner of the main view, a white button should have appeared:
You can move it wherever you want and change its size by dragging the little handles around it.
If you start the preview, you will notice one big problem: how are we supposed to click on a button if we don't have the mouse cursor?! Let's quickly fix that with the help of yet another very handy piece of code given to you by Core. Delete everything in your script and paste the following code:
UI.SetCursorVisible(true)
Now if you start the preview, you should be able to see the mouse cursor and click on the button. If you want to make sure your button reacts to the mouse cursor, select the button in the hierarchy and change its Hovered Color parameter in the properties window:
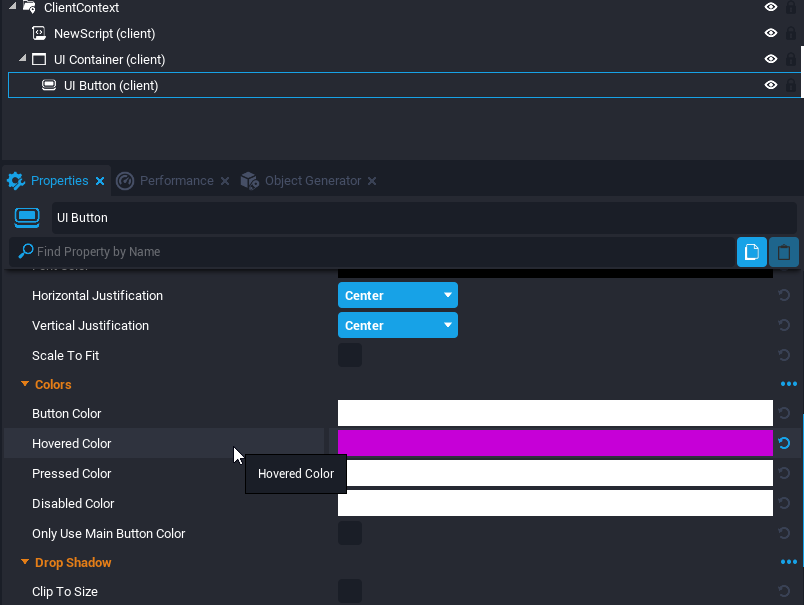
Now, let's make our button have an effect when we click on it, and for this example we will do something very simple, we will make the mouse cursor disappear. There is a specific piece of code that Core offers you which handles clicking buttons.
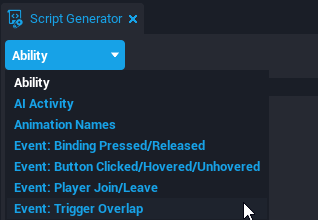
But first, let's talk about a very handy tool that will boost your productivity: the script generator. To open it, look at the top bar:
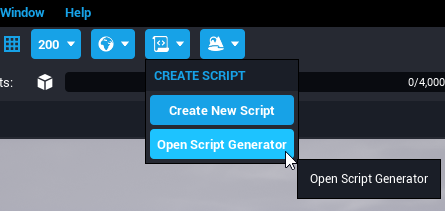
Once opened, click on the button at the top left corner of the script generator window which says "Ability", and choose "Event: Button Clicked/Hovered/Unhovered":
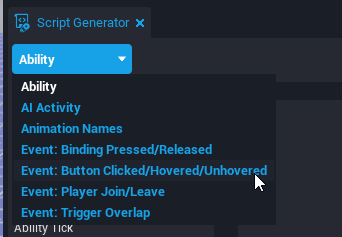
As you can see and as the name suggests, the script generator simply generates pieces of code most often used when developing Core games. It's a very quick and useful tool that even experienced programmers keep using.
In the case of buttons, it gives us ready made code for the 3 events linked to buttons: clicked, hovered and unhovered. Since we only need the clicked event, we are not going to copy everything, but only the parts that we need. And so, we need to copy two things: the handler function:

and the line that initializes the event:
![]()
Copy these 2 pieces of code and paste them into your script:
UI.SetCursorVisible(true)

function OnClicked(whichButton)
	print("button clicked: " .. whichButton.name)
end
button.clickedEvent:Connect(OnClicked)
You will notice that the line that initializes the event starts with button, this is a variable that needs to point to our button in the hierarchy. In other words, we need to tell the code which button we are actually talking about, because in different circumstances we may have many buttons. To achieve that, instead of using World.FindObjectByName, we will use a different method. At the top of your script, before UI.SetCursorVisible(true), add this line:
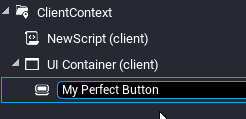
local button = script.parent:FindDescendantByName("My Perfect Button")
Here is what we are doing with this line: first, we create a variable named button which will contain our button. Then, in order to actually find our button, we say: hey script, find me your parent, then find any descendant of that parent with the name "My Perfect Button". It works perfectly because the client context is the parent of the script and our button is a descendant of the client context! But there is one thing left to do, and I am sure you have guessed it, we actually have to name our button "My Perfect Button"! Because if we don't do that, our button variable will be nil since there is no object with the name "My Perfect Button" to be found in the hierarchy.
Your code should look like this:
local button = script.parent:FindDescendantByName("My Perfect Button")

UI.SetCursorVisible(true)

function OnClicked(whichButton)
	print("button clicked: " .. whichButton.name)
end
button.clickedEvent:Connect(OnClicked)
If you start the preview and click the button, a message should be printed in the event log. Let's analyze the handler function:

When the event is fired, in other words in this case, when the button is clicked, the event tells the function: "hey, here is the button on which the player has just clicked". Then all that's left to do is to actually do something with the button. You can see the name that the script generator has given to the variable representing the button that's been clicked: whichButton. Then all that's left to do is to print a message in the event log. The .. are used to concatenate strings together, in this case "button clicked:" and whichButton.name.
You may be wondering why the handler function needs to receive the button that's been clicked with whichButton, and the reason is simple: you can have one handler function that will handle many different buttons. Imagine that you have 20 buttons in your user interface, you're not going to create 20 handler functions, but instead you're going to create only one handler function and just check which button has been clicked. The code would look like this:
function OnClicked(whichButton)
    if whichButton.name == "Close Button" then
        -- do something related to closing
    elseif whichButton.name == "Open Button" then
        -- do something related to opening
    elseif whichButton.name == "Check Button" then
        -- do something related to checking
    end
end
closeButton.clickedEvent:Connect(OnClicked)
openButton.clickedEvent:Connect(OnClicked)
checkButton.clickedEvent:Connect(OnClicked)
Now, we don't want our button to print a message every time it is clicked, but we want it to hide the mouse cursor. Replace this line:
print("button clicked: " .. whichButton.name)
With this line:
UI.SetCursorVisible(false)
Now, as soon as you click the button, the mouse cursor disappears and you're given camera control back!
-------------------
Tutorial continues in the next post below...