Racing Framework
A Comprehensive Guide
Table of Contents
1 - Introduction
2 - Example Files
3 - Game Settings
4 - Game Settings Reference
5 - Add a Custom Vehicle
6 - Game Events
7 - How to use Game Events
8 - APIs
9 - How to use APIs in your Scripts
10 - API Practical Applications
11 - Example 1 - Button to Start Race Immediately
12 - Example 2 - Display to show the Next Track Info
13 - Example 3 - Spectator Mode
14 - API Reference
15 - APIActivePlayers
16 - APIBasicGameState
17 - APIRaceTrack
Introduction
This guide is targeted towards more intermediate/advanced users who would like to start implementing custom features on top of the Racing Framework.
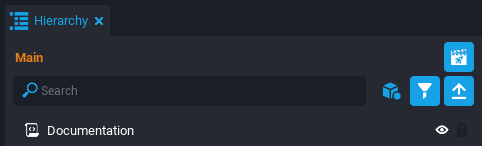
If you are new to Core or just started using the Racing Framework I would suggest you first go through the Documentation file that can be found in the project hierarchy of the framework.
Then go through the below tutorial first.
Example Files
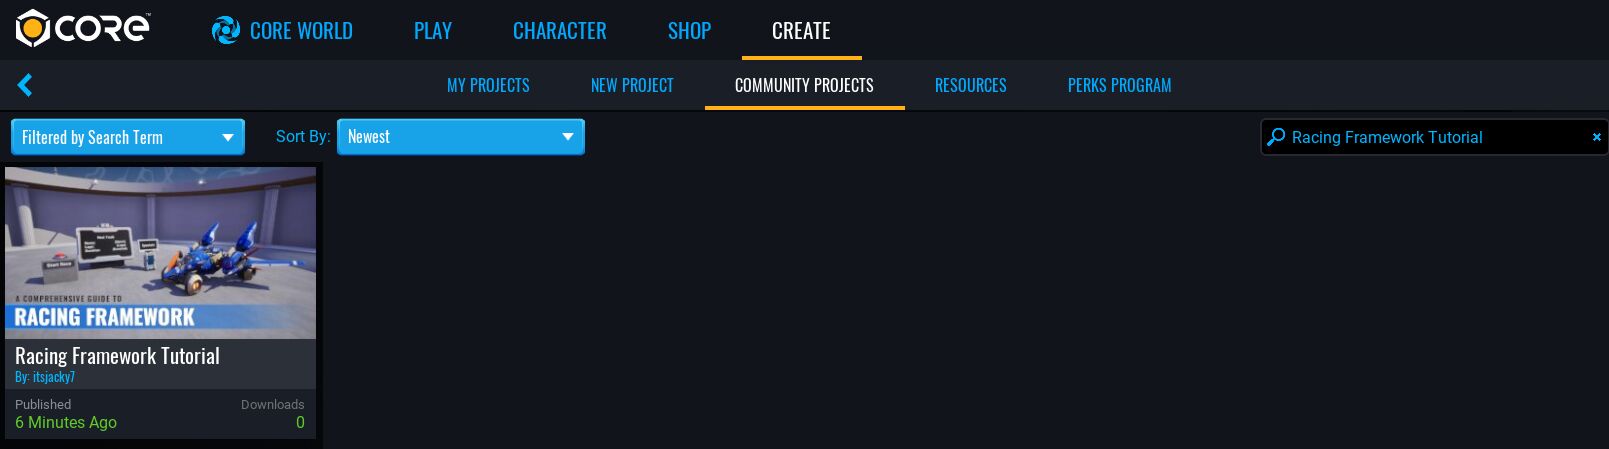
An open for editing game has been published to complement this tutorial.
To download the example game go to the Create > Community Projects tab in Core and search for "Racing Framework Tutorial" and set the Sort By filter to Newest. Find the Racing Framework Tutorial game by itsjacky7 and download.
You will find all the exmaples that we create in this tutorial under the Custom Features folder in the project hierarchy. The custom vehicle can be found in the Project Content under My Templates > Cars > Mecha Ship.
Game Settings
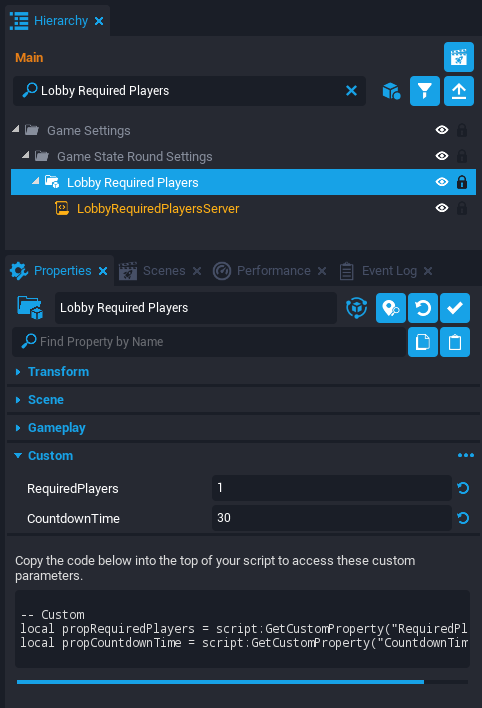
Most of the game settings that you can configure in the Racing Framework has been exposed as Custom Properties of the group object in the project hierarchy.
For example if you want to change the lobby countdown timer or the amount of players required to start a race. You can select the Lobby Required Players group object in the hierarchy and in the properties tab, navigate to the Custom Properties section. There you'll find the settings that can be modified to your likings.
Game Settings Reference
Below is a list of all the game settings available in the Racing Framework. The list is formatted starting with the name of the Group object followed by a table of the properties associated with the group.
Show/Hide Game Settings Reference
Basic Game State Manager
| Property | Description | Default |
|---|---|---|
| LobbyHasDuration | Lobby phase has a maximum duration | false |
| LobbyDuration | Lobby duration (if LobbyHasDuration) | 20 |
| RoundHasDuration | Round phase has a maximum duration | false |
| RoundDuration | Round duration (if RoundHasDuration) | 300 |
| RoundEndHasDuration | Round end phase has a maximum duration | true |
| RoundEndDuration | Round end duration (if RoundEndHasDuration) |
Lobby Required Players
| Property | Description | Default |
|---|---|---|
| RequiredPlayers | Number of players needed to start the countdown | 1 |
| CountdownTime | Time to round after number of players join | 30 |
Racing Round
| Property | Description | Default |
|---|---|---|
| RoundEndCountdownTime | 15 |
Race Tracks Manager
| Property | Description | Default |
|---|---|---|
| StartTrackIndex | 1 |
Race Track Vehicle Spawner
| Property | Description | Default |
|---|---|---|
| DefaultVehicle | Set default vehicle if player have not selected a car. | Sports Car |
Race Lap Time Tracker
| Property | Description | Default |
|---|---|---|
| LapMessageDuration | 2 | |
| WinMessageDuration | 5 | |
| ShowWinRank | true |
Vehicle Global Camera Controller
| Property | Description | Default |
|---|---|---|
| MaxFieldOfView | Field of view when vehicle is moving at MaxVehicleSpeed. | 125 |
| MinFieldOfView | Field of view when vehicle is moving at normal speed. | 90 |
| MaxVehicleSpeed | Set the max vehicle speed at which the camera would lerp to MaxFieldOfView. | 6000 |
| Pitch | -20 | |
| PositionOffset | (0, 0, 100) | |
| CameraPosition | (35, 0, 60) | |
| Stiffness | 4 | |
| LookBackBinding | Binding to look behind the vehicle. | ability_extra_20 |
Track 1 Settings
| Property | Description | Default |
|---|---|---|
| Waypoints | Waypoints | |
| StartingPositions | Starting Positions | |
| Vehicles | Vehicles | |
| Name | Race Track Name | Track 1 |
| Laps | Number of laps for this race track. | 3 |
| RoundTime | Set time for race to end.This helps ensure the race eventually ends if some players stay afk during a race. | 300 |
| DefaultVehicle | Set the default vehicle for this track. This will be assigned regardless of players’ vehicle choice. If AssignRandomVehicles is selected, then this property will be ignored. | Sports Car |
| AssignRandomVehicles | Ignores DefaultVehicle and assigns a random vehicle from the Vehicles list to each player before the race round starts. If the player has vehicle selected from the vehicle list, then this property ignores won’t assign a random vehicle. | true |
| Loop | Should the race track be looping? | true |
| DEBUG_DrawPath | Draw waypoint debug lines for this track. | false |
Race Minimap Display
| Property | Description | Default |
|---|---|---|
| LineColor | #6C6C6C | |
| LineThickness | 32 | |
| RotateMap | true |
Race Fullscreen Minimap Display
| Property | Description | Default |
|---|---|---|
| LineColor | #FFFFFF | |
| LineThickness | 32 | |
| RotateMap | false |
Vehicle Speedometer Display
| Property | Description | Default |
|---|---|---|
| SpeedUnit | Units are MPH (miles per hour), KMH (kilometers per hour), or CMS (centimeter per second). | MPH |
| MaxSpeed | Max speed number to be shown on the speedometer. | 220 |
| StartAngle | Set needle start angle for ticks spawning. The default angle is 0. Adjust the needle panel rotation to preview the start angle. | 250 |
| TicksSegmentsCount | Number of tick segments to divide the speedometer. | 11 |
| AnglePerTick | Angle number to add between ticks. | 20 |
Scoreboard
| Property | Description | Default |
|---|---|---|
| Binding | ability_extra_19 |
Ranked Nameplates
| Property | Description | Default |
|---|---|---|
| ShowOnSelf | Show a nameplate on the local player. | false |
| RankColor | #FFFFFF | |
| NameColor | #0093E2 | |
| MaxDistanceToShowRank | Only show rank up to this distance away. 0 means always show them. | 12000 |
| MaxDistanceToShowName | Only show player names up to this distance away. 0 means always show them. | 5000 |
| Scale | Overall scale factor for nameplates. | 2 |
Message Banner
| Property | Description | Default |
|---|---|---|
| DefaultDuration | Default duration of a message if none is specified | 3 |
| LocalMessageSpawnOffset | World local player offset to display local message on the player. | 200 |
| FadeOutDuration | 0.5 |
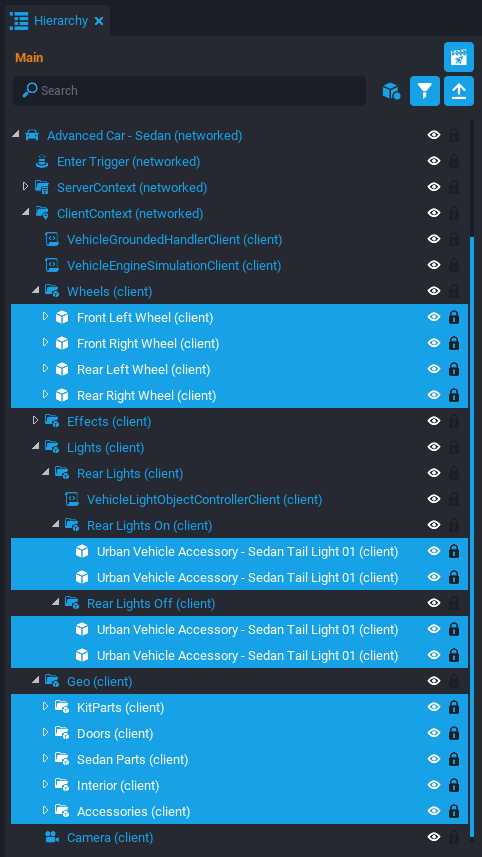
Add a Custom Vehicle
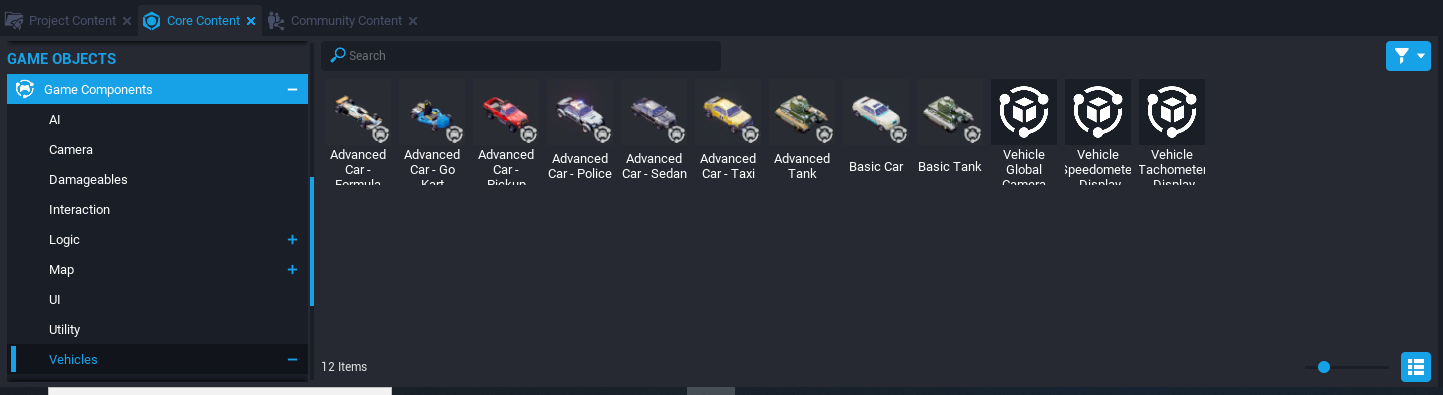
To create a custom vehicle it is easiest to start by using one of the default vehicle templates available in the Core editor. You can find them in the Core Content under Game Components > Vehicles. We’ll be starting our vehicle using the Advanced Car - Sedan.
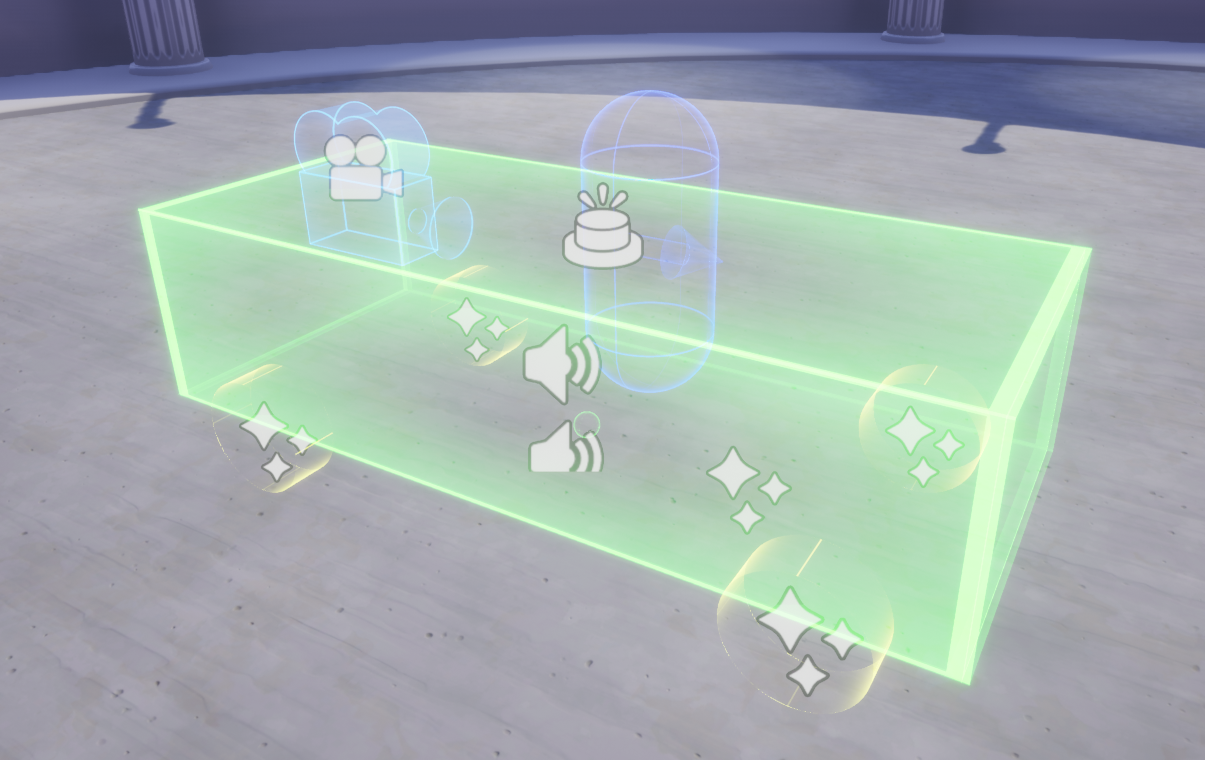
Once you’ve added the Advanced Car - Sedan to your project hierarchy we’ll start by removing all the geometry and keeping only the functional elements of the template. Select all the objects highlighted in the image below and delete them.
Select Deinstance and Delete when the popup is displayed.
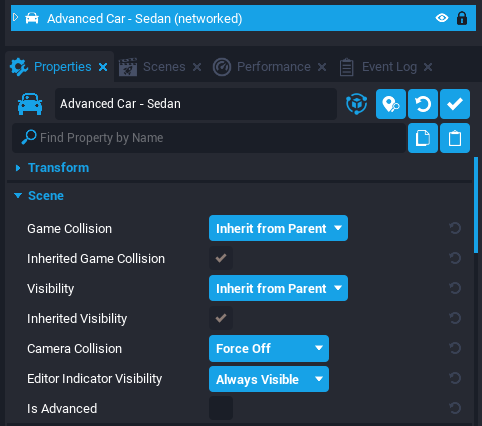
Select the Advanced Car - Sedan in the hierarchy and set the Editor Indicator Visibility to Always Visible. This will help make it easier to edit by making the collision box always visible.
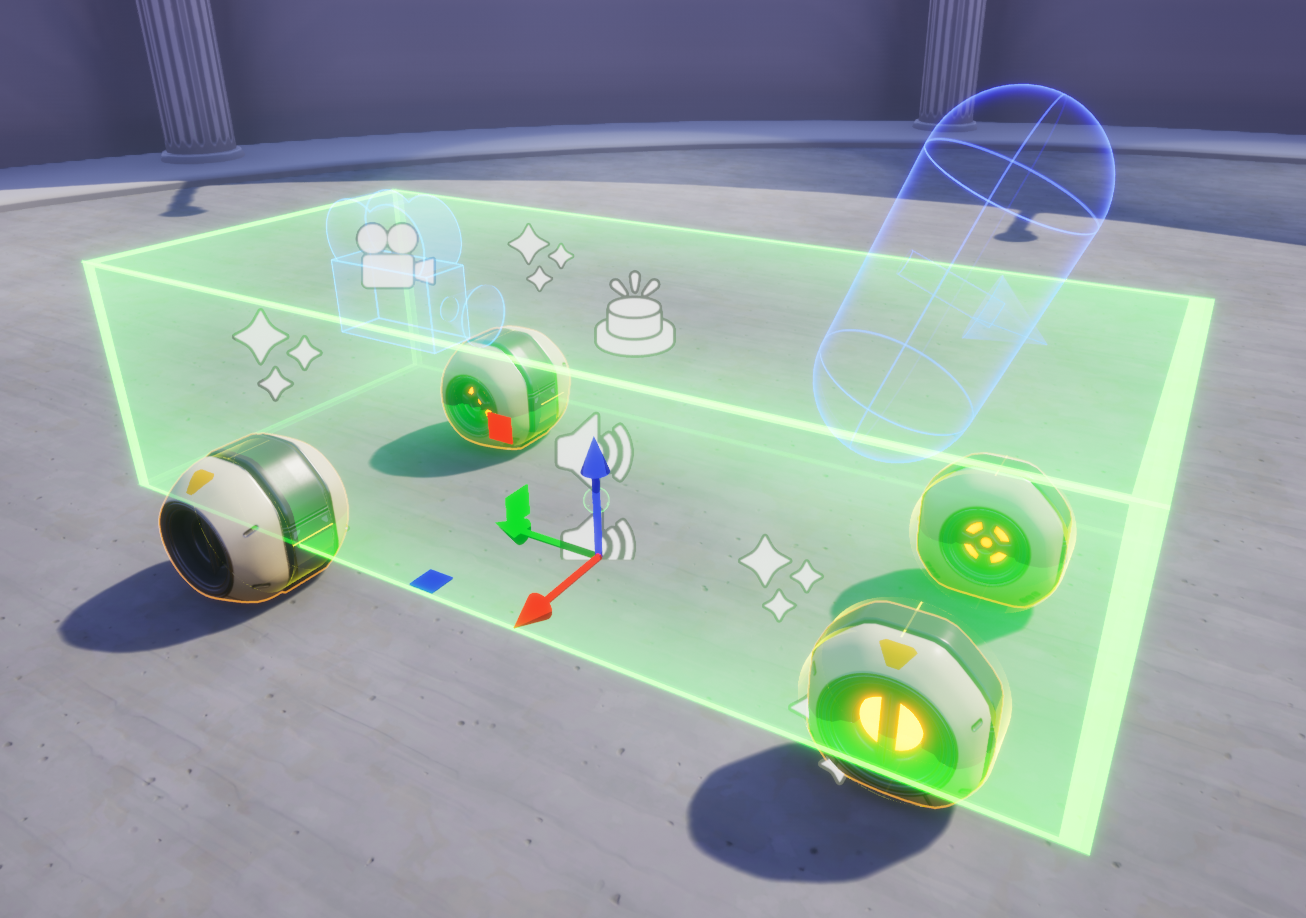
You should now see something like this in the Viewport.
In this guide we’ll be kitbashing a vehicle using the Mecha props (found in Core Content > 3d Objects > Props > Vehicles > Mecha).
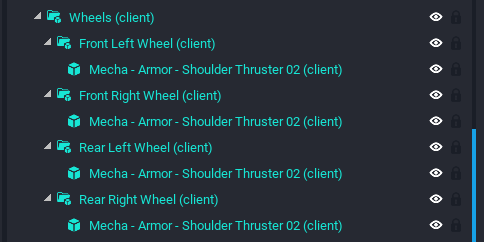
Start by adding the wheels into the Wheels folder. We used the Mecha - Armor - Shoulder Thruster 02 for the wheels rotate and position the wheels to match up with the vehicle collision.
Then you’ll need to add the objects into a group and appropriately name them (Front Left Wheel, Front Right Wheel, Rear Left Wheel, Rear Right Wheel). The project hierarchy should look like the below image.
The reason we need to have these groups even though our wheels consist of a single object is because when we link the wheels to the vehicle. Core will reset the position and rotation of linked object (set to 0, 0, 0). By linking the group the children mesh will maintain their position and rotation as you have set in the editor.
Select the Advanced Car - Sedan in the hierarchy and lets rename it to Mecha Ship (or to your own vehicle name).
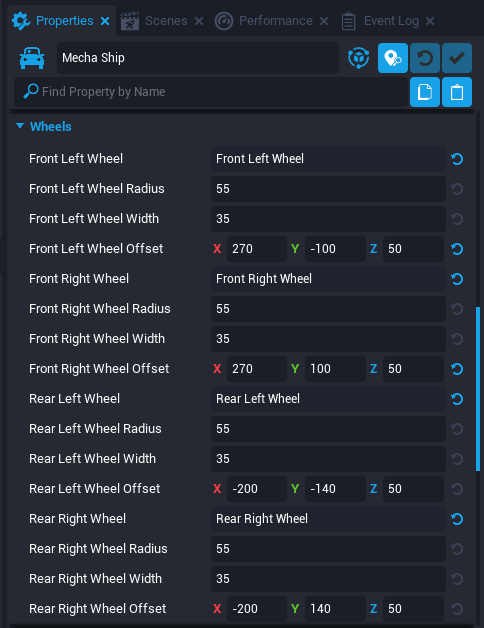
Then in the Properties, scroll down to the Wheels section. Then drag the group object of the wheels we created earlier into the corresponding Front Left Wheel, Front Right Wheel, Rear Left Wheel, Rear Right Wheel properties. So that you have something like the below image.
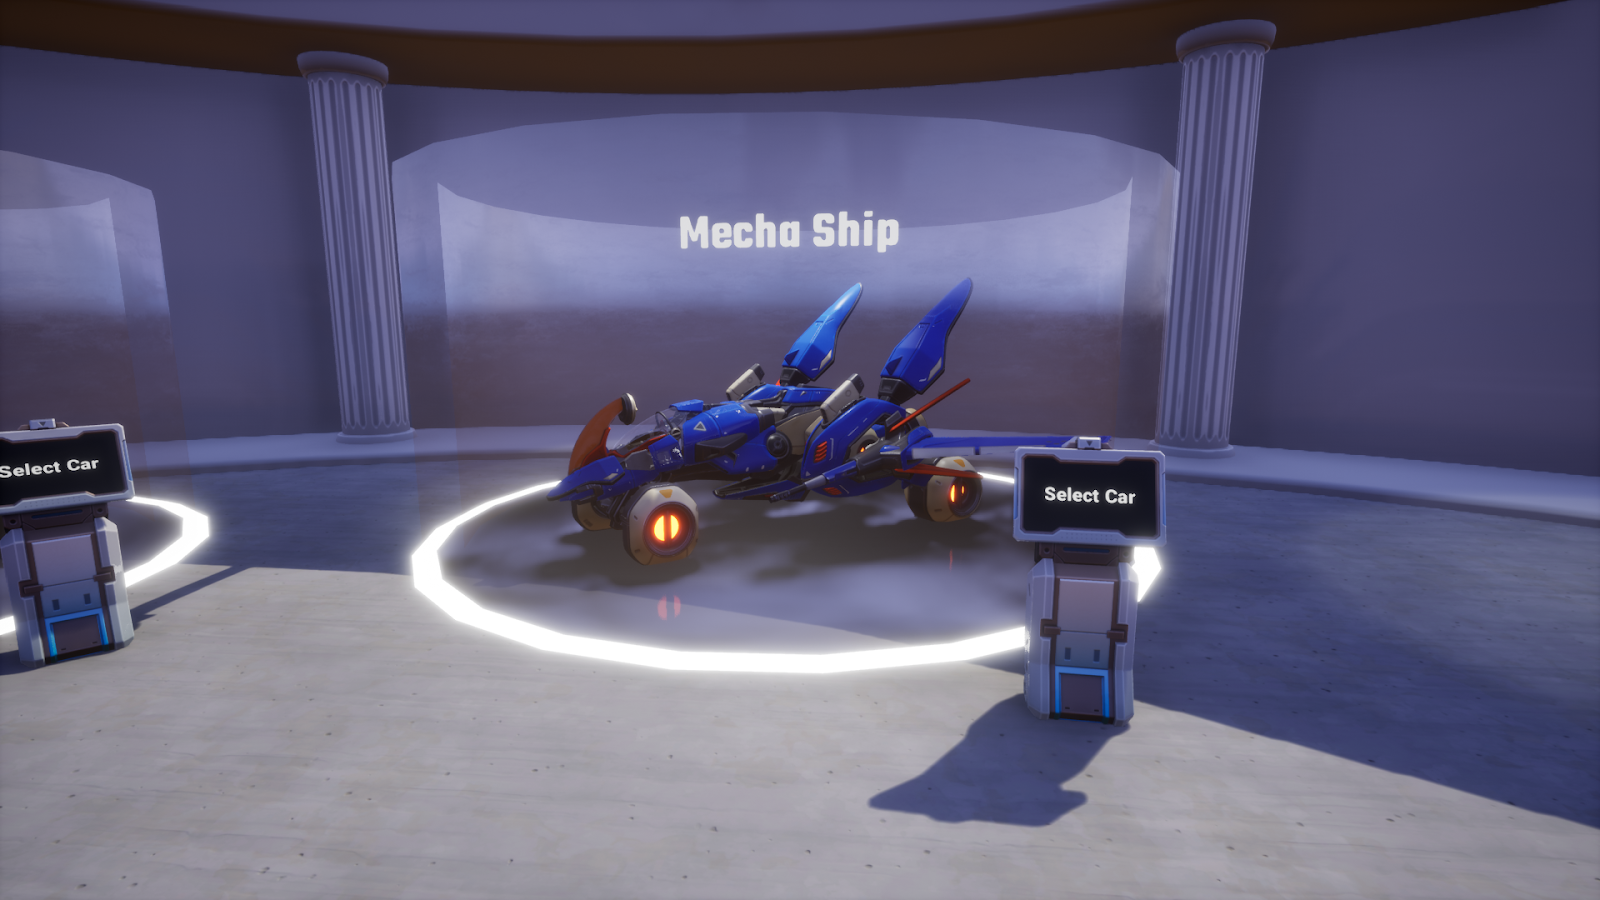
Then in the Geo folder you are free to kitbash anything you like for your vehicle. Just make sure that you position the vehicle within the vehicle’s collision box. We used the Mecha Ship 01 (Prop) for the vehicle.
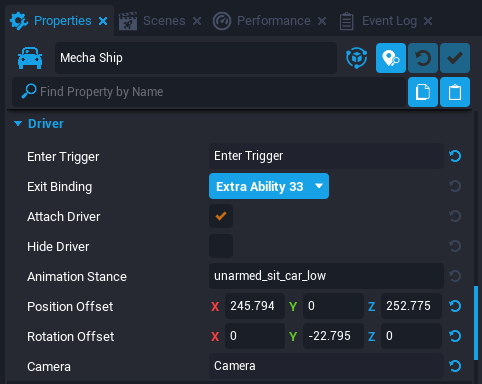
With the vehicle selected, under the Driver section in the object properties adjust the Position Offset and Rotation Offset to where you want the player to sit on the vehicle (there is a blue colored capsule shaped gizmo that indicates the driver’s position). Alternatively, if you prefer you player hidden, enable the Hide Driver property.
Check the players position in Preview Mode and adjust to your liking.
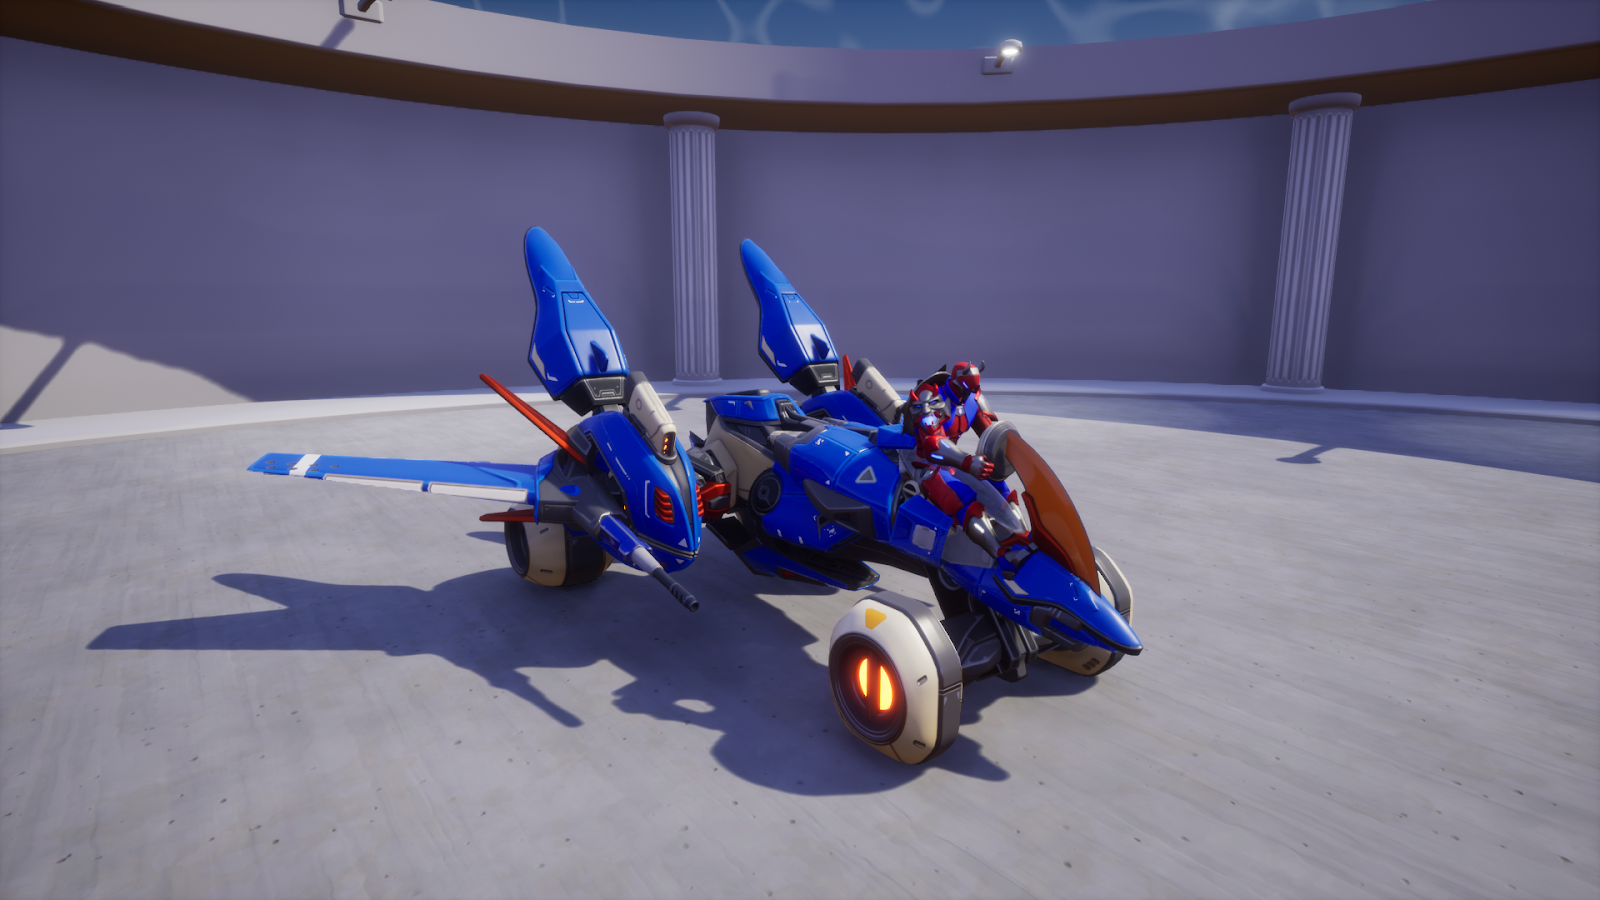
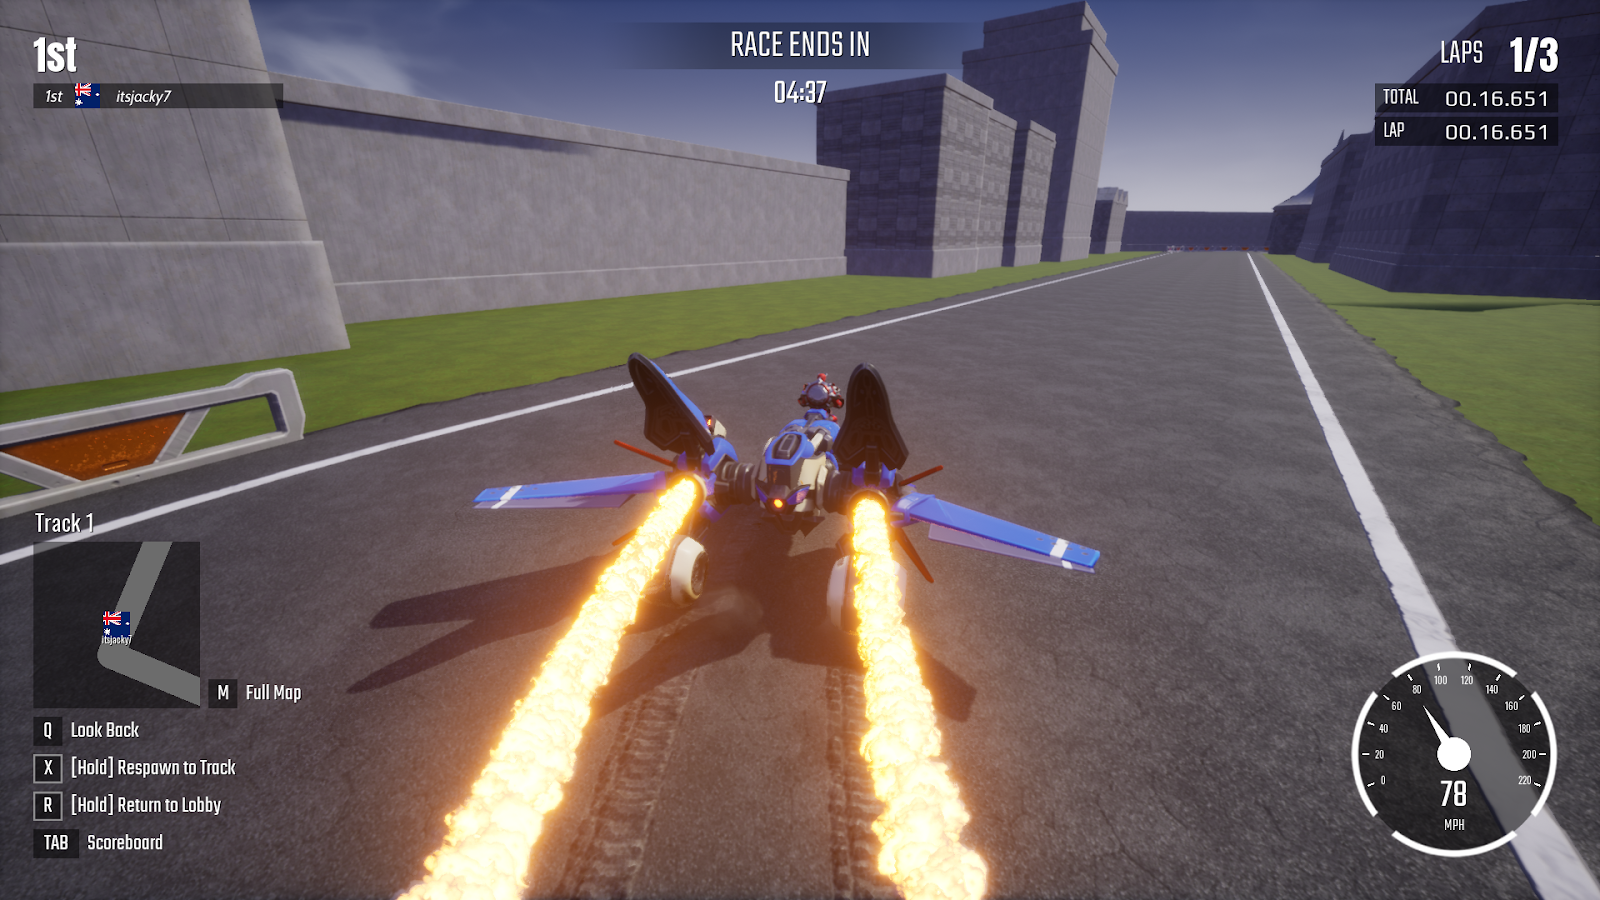
Don’t limit yourself to just using meshes. Consider adding some Decals and Effects to your vehicle. Just make sure that you add it within the ClientContext folder of the Vehicle. For our Mecha Ship we added Rocket Trail VFX effects.
Once you are happy with your vehicle, right-click the vehicle object in the project hierarchy and select Create New Template From This. Give it the name of the vehicle (in our case Mecha Ship).
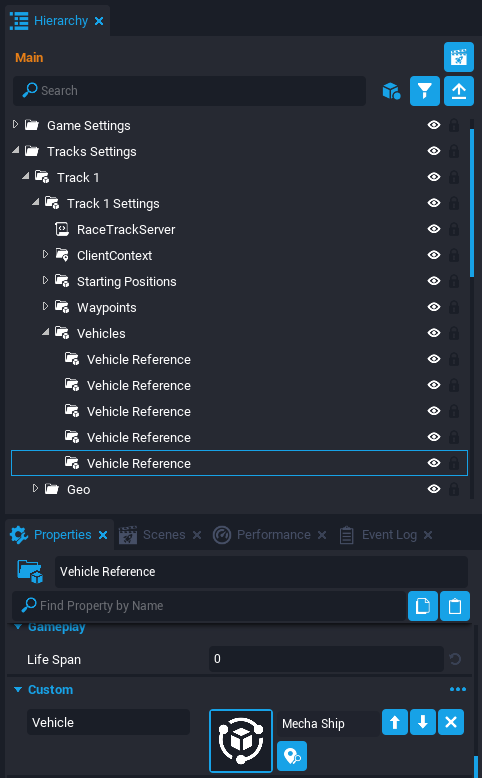
Finally, to add the custom vehicle to the game navigate to the Track Settings > Track 1 > Track 1 Settings > Vehicles group in the project hierarchy. Select and duplicate (CTRL + W) one of the Vehicle Reference object and then drag your vehicle template into the Vehicle custom property of the Vehicle Reference object. You will have to repeat this step for each of the race track that you want this vehicle to be available.
Check your custom vehicle out in Preview Mode.
Game Events
The Racing Framework scripts utilize various event broadcasts to communicate between each other such as when the state of the game has changed or been updated.
Below are some of the more useful events available that you can utilize in your own scripts.
-- Internal variables
local API = require(script:GetCustomProperty("APIActivePlayers"))

-- Constant variables
local RESOURCE_NAME = "IsParticipant"
local PLAYER_ACTIVE_EVENT = API.PLAYER_ACTIVE_EVENT
local PLAYER_NON_ACTIVE_EVENT = API.PLAYER_NON_ACTIVE_EVENT

function OnPlayerResourceChanged(player, resource)
    if resource == RESOURCE_NAME then
        if API.IsPlayerActive(player) then
            Events.Broadcast(PLAYER_ACTIVE_EVENT, player)
        else
            Events.Broadcast(PLAYER_NON_ACTIVE_EVENT, player)
        end
    end
end
Events.Broadcast("GameStateChanged", oldState, newState, stateHasDuration, stateEndTime)
Events.BroadcastToAllPlayers("GameStateChanged", oldState, newState, stateHasDuration, stateEndTime)
Events.Broadcast("RaceTrackChanged", GetCurrentRaceTrackId())
Events.Broadcast("StartRace", laps)
Events.Broadcast("EndRace")
Events.Broadcast("ResetRace")
Events.Broadcast("EnterLobbyArea", player)
Events.Broadcast("VehicleSelected", vehicleAsset)
How to use Game Events
We can utilize these events in our own script by connecting to them. For example if you want to have a sound play when the race has ended we can connect to the EndRace event to trigger the sound to play.
function OnEndRace()
    SOUND:Play()
end

Events.Connect("EndRace", OnEndRace)
APIs
The Racing Framework is bundled with a few APIs which helps keep track of various states of the game, more importantly they can be used to retrieve and/or modify these state and thus is very useful for implementing custom features in your game.
To find the API scripts, navigate to the Project Content and type in “API” into the Search field. This will return the following 3 scripts:
- APIActivePlayers
- APIBasicGameState
- APIRateTrack

How to use APIs in your Scripts
Before you can use the APIs in your scripts, there are a few things you’ll need to do first:
- Select your script in the project Hierarchy.
- Drag the API script(s) that you need from the Project Content and drop into the Add Custom Property area of your script.
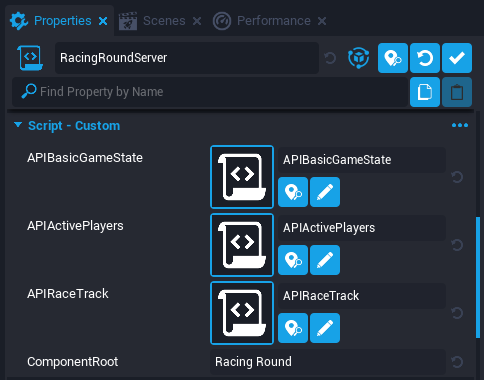
E.g. RacingRoundServer script uses all 3 of the API scripts
- Add the below code to the top of your script. The require function is used to load the API.scripts and will make the API functions available to your script via the defined variables (AAP, ABGS, API).
local AAP = require(script:GetCustomProperty("APIActivePlayers"))
local ABGS = require(script:GetCustomProperty("APIBasicGameState"))
local API = require(script:GetCustomProperty("APIRaceTrack"))
- You can then call the API functions using the variable name along with an API function name separated by a “.” character. See below for a few examples. You may refer to the API Reference section of this tutorial to find a list of the functions available in the APIs.
AAP.GetActivePlayers()
ABGS.GetGameState()
API.GetCurrentRaceTrackId()
API Practical Applications
Now that you know how to utilize the Racing Framework APIs, lets run through a few practical examples to give you some idea on how you can implement custom features in your racing game.
Example 1 - Button to Start Race Immediately
You want to increase the lobby duration so that more players can join the race but solo players complain about having to wait too long. Lets add a start button to players can skip the countdown and start the race immediately whenever they want.
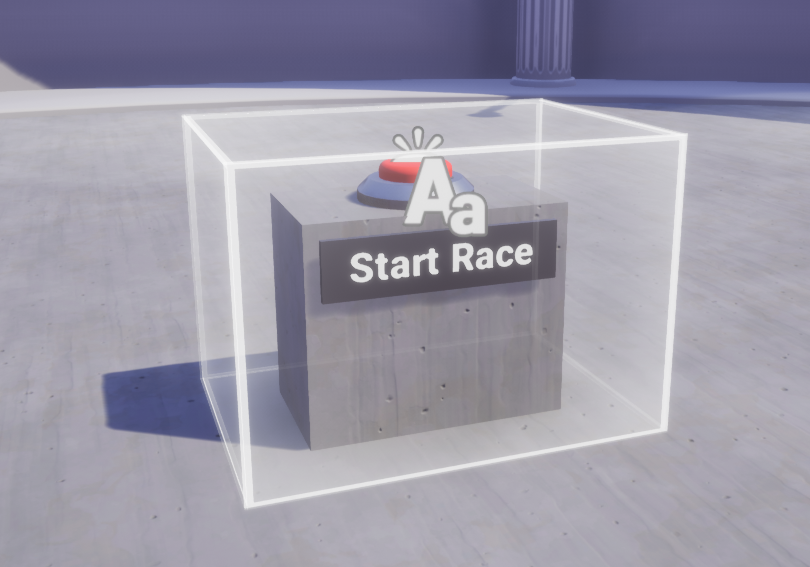
Start by creating the button geometry. Here we used some basic shapes and world text to display “Start Race” to indication what the button will do. Then add a trigger and enable interactable. You should have something like the below image.
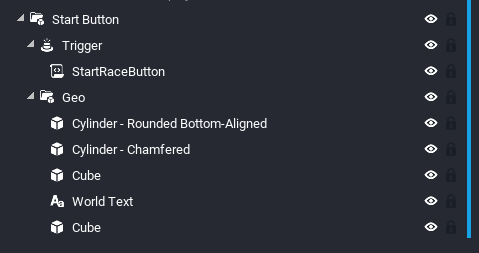
Next, create a new script and name it StartRaceButton and drag it into the project hierarchy as a child of the trigger. Your project hierarchy should look something like the below image.
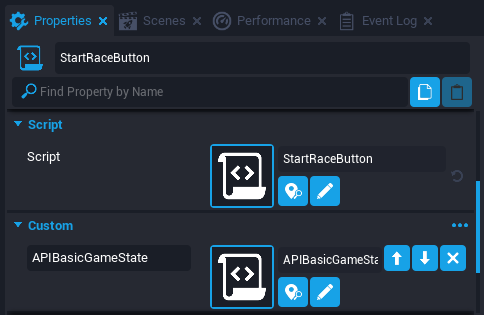
Then with the StartRaceButton script selected, add the APIBasicGameState script as a custom property.
Open the script and add the below code to the header to get reference to the API script and the trigger.
local API = require(script:GetCustomProperty("APIBasicGameState"))
local trigger = script.parent
When player interacts with the trigger all we have to do to start the race is simply set the lobby countdown to zero. This can be easily accomplished using the SetTimeRemainingInState API function.
function OnInteracted(whichTrigger, other)
    API.SetTimeRemainingInState(0)
end
trigger.interactedEvent:Connect(OnInteracted)
A problem with the above implementation is that the button will also work when a race is in progress. So when a new player joins and interacts with the start button, players currently in the race will be abruptly returned to the lobby. So to prevent this we should include a check to ensure that the game is currently in the lobby state.
function OnInteracted(whichTrigger, other)
    local gameState = API.GetGameState()

    if gameState == API.GAME_STATE_LOBBY then
        API.SetTimeRemainingInState(0)
    end
end
The final StartRaceButton script.
local API = require(script:GetCustomProperty("APIBasicGameState"))
local trigger = script.parent

function OnInteracted(whichTrigger, other)
    local gameState = API.GetGameState()

    if gameState == API.GAME_STATE_LOBBY then
        API.SetTimeRemainingInState(0)
    end
end

trigger.interactedEvent:Connect(OnInteracted)
Challenge
Currently the start button can be triggered by anyone. So if you have multiple players in the lobby the race can be started even when someone isn’t ready. Try to implement a ready button instead so that the race starts only if everyone in the lobby is ready.
Example 2 - Display to show the Next Track Info
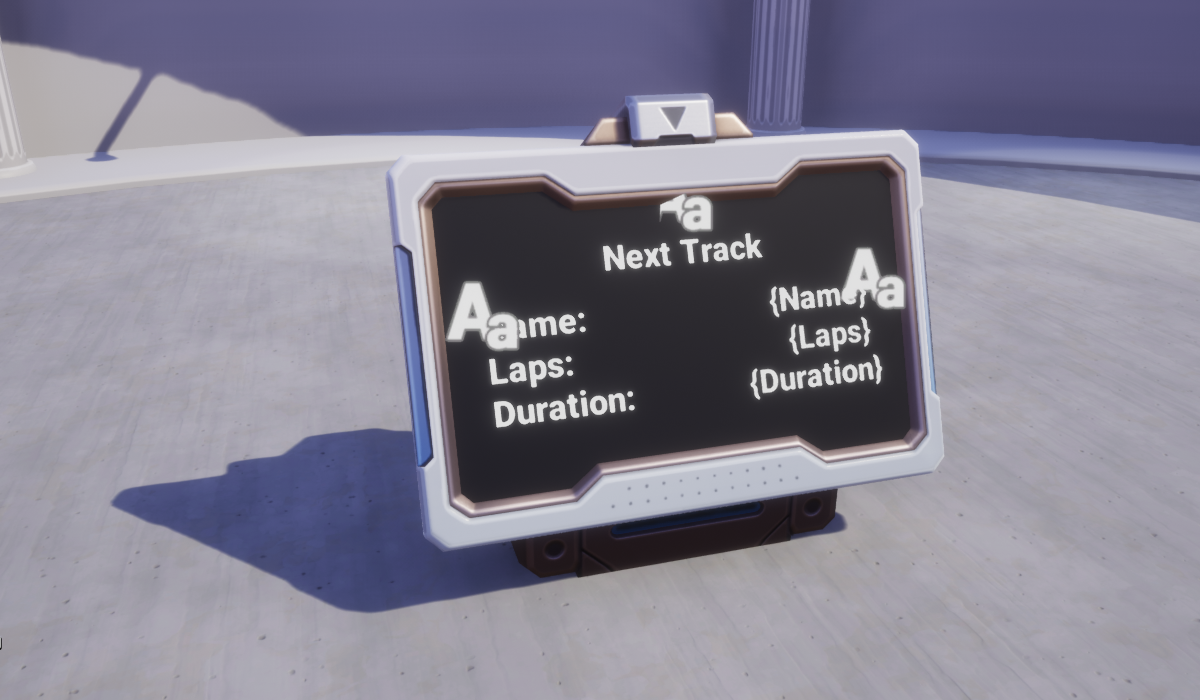
While players are waiting in the lobby area they currenty have no idea what the next race track will be. In this first example we’ll create a display in that will give players some information about the upcoming race track, so they can better prepare for the race.
First we’ll create the display that will hold the track info, here we used the Sci-Fi Console Screen and positioned some World Text accordingly:
-
Title
-
Track Label (hint: you can use Shift + Enter in the text input to insert a newline)

-
Track Info (with placeholder text that we’ll be replacing with our script)
Resulting in something like this:
Next we’ll create our script, create a new script and call it NextRaceTrackDisplayClient and create a new Client Context in your hierarchy and place both the script and the display geo in the Client Context folder. Your hierarchy should look something like the below image.

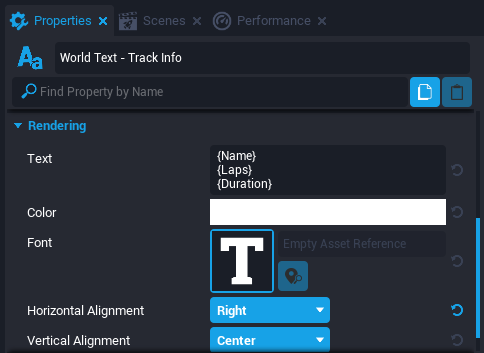
For this script we’ll only be using functions from the APIRaceTrack API. Add the APIRaceTrack API script and the Track Info world text as custom properties to the script
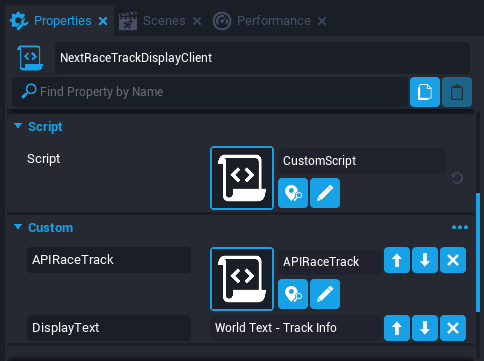
Add the custom properties to your scripts
local API = require(script:GetCustomProperty("APIRaceTrack"))
local TEXT = script:GetCustomProperty("DisplayText"):WaitForObject()
If you refer to the Game Events section you’ll find an event call RaceTrackChanged, this event is broadcasted whenever a race has ended and signals when the next race track is loaded. We can connect to this event to update our display every time the race track has changed.
function OnRaceTrackChanged(currentRaceTrackId)

end

Events.Connect("RaceTrackChanged", OnRaceTrackChanged)
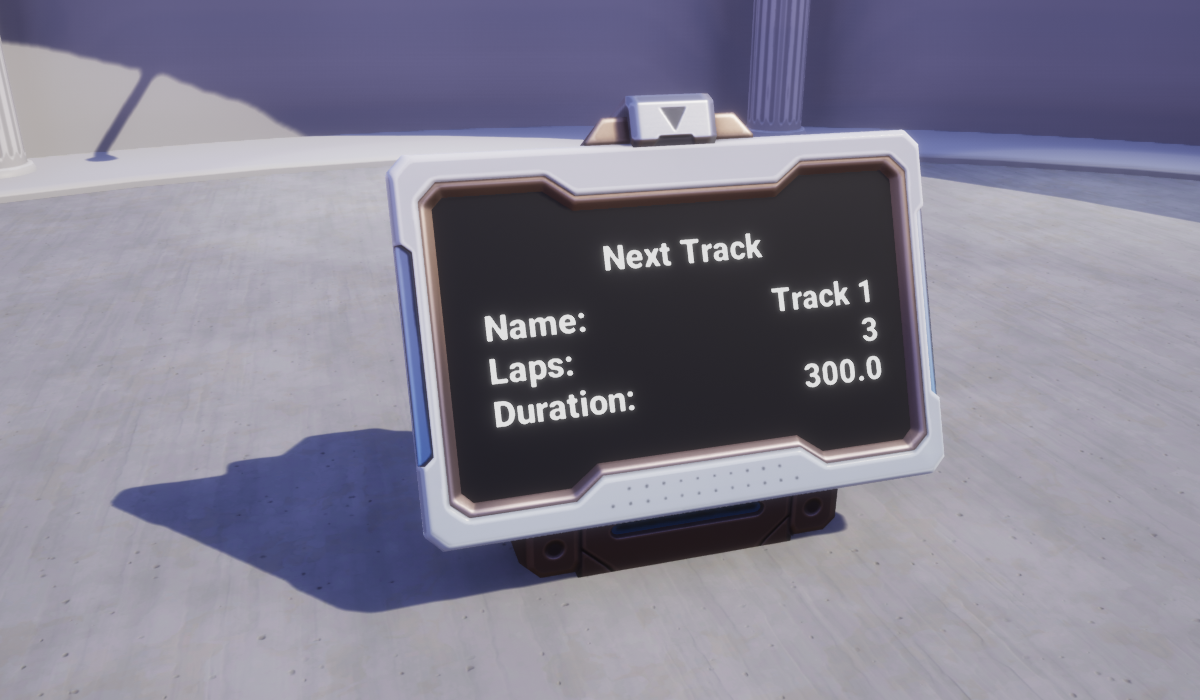
Then with access to the Race Track API we can retrieve information about the upcoming race track with the GetRaceTrackState function and simply update the track info world text with race track information returned.
local raceTrackState = API.GetRaceTrackState(currentRaceTrackId)
TEXT.text = raceTrackState["name"] .. "\n" ..
            raceTrackState["laps"] .. "\n" ..
            raceTrackState["roundTime"]
The final NextRaceTrackDisplayClient script.
local API = require(script:GetCustomProperty("APIRaceTrack"))

local TEXT = script:GetCustomProperty("DisplayText"):WaitForObject()

function OnRaceTrackChanged(currentRaceTrackId)
    local raceTrackState = API.GetRaceTrackState(currentRaceTrackId)

    TEXT.text = raceTrackState["name"] .. "\n" ..
                raceTrackState["laps"] .. "\n" ..
                raceTrackState["roundTime"]
end

Events.Connect("RaceTrackChanged", OnRaceTrackChanged)
Thats all there is to it. Position the display where you like somewhere in the lobby area and test it out.
Challenge
Try implementing a UI version of this and show information of all available race tracks instead of just the next track. (Hint there is a function called GetRaceTracks() in the APIRaceTrack that returns a table of race track ids)
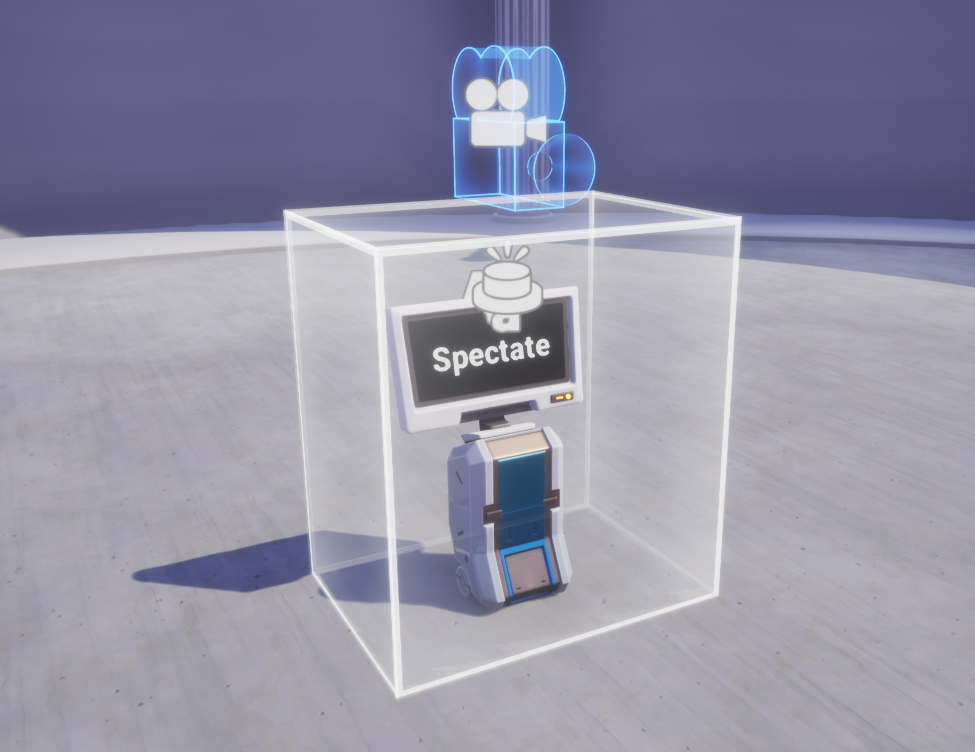
Example 3 - Spectator Mode
Players waiting who joined the game while a race is in progress may get bored waiting for a race to finish. So why not let them in on the action and let them spectate the race.
In this example, we won’t be walking through it in detail as it is mostly out of scope for this tutorial. However, this example is provided as it demonstrates how you can combine and use multiple APIs and events to implement a feature.
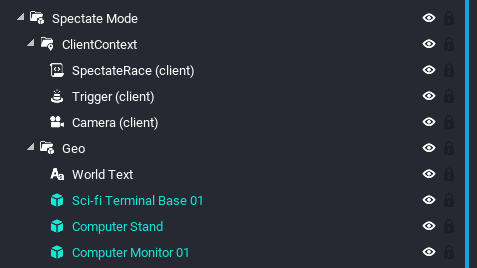
We used a Sci-Fi terminal for the geometry with world text to display “Spectate” and a trigger to interact with. For this feature we also need a camera that overrides the player’s default camera and is used to follow the other players.
Hierarchy for the Spectator Mode component.
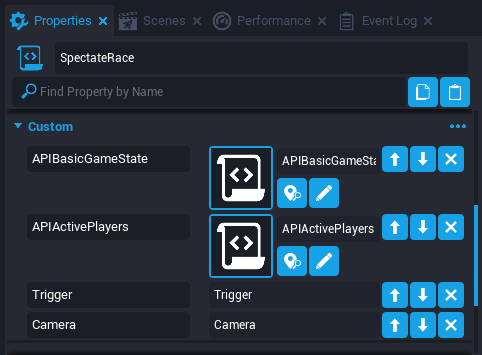
The SpectateRace script properties.
The SpectateRace script.
- APIBasicGameState is used to check if a race is in progress
- APIActivePlayers is used to get players that are participating in the race
- And we use the PLAYER_NON_ACTIVE_EVENT event to listen to when players leave a race so we can spectate the next player or end spectating if no players are in the race
local ABGS = require(script:GetCustomProperty("APIBasicGameState"))
local AAP = require(script:GetCustomProperty("APIActivePlayers"))

local trigger = script:GetCustomProperty("Trigger"):WaitForObject()
local camera = script:GetCustomProperty("Camera"):WaitForObject()
local spectateIndex = 1
local spectatePlayer = nil
local bindingPressedListener = nil
local playerNonActiveEventListener = nil

local LOCAL_PLAYER = Game.GetLocalPlayer()
local END_SPECTATE_BINDING = "ability_extra_33"
local NEXT_PLAYER_BINDING = "ability_primary"
local PLAYER_NON_ACTIVE_EVENT = AAP.PLAYER_NON_ACTIVE_EVENT

function OnInteracted(theTrigger, player)
    local gameState = ABGS.GetGameState()

    if gameState == ABGS.GAME_STATE_ROUND then
        local activePlayers = AAP.GetActivePlayers()
        spectatePlayer = activePlayers[1]
        SpectatePlayer(spectatePlayer)
        Task.Wait()
        bindingPressedListener = LOCAL_PLAYER.bindingPressedEvent:Connect(OnBindingPressed)
        playerNonActiveEventListener = Events.Connect(PLAYER_NON_ACTIVE_EVENT, OnPlayerNonActiveEvent)
    end
end

function SpectatePlayer(player)
    trigger.isInteractable = false
    camera.followPlayer = player
    LOCAL_PLAYER:SetOverrideCamera(camera, 0.2)
end

function SpectateEnd()
    trigger.isInteractable = true
    LOCAL_PLAYER:ClearOverrideCamera()
    spectateIndex = 1
    spectatePlayer = nil
    bindingPressedListener:Disconnect()
    playerNonActiveEventListener:Disconnect()
end

function SpectateNextPlayer(player)
    local activePlayers = AAP.GetActivePlayers()
    spectateIndex = spectateIndex + 1
    if spectateIndex > #activePlayers then
        spectateIndex = 1
    end
    spectatePlayer = activePlayers[spectateIndex]
    camera.followPlayer = spectatePlayer
end

function OnBindingPressed(player, bindingPressed)
    if bindingPressed == END_SPECTATE_BINDING then
        SpectateEnd()
    elseif bindingPressed == NEXT_PLAYER_BINDING then
        SpectateNextPlayer()
    end
end

function OnPlayerNonActiveEvent(player)
    local activePlayers = AAP.GetActivePlayers()
    if #activePlayers == 0 then
        SpectateEnd()
        return
    end
    if player == spectatePlayer then
        SpectateNextPlayer()
    end
end

trigger.interactedEvent:Connect(OnInteracted)
Challenge
Now that you know how to use the Racing Framework APIs and events. Go ahead and experiment with the various API function that the framework has to offer and try implementing some of your own ideas. Try combing multiple APIs and using multiple events together.
API Reference
Below is a list of all the functions available in the APIs, it is recommended that you read through the API scripts yourself to understand what each function does but in general the function names are self explanatory.
APIActivePlayers
Constants
API.PLAYER_ACTIVE_EVENT = "APM_OnPlayerActive"
API.PLAYER_NON_ACTIVE_EVENT = "APM_OnPlayerNonActive"
Functions
API.AddActivePlayer(player)
API.RemoveActivePlayer(player)
API.GetActivePlayers()
API.GetNonActivePlayers()
API.IsPlayerActive(player)
APIBasicGameState
Constants
API.GAME_STATE_LOBBY = 0
API.GAME_STATE_ROUND = 1
API.GAME_STATE_ROUND_END = 2
Functions
API.RegisterGameStateManagerServer(stateGetter, stateTimeGetter, stateSetter, stateTimeSetter)
API.RegisterGameStateManagerClient(stateGetter, stateTimeGetter)
API.IsGameStateManagerRegistered()
API.GetGameState()
API.GetTimeRemainingInState()
API.SetGameState(newState)
API.SetTimeRemainingInState(remainingTime)
APIRaceTrack
Constants
API.PLAYER_STARTING_STATE = 1
API.PLAYER_RACING_STATE = 2
API.PLAYER_FINISHED_STATE = 3
Functions
API.SetPlayerTotalRaceTimeSeconds(player, seconds)
API.GetPlayerTotalRaceTimeSeconds(player)
API.SetPlayerWayPointIndex(player, index)
API.GetPlayerWayPointIndex(player)
API.SetPlayerCurrentLap(player, lap)
API.GetPlayerCurrentLap(player)
API.SetPlayerRaceState(player, state)
API.GetPlayerRaceState(player)
API.GetPlayerRank(player)
API.SetPlayerRank(player, rank)
API.RegisterRaceTrack(id, functionTable)
API.GetRaceTracks()
API.GetRaceTrackState(raceTrackId)
API.GetRaceTrackVehicles(raceTrackId)
API.GetRaceTrackWaypoints(raceTrackId)
API.GetRaceTrackWayPointPositionByIndex(raceTrackId, index)
API.GetRaceTrackWayPointIndex(raceTrackId, wayPoint)
API.GetStartingPositions(raceTrackId)
API.RegisterRaceTrackManager(setRaceTrackManager)
API.GetCurrentRaceTrackId()
API.SetCurrentRaceTrackId(raceTrackId)
API.CalculateRaceTrackLapDistance(raceTrackId)
API.CalculateRaceTrackTotalDistance(raceTrackId)
API.CalculateRaceTrackLapDistance(raceTrackId)
API.GetNormalizedRelativeDistance(position, startPosition, endPosition)
API.CalculatePlayerDistanceOnRaceTrack(player, raceTrackId)
API.GetPlayerWayPointIndex(player, raceTrackId)
API.GetRaceTrackState(raceTrackId)
API.GetNormalizedRelativeDistance(playerPosition, position, nextPosition)
API.GetNormalizedRelativeDistance(playerPosition, position, lastPosition)